Operation
Charging the battery
Make sure that you install the socket-outlet near the equipment and that it is easy to get access to.
Follow this procedure:
Connect a power supply to a wall outlet.
Connect the power supply to the USB-C connector power on the FLIR ONE camera.
Let the battery charge for approximately 40 minutes.
The charge indicator will flash green during charging, and then change into a steady green light when fully charged.
Turning the FLIR ONE camera on and off
Push the On/off button on the bottom of the FLIR ONE camera to turn it on. It takes about 20 seconds for the camera to start. The indicator will flash green when the FLIR ONE camera is ready.
The camera automatically turns off after 2 minutes of inactivity.
Push and hold the On/off button for more than 2 seconds to turn off the FLIR ONE camera.
Connecting the FLIR ONE camera to your phone
Download and install the FLIR ONE app on your phone, and then start it.
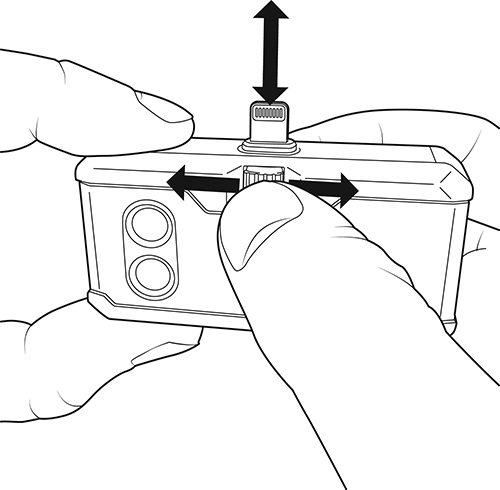
Turn on the FLIR ONE camera and connect it to your phone. If needed, adjust the blue dial of the OneFit connector and extend the connector to the appropriate length to fit your phone’s protective case.
If the FLIR ONE camera is turned off when you connect it to your phone, the app will prompt you to attach your FLIR ONE camera before you can view the camera features.
Using the FLIR ONE app
Installation
The latest version of the FLIR ONE app is available on the Apple App Store for iOS devices and the Google Play Store for Android devices. Download and install the app on your device.
Onboarding
The onboarding of the FLIR ONE app will introduce you to the app and guide you to set the permissions needed. After the onboarding is completed, the live view from the camera is presented.
Camera view
When the FLIR ONE camera is connected and turned on, you can see the live view from the camera and take an image or a video.
The camera view contains functionality to modify the live view. Depending on the camera model, different functionality is available:
|
FLIR ONE PRO |
FLIR ONE PRO LT |
FLIR ONE |
|
|
IR Scale |
|||
|
Hide/show scale, adjust scale limits |
Yes |
Yes |
No |
|
Color |
|||
|
Choose from nine color palettes |
Yes |
Yes |
Yes |
|
Measurements |
|||
|
Measurement spot |
Yes (three spots) |
Yes (three spots) |
Yes (one spot) |
|
Automatic tracking of hottest and coldest spot |
Yes |
Yes |
No |
|
Image mode |
|||
|
Thermal / DC (visual) / MSX |
Yes, all modes |
Yes, all modes |
MSX mode, only |
|
MSX Distance |
|||
|
Align visual and thermal images in MSX mode, depending on distance to object |
Yes |
Yes |
Yes |
Calibration
The camera automatically calibrates and refreshes the image periodically to provide an optimal image. The thermal camera has a mechanical shutter inside that activates during calibration, which releases a clicking sound. When the shutter activates, the image will freeze for a brief period. When the camera first turns on, and periodically thereafter, the camera will automatically calibrate. It is also possible to manually initiate a calibration in the FLIR ONE app.
Gallery
Captured images and videos can be viewed in the gallery of the FLIR ONE app. Images and videos can also be saved in the gallery of the phone, if permission is given. Permissions are set during onboarding, or later in the phone settings for the app.
Relevant information related to the image is presented in Image details, where it’s also possible to add a note to the image.
In the gallery of the FLIR ONE app, images can be edited with the same functionality as in the camera view.
Images and videos can be shared to other apps, for example an e-mail app or a social media app on your mobile device.
Drawer menu
In the drawer menu you find:
Relevant information related to the camera.
Settings for the FLIR ONE app; temperature unit, time format, date format, temperature range for the FLIR ONE PRO, emissivity (see Emissivity), and location.
Help on how to use the app in more detail.
Contact to support.
Other available apps that are compatible with the FLIR ONE camera.
Using a thermal camera
Measurements
Measurements in thermal cameras show the temperature on the surface of an object. The measurement accuracy depends on many factors, including the distance from the object, the ambient temperature, and the emissivity of the material being observed. Users are encouraged to learn more about the science of thermography from www.infraredtraining.com.
Emissivity
When the spot meter is enabled, the temperature displayed is affected by many factors, including a property of the target material known as emissivity. This property is a relative rating of how well the target material emits or radiates thermal energy. Some materials are more emissive than others; glossy or reflective materials such as metals tend to be poor emitters. For most materials, the default “matte” setting is a fair approximation.