Reporting
This chapter describes the screen elements of the Reporting page.
General
The Reporting page is the page where you create your report. Create it from scratch or by using a template—either select one of the available templates or create a new one.
Reports are saved in the .atr (advanced thermal report) file format and report templates are saved in the .att (advanced thermal template) file format. Both formats can be exported to Adobe PDF or Microsoft XPS.
When images are added to a report, copies of the images are made. This means, when changes are made to an image that has been added to a report, the original image stays unchanged.
Navigation
This image shows what the user interface looks like when you have selected to Create blank report. The user interface looks similar when you have selected to Generate report using template and selected the template, and then added the images.
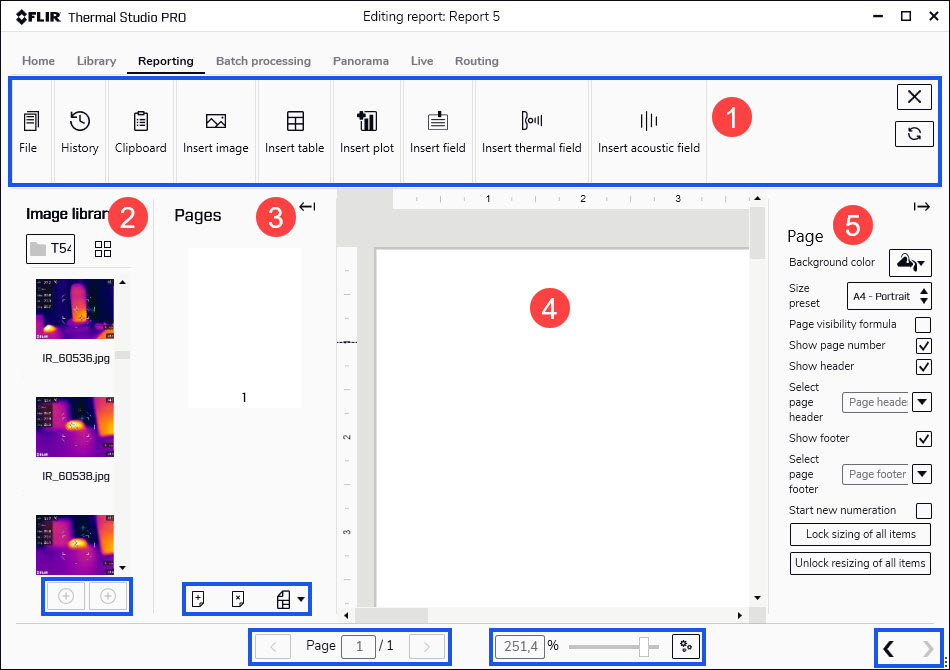
Toolbar
Depending on what you are currently doing, the context-sensitive toolbar includes options for creating, saving, exporting, and printing reports, and for editing the reports by inserting images and other items.
Image library
Navigate to image files in folders both locally on your computer and on any connected network shares. Use the icons at the bottom of the pane to add any selected image files or folders to a report or to batch processing.
Pages
See all pages included in the report. Use the icons at the bottom of the pane to add or remove pages. Change the order of the pages by right-clicking a page, and then clicking Move up or Move down.
Report workspace
This is the workspace where you create and edit the report. Use the toolbar to insert images, tables, plots, fields, thermal fields, and formulas into the report. To move the items around on a page, click and hold an item and then place it where you want it to go. Note the page navigation, the page zoom, and the Visibility settings like Show ruler and Show mesh at the bottom of the pane.
Properties and settings
Click an item in the report workspace to see and change settings such as position on the page (Left and Top) and image size (Width and Height). Click Overlay... to open the image in the overlay view and make changes for this particular image. When you select or deselect a check box in the list of settings, the result is immediately presented in the image. To close the overlay view and return to the Reporting page, click OK or Cancel.