Edit reports and templates
This chapter describes how to add elements such as images, tables, plots, and fields to the report. Note that these elements and the thermal images they refer to must be on the same page in the report. The exception is the Summary table, which is normally placed at the end of the report.
Navigation
This image shows what the user interface looks like when you have started to edit a report and added a few pages and elements.
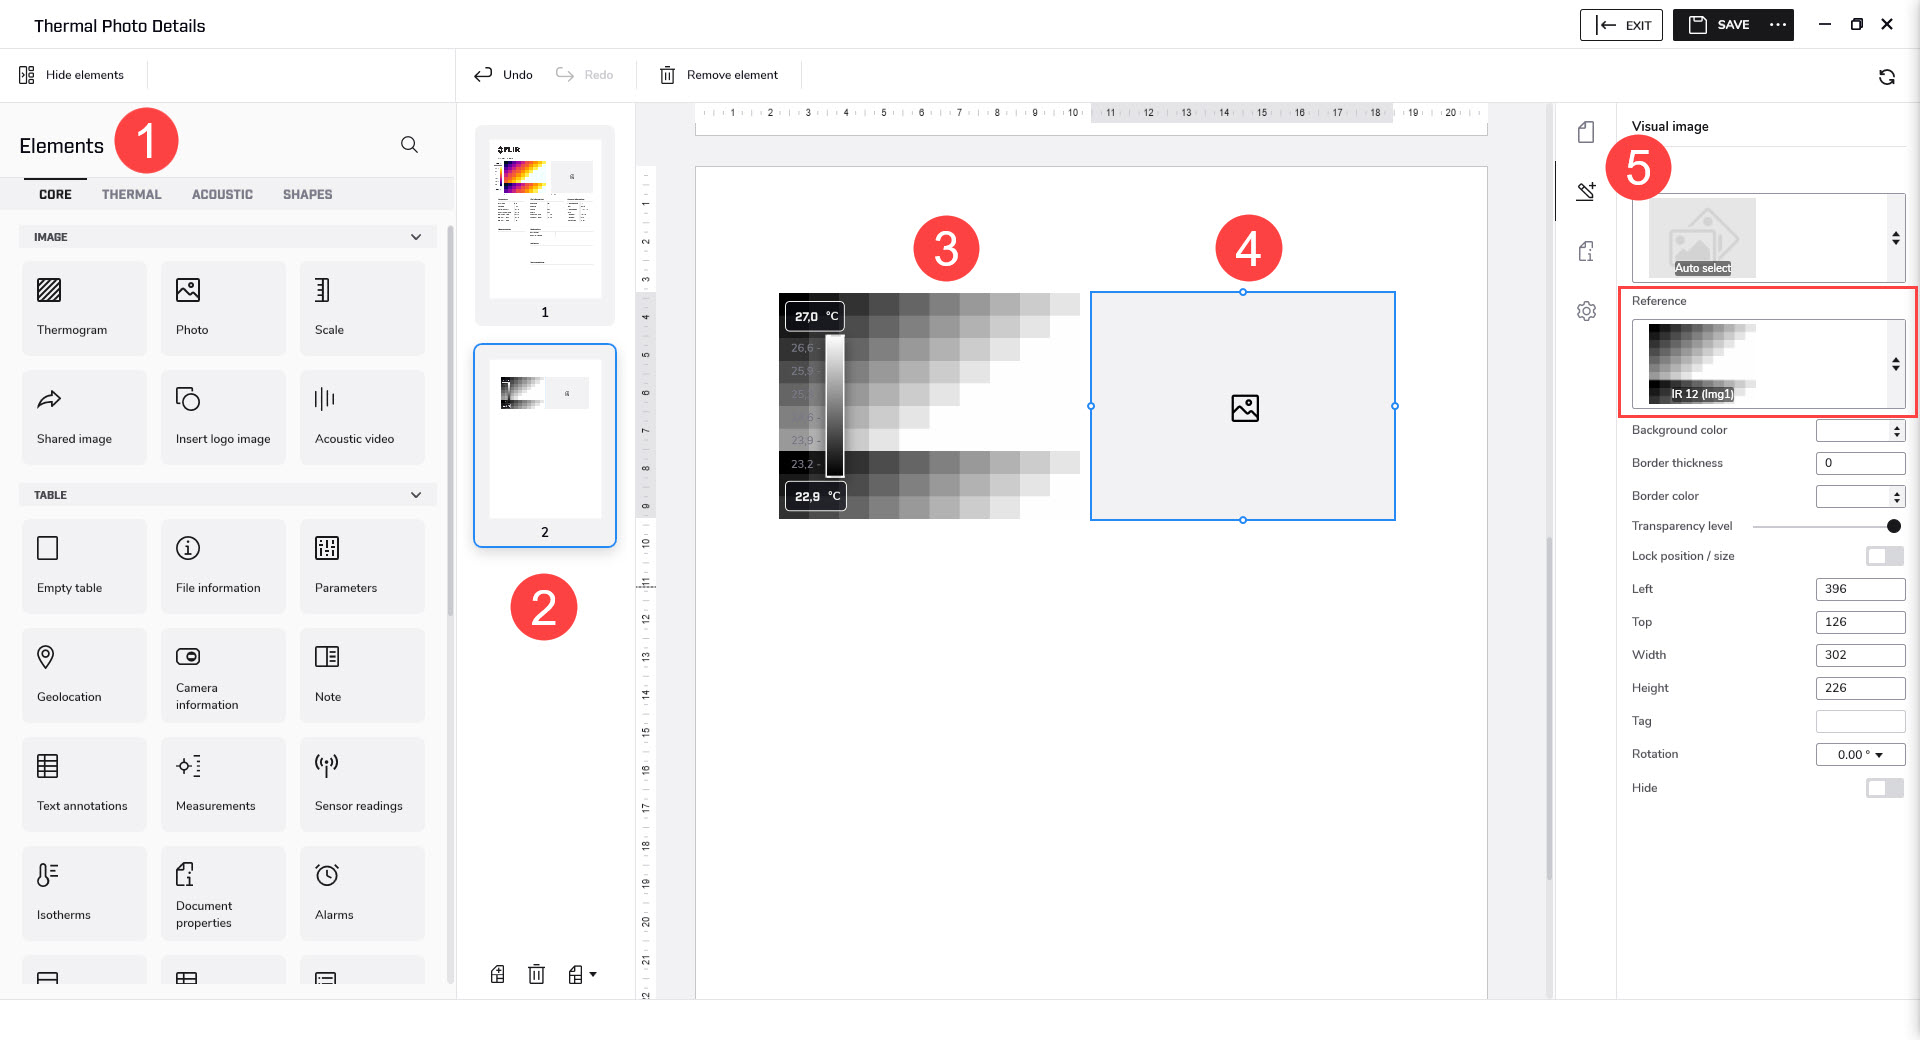
Elements pane
Page pane
Use the buttons at the bottom to add and remove pages.
Thermogram element
Placeholder for a thermal image.
Photo element
Placeholder for a visual image.
Properties pane
Use the vertical pane toolbar to select display of page details, element details, document properties, and general settings.
The element details shows, for example, which thermal image the element is referring to.
Start editing
To start editing a report or reporting template, follow this procedure:
Select the Reporting tab.
Open a report or reporting template.
To display the available report elements in the left pane, do the following:
When editing a report, click Add field on the top toolbar.
When editing a reporting template, click Add page element on the top toolbar.
Images
Several types of images are available like Thermogram (thermal image), Photo (visual image), Scale (temperature), and Acoustic video.
Add a thermal image
Click the report page where the image is to be added.
In the elements pane, click Thermogram. A placeholder for a thermal image is added to the report page.
Click Photo. A placeholder for a visual image is added next to the placeholder for the thermal image.
To verify that the visual image is referencing the correct thermal image, click the visual image. Its Reference is then shown in the properties pane.
Add a temperature scale
By default, a temperature scale is visible in the thermal image. To add a scale and place it anywhere on the report page, follow this procedure:
In the report, click the thermal image for which a temperature scale is to be added.
In the elements pane, click Scale. A scale is added to the report page.
Click and hold the scale, and then move it into position.
To verify that the scale is referencing the correct thermal image, click the scale. Its Reference is then shown in the properties pane.
Remove or hide a temperature scale
To show/hide the temperature scale in the thermal image, follow this procedure:
In the report, click the thermal image with the scale to be hidden.
In the properties pane, use the Show scale switch to show/hide the temperature scale.
To remove an added temperature scale, follow this procedure:
In the report, click the scale to be removed.
Right-click the scale, and then click Remove.
Add an acoustic video or image
You can add an acoustic video or image to the report.
Click the report page where the video/image is to be added.
In the elements pane, click Acoustic video. A placeholder is added to the report page.
Tables
A table can show any type of information such as measurements, parameters, and camera information. Add a table and reference it to one of the images on the report page. Modify the table by adding or removing table rows and columns, or by changing row and column order.
Add a table
In the report, click the image for which a table is to be added.
In the elements pane, click the preferred type of table. The table is added to the report page.
Click and hold the table, and then move it into position.
To verify that the table is referencing the correct image, point at the table and then click the arrow icon that appears. Its Reference is then shown in the properties pane.
Remove a table
In the report, click the table.
Point at the table and right-click the arrow icon that appears, and then click Remove.
Add a table row
In the report, right-click anywhere in the table.
Click Add row, and then select which information to add.
The new row is added at the bottom of the table.
Move a table row (change the row order)
In the report, click the table.
Right-click the row to be moved, and then click Move up or Move down.
Remove a table row
In the report, click the table.
Right-click the row to be removed, and then click Remove row.
Add a table column
Not available for all types of tables.
In the report, click the table.
In the table, right-click the column to the left of where you want to add the new column.
Click Add column, and then select which information to add.
Move a table column (change the column order)
Not available for all types of tables.
In the report, click the table.
Right-click the column to be moved, and then click Move left or Move right.
Remove a table column
Not available for all types of tables.
In the report, click the table.
Right-click the column to be removed, and then click Remove column.
Plots
Add a plot and reference it to one or more images. Several types of plots are available.
Add a plot (single thermal or acoustic image)
In the report, click the image for which a plot is to be added.
In the elements pane, click the preferred type of plot. The plot is added to the report page.
Click and hold the plot, and then move it into position.
To verify that the plot is referencing the correct image, click the plot. Its Reference is then shown in the properties pane.
Add a plot (several thermal images)
In the report, click one of the thermal images for which a plot is to be added.
In the elements pane, click the preferred type of plot. The plot is added to the report page.
Click and hold the plot, and then move it into position.
Click the plot. Settings for the plot are shown in the properties pane.
In the Reference list, click the check boxes of all images that you want the plot to reference.
Remove a plot
In the report, click the plot to be removed.
Right-click the plot, and then click Remove.
Fields
A field is a single object that can be placed anywhere in the report. Several types of fields are available.
Add a field
In the elements pane, click the preferred type of field. The field is added to the report page.
Click and hold the field, and then move it into position.
Click the field. Settings for the field are shown in the properties pane.
Remove a field
In the report, click the field to be removed.
Right-click the field, and then click Remove.
Thermal fields
Several types of thermal fields are available. Add a thermal field and reference it to one of the thermal images on the report page.
Add a thermal field
In the report, click the thermal image for which a thermal field is to be added.
In the elements pane, select the Thermal tab, and then click the preferred type of thermal field. The field is added to the report page.
Click and hold the thermal field, and then move it into position.
To verify that the field is referencing the correct thermal image, click the thermal field. Its Reference is then shown in the properties pane.
The field settings are available in the properties pane. You can, for example, use the Treat as title switch to show the name of the field at the top of the field.
Remove a thermal field
In the report, click the thermal field to be removed.
Right-click the field, and then click Remove.
Acoustic fields
Several types of acoustic fields are available like Acoustic discharge type, Estimated leak size, Estimated leak cost, Acoustic severity, and Acoustic recommendation. Add an acoustic field and reference it to one of the acoustic videos/images on the report page.
Add an acoustic field
In the report, click the acoustic video/image for which an acoustic field is to be added.
In the elements pane, select the Acoustic tab, and then click the preferred type of acoustic field. The field is added to the report page.
Click and hold the acoustic field, and then move it into position.
To verify that the field is referencing the correct acoustic video/image, click the acoustic field. Its Reference is then shown in the properties pane.
The field settings are available in the properties pane.
Remove an acoustic field
In the report, click the acoustic field to be removed.
Right-click the field, and then click Remove.