Handling the camera
Charging the battery
Make sure that you install the socket-outlet near the equipment and that it is easy to get access to.
You must charge the battery for 4 hours before you start using the camera for the first time.
Using the power supply to charge the battery when it is inside the camera
Put the battery into the camera battery compartment.
Connect the power supply cable plug to the power connector on the camera.
Connect the power supply mains-electricity plug to a mains socket.
To check the status of the battery charging, do one of the following:
If the camera is turned on: Place your finger at the top of the screen and swipe down. The battery status is displayed on the swipe-down menu.
If the camera is turned off: The battery is being charged when the green light of the battery condition LED indicator flashes.
It is good practice to disconnect the power supply cable plug when the green light of the battery condition LED indicator is continuous.
Using the stand-alone battery charger to charge the battery
Put the battery in the battery charger.
Connect the power supply cable plug to the connector on the battery charger.
Connect the power supply mains-electricity plug to a mains socket.
It is good practice to disconnect the power supply cable plug when the blue LED on the battery charger is glowing continuously.
Stand-alone battery charger LED indicator
|
Type of signal |
Explanation |
|---|---|
|
The blue LED flashes. |
The battery is being charged. |
|
The blue LED glows continuously. |
The battery is fully charged. |
Turning on and turning off the camera
To turn on the camera, push and release the On/off button
 .
.To turn off the camera, push and hold the On/off button
for more than 0.5 second.
Do not remove the battery to turn off the camera.
Adjusting the infrared camera focus
It is very important to adjust the focus correctly. Incorrect focus adjustment affects how the image modes work. It also affects the temperature measurement.
You can adjust the focus manually by rotating the focus ring or autofocus the camera by the press of a button. The camera can also be set up to perform continuous autofocusing.
Manual focus
To adjust the focus manually, rotate the focus ring.
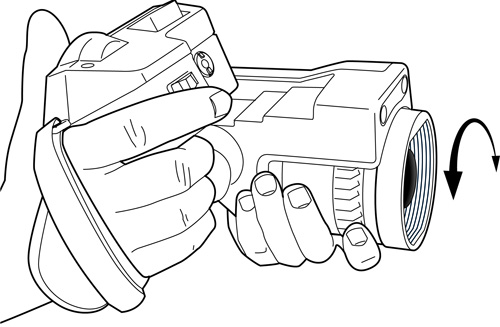
Do not touch the lens surface when you adjust the infrared camera focus manually. If this happens, clean the lens according to the instructions in Infrared lens.
The focus ring can be rotated infinitely, but only a certain amount of rotation is needed when focusing.
The response of the focus mechanism is progressive, meaning that a faster rotation of the focus ring gives a disproportional higher speed of focus change. This allows for both fine adjustment with a relatively large (but slow) rotation and rapid change with a smaller (but faster) rotation. Furthermore, for a very slow rotation, the lens moves in very small, discrete steps (which you can hear), allowing for a controlled fine adjustment of the focus.
Autofocus
The infrared camera can be configured to autofocus when you push the Save button half-way down.
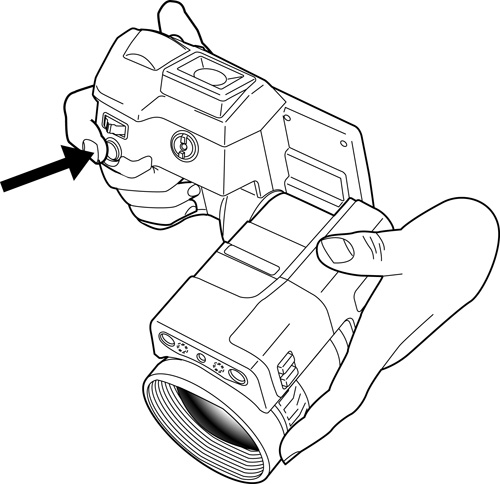
Follow this procedure:
To enable the autofocus function of the Save button, select
 (Settings) > Save options & storage > Save button half-press = Autofocus.
To autofocus, push the Save button half-way down.
You can also assign the autofocus function to one of the programmable buttons. For more information, see section Programmable buttons.
Continuous autofocus
The infrared camera can be set up to perform continuous autofocusing.
In this mode, the digital camera is used, which means that continuous autofocus will not work in darkness.
When continuous autofocus is enabled, it is not possible to manually adjust the focus by rotating the focus ring.
To stop continuous autofocus (e.g., to stabilize the focus before saving an image), push the Save button half-way down.
Follow this procedure:
Push the joystick to display the menu system.
Use the joystick to go to
(Settings).Push the joystick to display the Settings menu.
Select Device settings and push the joystick.
Select Continuous autofocus and push the joystick.
Select On and push the joystick.
You can also assign the function Continuous autofocus to one of the programmable buttons. For more information, see section Programmable buttons.
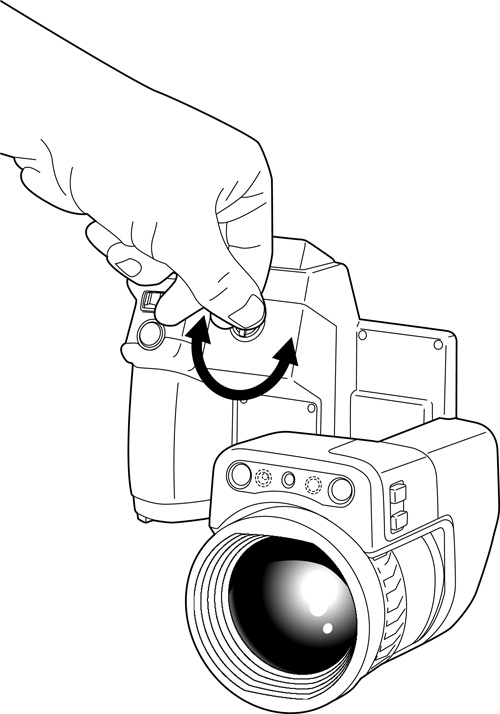
Adjusting the viewfinder’s dioptric correction (sharpness)
Make sure that the beams from the intensive energy sources do not go into the viewfinder. The beams can cause damage to the camera. This includes the devices that emit laser radiation, or the sun.
This item is dependent on the camera model.
Follow this procedure:
Push the
 button
to switch from touch-screen LCD mode to viewfinder mode.
button
to switch from touch-screen LCD mode to viewfinder mode.To adjust the viewfinder’s dioptric correction, look through the viewfinder and rotate the adjustment knob clockwise or counter-clockwise for the best sharpness.
Maximum dioptric correction: +2.
Minimum dioptric correction: –2.
Adjusting the angle of the lens
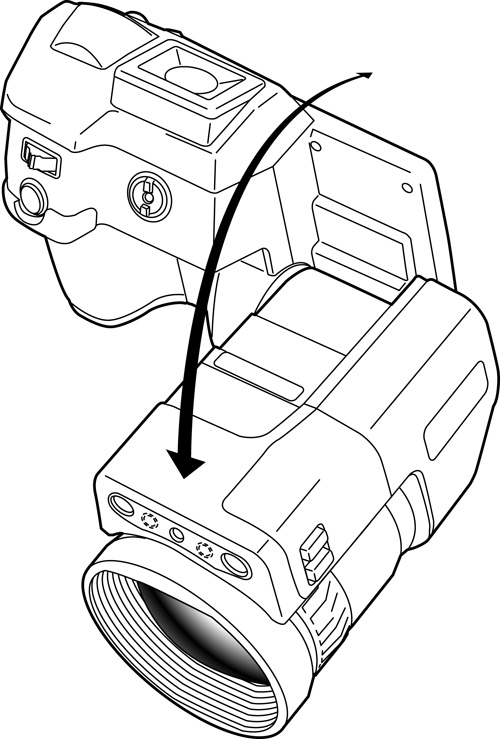
To adjust the angle, tilt the lens up or down.
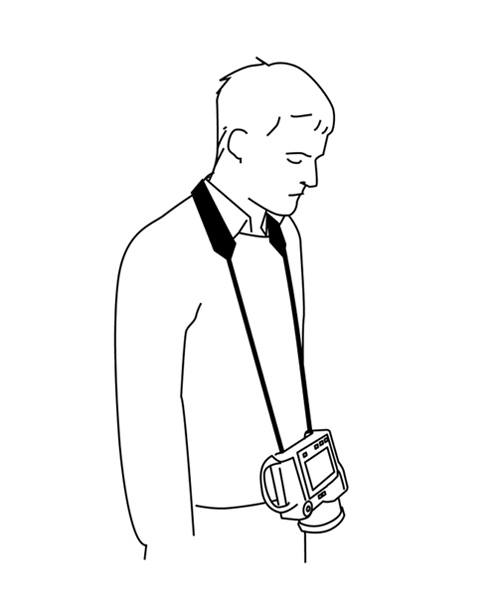
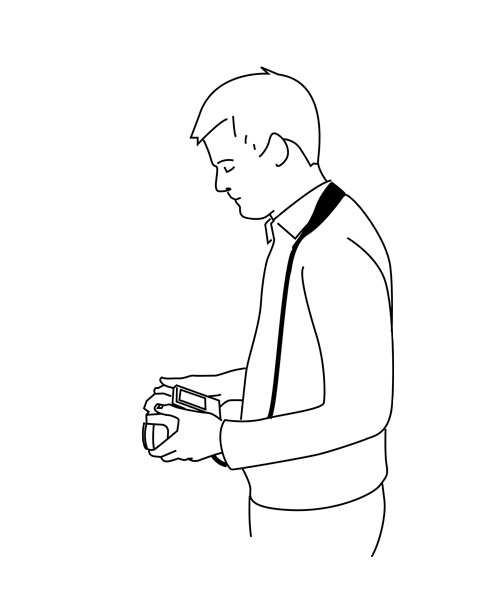
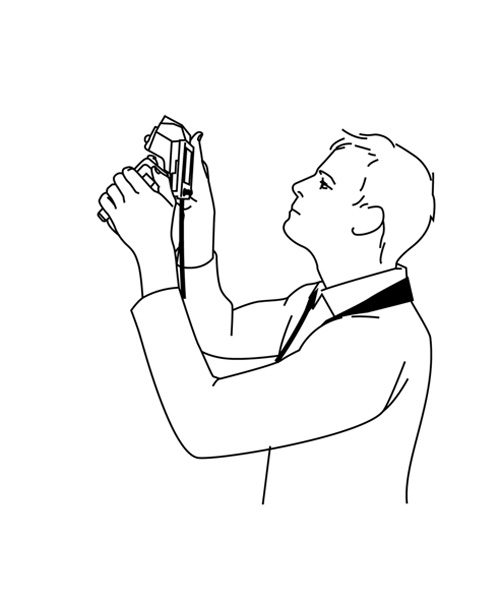
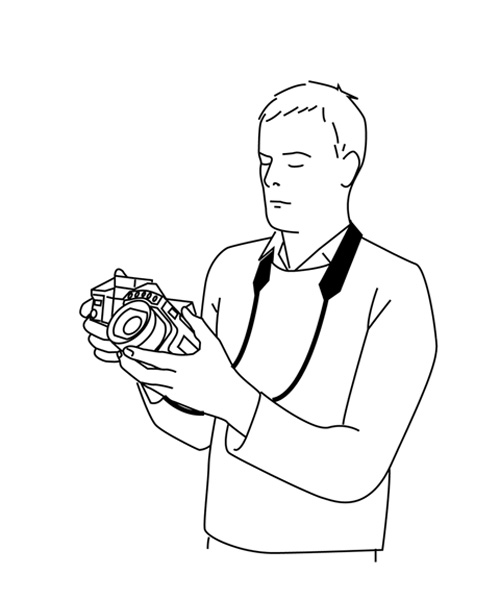
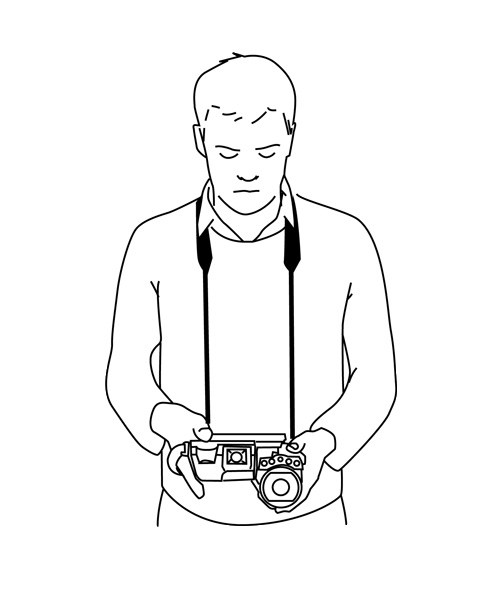
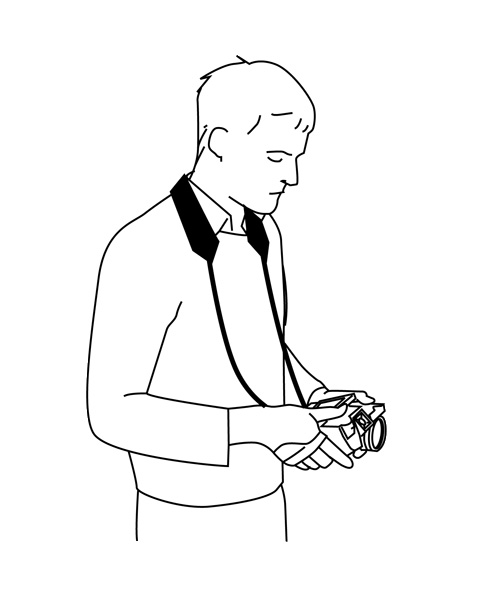
A note about ergonomics
To prevent strain-related injuries, it is important that you hold the camera ergonomically correctly. This section gives advice and examples on how to hold the camera.
Always tilt the touch-screen LCD to suit your work position.
When you hold the camera, make sure that you support the optics housing with your left hand too. This decreases the strain on your right hand.
Always use the supplied neck strap. See section Neck strap attachment points.
 |
 |
 |
 |
 |
 |
Operating the laser pointer
Do not look directly into the laser beam. The laser beam can cause eye irritation.
The laser pointer is enabled by a setting. Select
(Settings) > Device settings > Lamp & laser > Enable lamp & laser.The laser pointer may not be enabled in all markets.
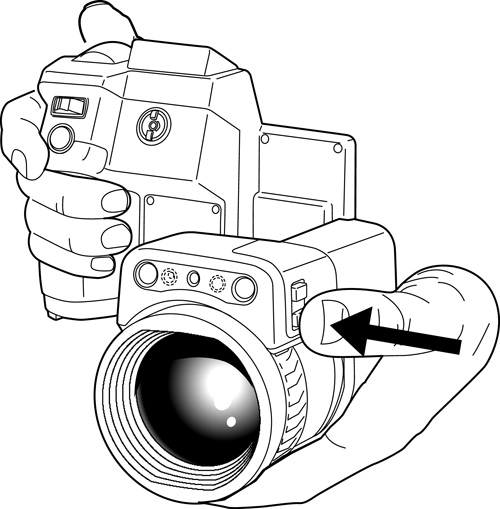
To operate the laser pointer, do the following:
To turn on the laser pointer, push and hold the laser button.
To turn off the laser pointer, release the laser button.
The symbol  is displayed on the screen when the laser pointer is
on.
is displayed on the screen when the laser pointer is
on.
Using the digital zoom function
The current zoom factor is displayed in the upper left corner of the screen.
In preview/edit mode, it is possible to pan a zoomed image by touching the screen.
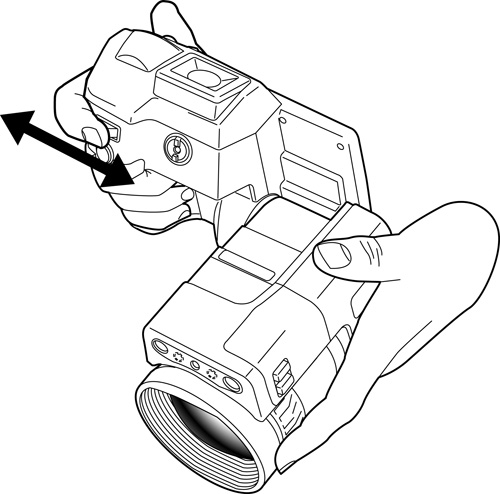
To zoom, push the zoom button left or right.
You can also zoom the image by touching the screen. For more information, see section Zooming an image.
Programmable buttons
There are four individually programmable buttons: two hardware buttons, and two software buttons on the screen.
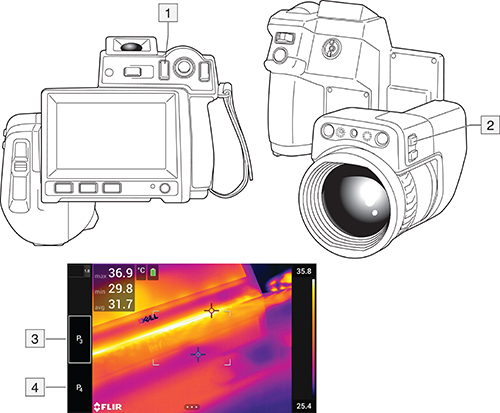
Programmable button
.
Programmable button.
Programmable button P3 (function assigned).
Programmable button P4.
Assigning functions to the programmable buttons
You can assign different functions to the programmable buttons. You can, for example, use a programmable button to easily switch between two settings you use often. You can also choose to define two different setups for saving and previewing: the usual setup for the Save button (which is defined by the Save options and storage settings, see section Save options & storage) and another setup for a programmable button.
To assign a function to a programmable button, do the following:
Push/press and hold the programmable button. This displays the Programmable button menu.
Move the joystick up/down to select one of the functions. Push the center of the joystick to confirm.
Programmable button options
Available options for all programmable buttons:
No action: This is the default setting. Nothing will happen when you push/press the button.
Hide image overlay graphics: Switch between hide/show all overlay graphics and image overlay information. For more information, see section Hiding all overlay.
Calibrate: Perform a manual NUC. For more information, see section Performing a non-uniformity correction (NUC).
Auto-adjust the manual temperature scale: Perform an automatic adjustment of the image while remaining in manual image adjustment mode.
Switch Thermal <> Digital camera: Switch between the image modes Thermal and Digital camera. For more information, see section Working with image modes.
Switch Thermal <> Thermal MSX: Switch between the image modes Thermal and Thermal MSX. For more information, see section Working with image modes.
Switch 1x zoom <> Max zoom: Switch between the digital zoom factor of 1× and maximum zoom.
Switch single shot <> Video: Switch between the recording modes Single shot and Video.
Switch between two latest palettes: Switch between the two last-used color palettes. For more information, see section Changing the color palette.
Switch temperature range: Cycle through the camera temperature ranges. For more information, see section Camera temperature range.
Additional options for the hardware buttons:
Autofocus: One-shot autofocus of the infrared camera.
Continuous autofocus: Switch between the enabled/disabled continuous autofocus functions.
Switch screen rotation On <> Off: Switch between enabled/disabled screen rotation.
Save: Save an image.
Save + Prompt for note: Save an image and display the note annotation tool.
Save + Prompt for table: Save an image and display the table annotation tool.
Save + Prompt for voice annotation: Save an image and display the voice annotation tool.
Save + Prompt for sketch: Save an image and display the sketch annotation tool.
Save + Select annotation from menu: Save an image and display the annotation tool menu.
Preview: Display a preview image.
Preview + Prompt for note: Display a preview image and the note annotation tool.
Preview + Prompt for table: Display a preview image and the table annotation tool.
Preview + Prompt for voice annotation: Display a preview image and the voice annotation tool.
Preview + Prompt for sketch: Display a preview image and the sketch annotation tool.
Preview + Select annotation from menu: Display a preview image and the annotation tool menu.
Moving files to a computer
When you save an image or video clip in the image archive of the camera, the file is stored on the memory card.
You can connect the camera to a computer, using a USB cable. Once connected, you can move the image and video files from the memory card to the computer.
Follow this procedure:
Connect a USB cable to the USB Micro B connector at the bottom of the camera.
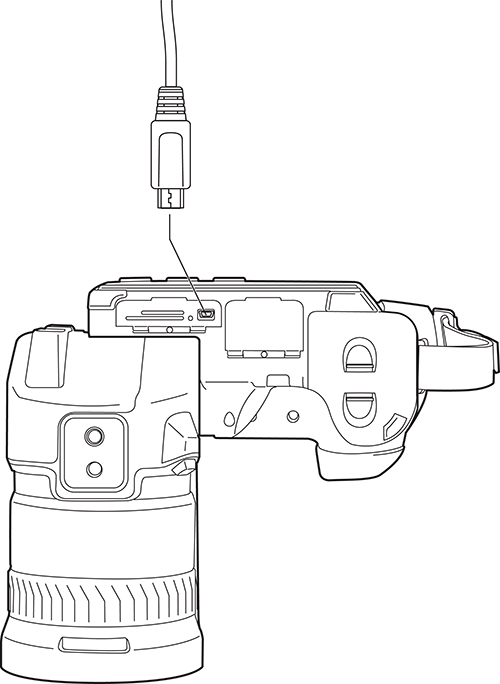
Connect the other end of the USB cable to the computer.
Turn on the camera.
Do one of the following:
Move the files to the computer using a drag-and-drop operation.
NoteMoving a file using a drag-and-drop operation does not delete the file in the camera.
Import the images into a FLIR Thermography software.
Changing lenses
Do not touch the lens surface when you change lenses. If this happens, clean the lens according to the instructions in Infrared lens.
Follow this procedure:
Take a firm grip around the outermost part of the lens.
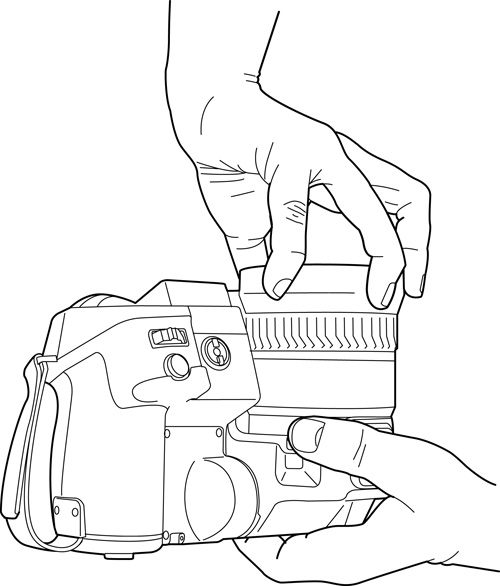
Push the release button and rotate the lens 45° counter-clockwise.
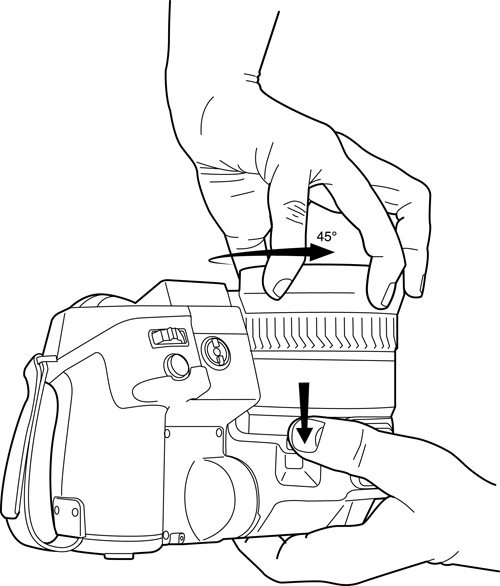
Carefully pull out the lens from the lens bayonet mount.
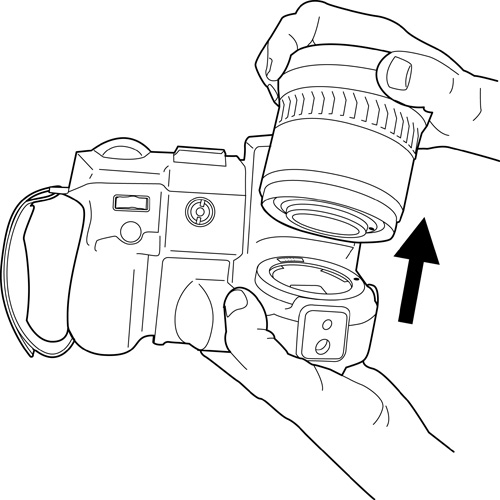
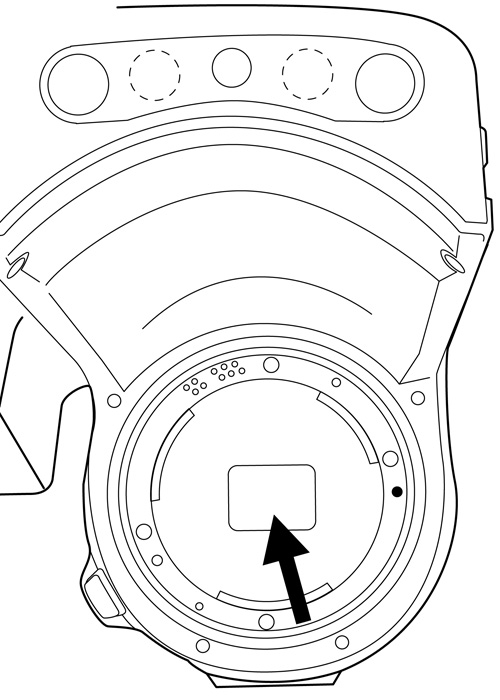
The infrared detector is now fully exposed. Do not touch this surface. If you see dust on the detector, follow the instructions in Infrared detector.
Note the index marks on the lens bayonet mount and on the lens.
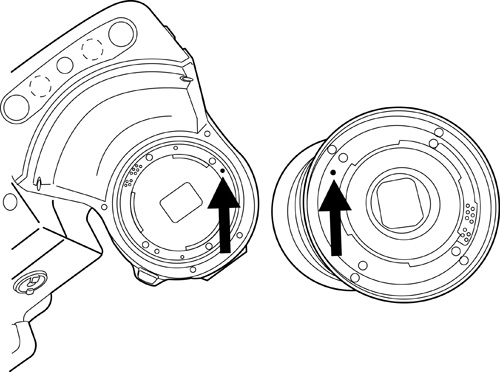
Align the lens correctly to the bayonet mount. Carefully push the lens into position.
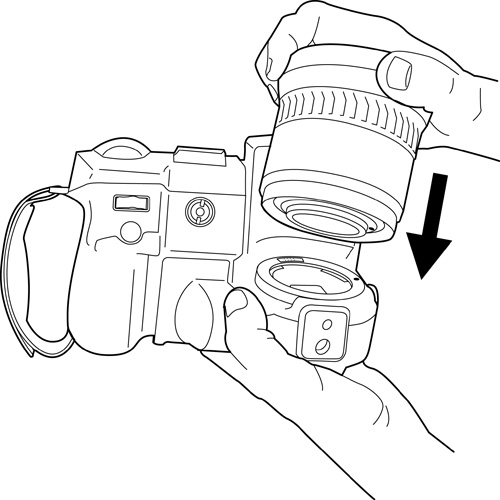
Rotate the lens 45° clockwise. The lens makes a click when it locks in place.
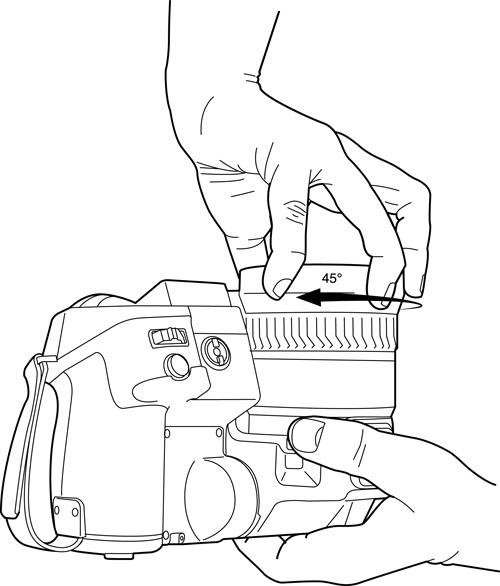
Using the 7° lens
This section applies to the IR lens f=142 mm (7°).
When you hold the camera, make sure that you support the lens with your hand. The lens is heavy and the joint between the optics and camera housings is not strong enough to hold the lens.
Do not touch the lens surface when you change lenses. If this happens, clean the lens according to the instructions in Infrared lens.
Mounting the lens
Remove the rear lens cap from the lens.
Take a firm grip around the middle part of the lens. Note the red index marks on the lens and on the lens bayonet mount.
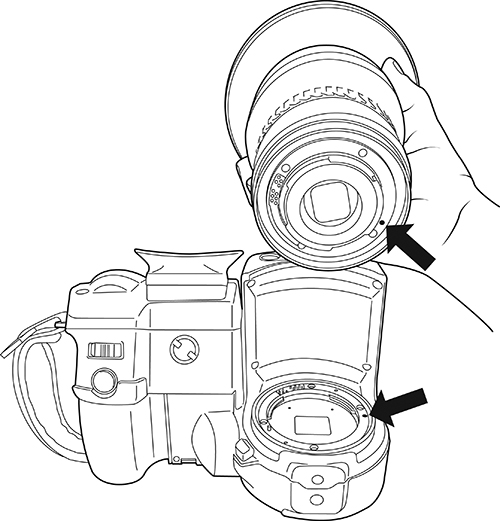
Align the index mark on the lens with the index mark on the lens bayonet mount on the camera. Carefully push the lens into position, and then rotate the lens 45° clockwise. The lens makes a click when it locks into place.
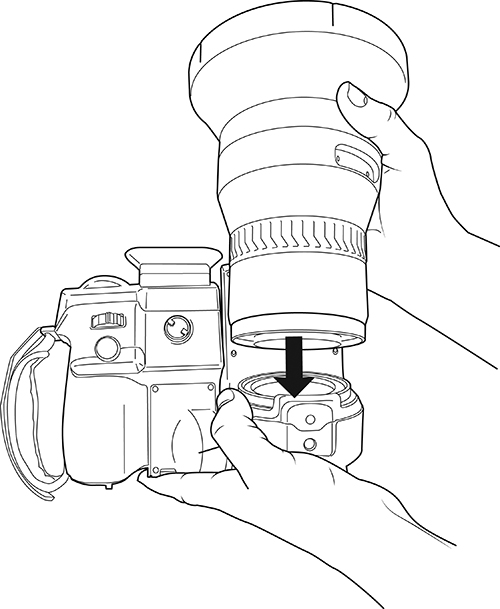
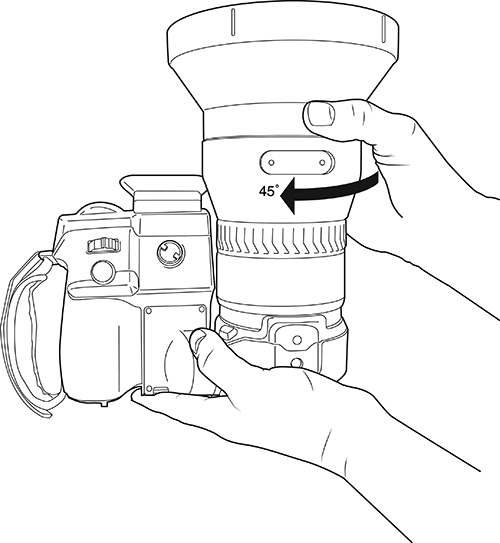
Mounting the lens support
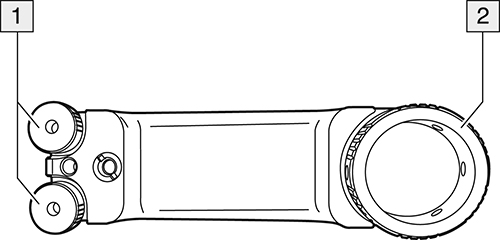
Lens screws
Camera screw
Follow this procedure:
Align the lens screws and the camera screw of the support with the screw holes and the tripod thread of the camera.
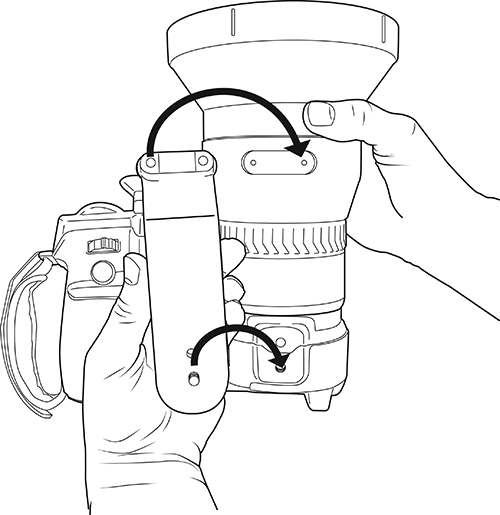
Tighten the screws; first the lens screws, and then the camera screw.
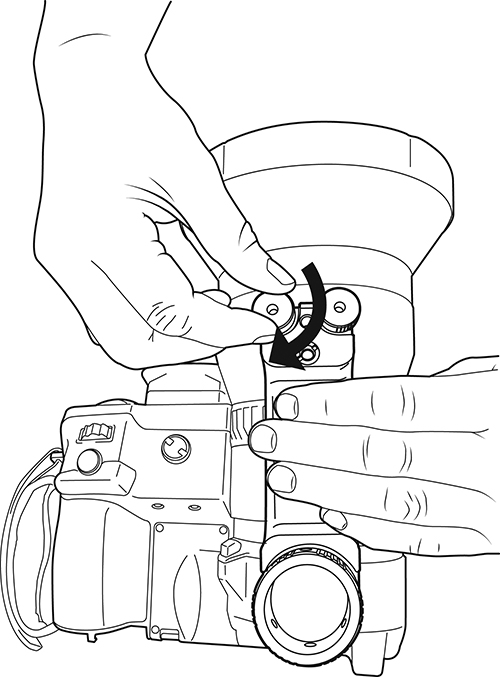
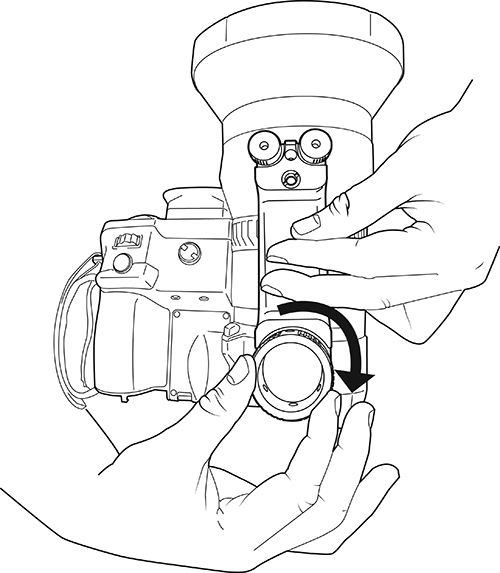
Removing the lens
Mount the front lens cap on the lens.
Untighten the camera screw and the lens screws of the lens support, and then remove the lens support.
Take a firm grip around the middle part of the lens.
Push the release button and rotate the lens 45° counter-clockwise. The lens makes a click when it is unlocked.
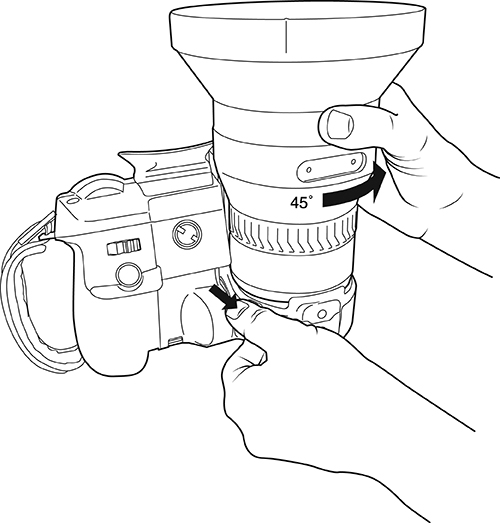
Carefully pull out the lens from the bayonet mount.
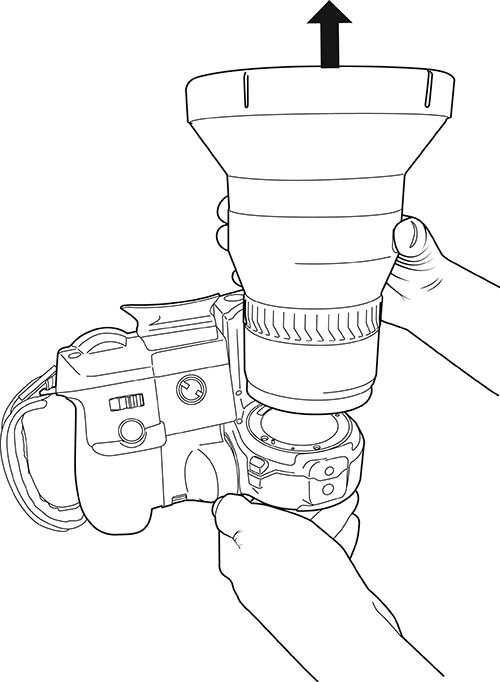
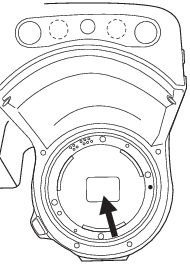
The infrared detector is now fully exposed. Do not touch this surface. If you see dust on the detector, follow the instructions in Infrared detector.
Using the close-up lens
If you need to look at small objects very close up, you can attach the close-up lens to the infrared lens.
When the close-up lens is attached, the digital camera and the infrared camera do not see the same scene. This means that functions that are based on content captured by the digital camera cannot be used, e.g., continuous autofocus and some image modes.
When using the close-up lens, keep the following in mind. (For instructions, see section Attaching the close-up lens.)
For best performance, adjust the focus to infinity.
The working distance for the close-up lens is 97 mm. (The working distance is the distance between the front of the lens and the closest surface of the object when the object is in sharp focus.)
You must activate the global parameter External IR window compensation.
Only use the Thermal image mode.
Deactivate continuous autofocus.
Do not use the laser pointer.
The close-up lens can only be used with the infrared lens f = 36 mm (28°).
Attaching the close-up lens
Do not touch the lens surfaces when you attach the close-up lens. If this happens, clean the lens according to the instructions in Infrared lens.
Follow this procedure:
Before attaching the close-up lens, adjust the focus to infinity by doing the following:
Aim the camera toward a distant object (more than 40 m (130′) away).
Autofocus the camera (see section Autofocus) or adjust the focus manually (see section Manual focus).
NoteOnce the focus is set to infinity, be careful when you continue with the procedure. Make sure you do not rotate the focusing ring by mistake.
Remove the outermost rubber protection from the infrared lens.
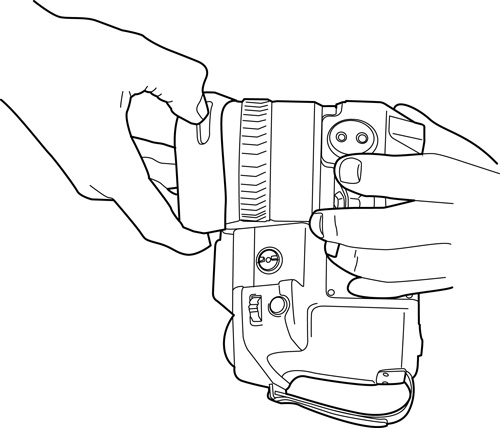
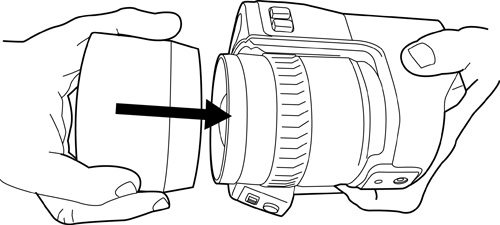
Align the close-up lens with the infrared lens. Carefully push the close-up lens into position.
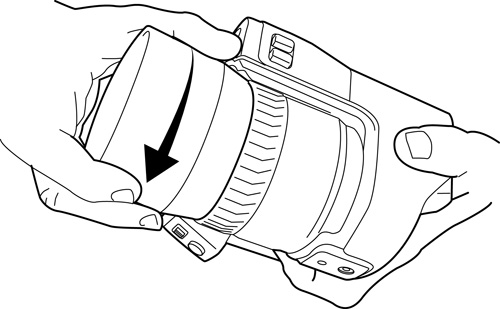
Turn the close-up lens clockwise until it stops.
Activate the global parameter External IR window compensation by doing the following:
Push the joystick to display the menu system.
Select
 (Measurement
parameters) and push the joystick. This displays a submenu.
(Measurement
parameters) and push the joystick. This displays a submenu.Select
 (External IR
window compensation) and push the joystick. This displays
a dialog box.
(External IR
window compensation) and push the joystick. This displays
a dialog box.In the dialog box, define the settings for the infrared window compensation:
Turn compensation on/off: Select On.
Temperature: Select the temperature of the close-up lens.
Transmission: Select 0.89, which is a typical transmission value for the close-up lens.
The status icon
 is now displayed.
Select the image mode Thermal by doing the following:
Push the joystick to display the menu system.
Select
 (Image mode) and push the joystick. This displays a submenu.
Select
 (Thermal) and push the joystick.
Deactivate continuous autofocus by selecting
(Settings) > Device settings > Continuous autofocus = Off.
Removing the close-up lens
Do not touch the lens surfaces when you remove the close-up lens. If this happens, clean the lens according to the instructions in Infrared lens.
Follow this procedure:
Turn the close-up lens counter-clockwise until it separates from the infrared lens.
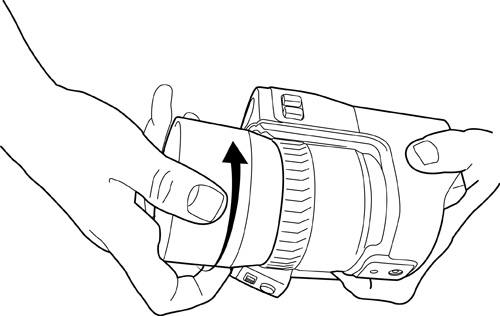
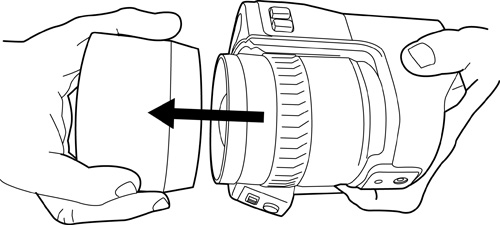
Carefully pull out the close-up lens from the infrared lens.
Note the grooves on the infrared lens and their counterparts on the inside of the rubber protection.
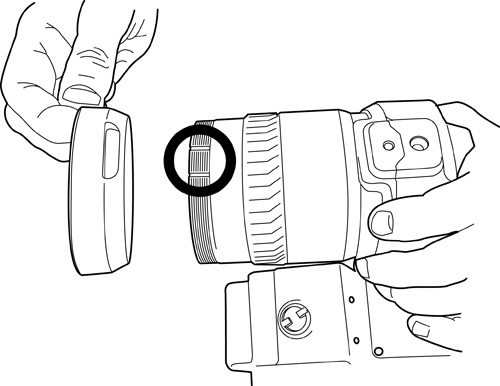
Align the rubber protection with the infrared lens.
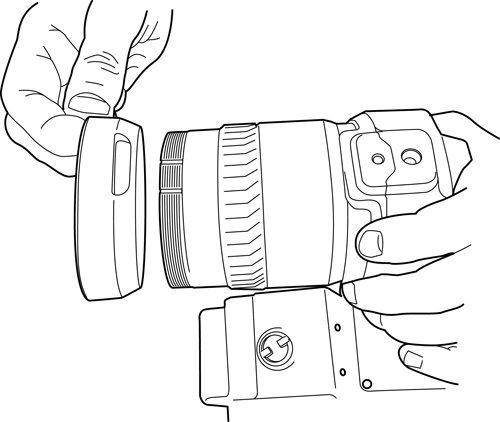
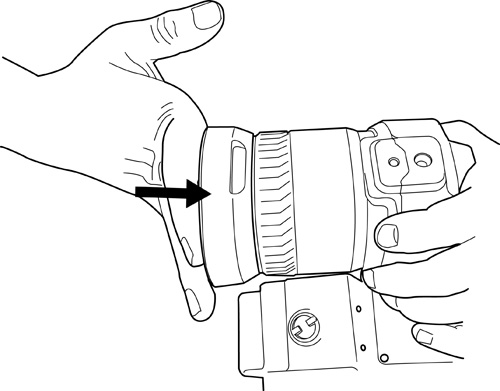
Push the rubber protection into position.
Deactivate the global parameter External IR window compensation by doing the following:
Push the joystick to display the menu system.
Select
(Measurement
parameters) and push the joystick. This displays a submenu.Select
(External IR
window compensation) and push the joystick. This displays
a dialog box.In the dialog box, select Turn compensation on/off = Off.
Calibrating the compass
It is recommended that the compass is calibrated every time you move the camera to a new location.
Follow this procedure:
Push the joystick to display the menu system.
Use the joystick to go to
(Settings).Push the joystick to display the Settings menu.
Select Device settings and push the joystick.
Depending on the camera configuration, select Wireless & geolocation, Wireless, or Geolocation and push the joystick.
Select Compass and push the joystick.
If the Compass check box is unchecked, push the joystick to enable the compass.
Select Calibrate compass and push the joystick. Follow the on-screen instructions.
NoteYou must rotate the camera slowly.