Operation
Charging the battery
Charging the battery using the FLIR power supply
Follow this procedure:
Connect the power supply to a wall outlet.
Connect the power supply cable to the USB connector on the camera. To access the USB connector, see section Accessing the connector bay.
The charging time for a fully depleted battery is 2 hours.
Charging the battery using the FLIR stand-alone battery charger.
Follow this procedure:
Connect the stand-alone battery charger to a wall outlet.
Remove the battery from the camera.
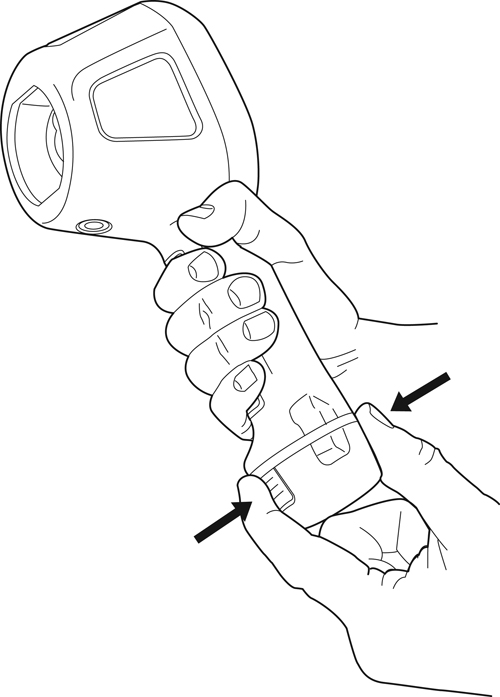
Put the battery into the stand-alone battery charger.
The charging time for a fully depleted battery is 2 hours.
The battery is being charged when the blue LED is flashing.
The battery is fully charged when the blue LED is continuous.
Charging the battery using a USB cable
Follow this procedure:
Connect the camera to a computer using a USB cable. To access the USB connector, see section Accessing the connector bay.
To charge the camera, the computer must be turned on.
Charging the camera using a USB cable connected to a computer takes considerably longer than using the FLIR power supply or the FLIR stand-alone battery charger.
Turning on and turning off the camera
Push the on/off button to turn on the camera.
Push and hold the on/off button for more than 3 seconds but less than 10 seconds to put the camera into standby mode. The camera then automatically turns off after 6 hours.
Push and hold the on/off button for more than 10 seconds to turn off the camera.
Accessing the connector bay
Follow this procedure:
Fold up the rubber cover at the top of the camera.
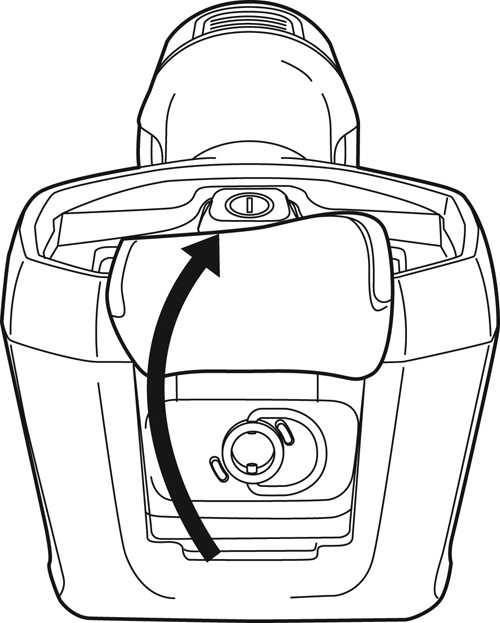
Hold the metal ring firmly.
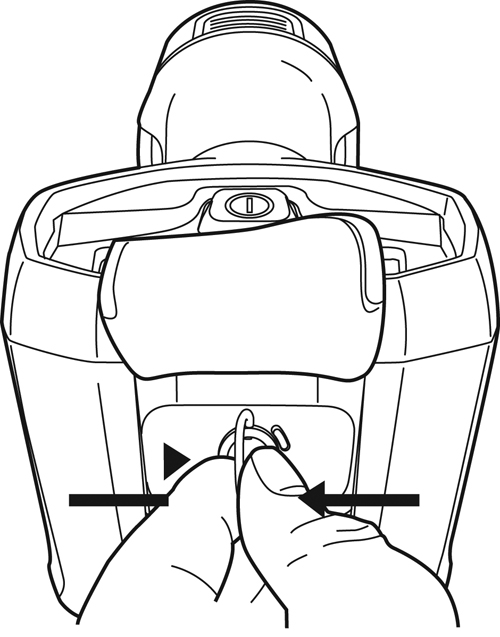
Turn the ring about 90° counter-clockwise.
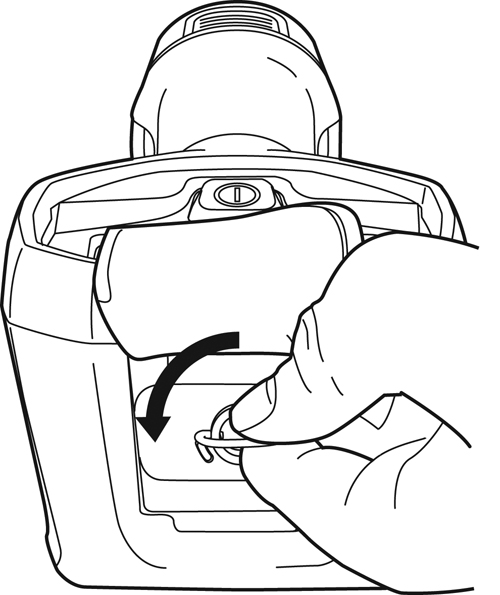
Pull out the plastic insert.
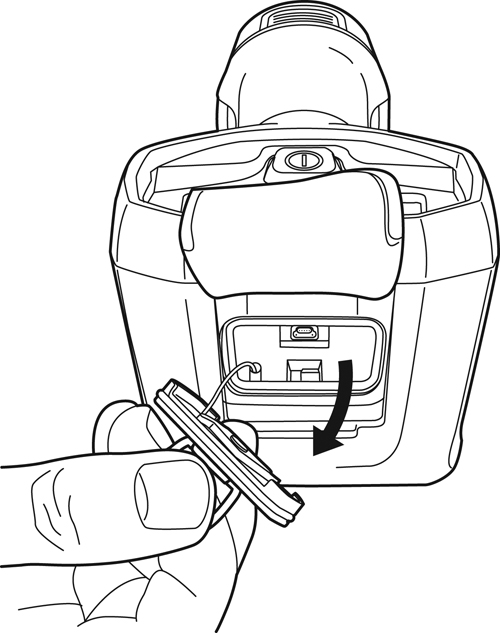 CAUTION
The plastic insert has an O-ring seal. Do not damage the O-ring seal.
Changing temperature unit
The camera displays temperatures in ℃ or ℉. You change the temperature unit with a switch, located in the connector bay.
Follow this procedure:
To access the temperature unit switch, see section Accessing the connector bay.
Set the temperature unit switch to the desired position.
Configuring the camera
The FLIR K-series camera configurator is a Windows application used to configure the camera.
Installation
Go to https://support.flir.com. Find the software download area and search for FLIR K-series camera configurator.
Download the FLIR K-series camera configurator installer package.
Start the installation by double-clicking the executable installer file.
Follow the instructions in the setup wizard.
Configure the camera
Connect the camera to the computer, using the USB cable.
Turn on the camera.
Run the FLIR K-series camera configurator application.
The application automatically connects to the camera and displays the available settings.
To change the language, click Options on the top menu.
The General settings tab
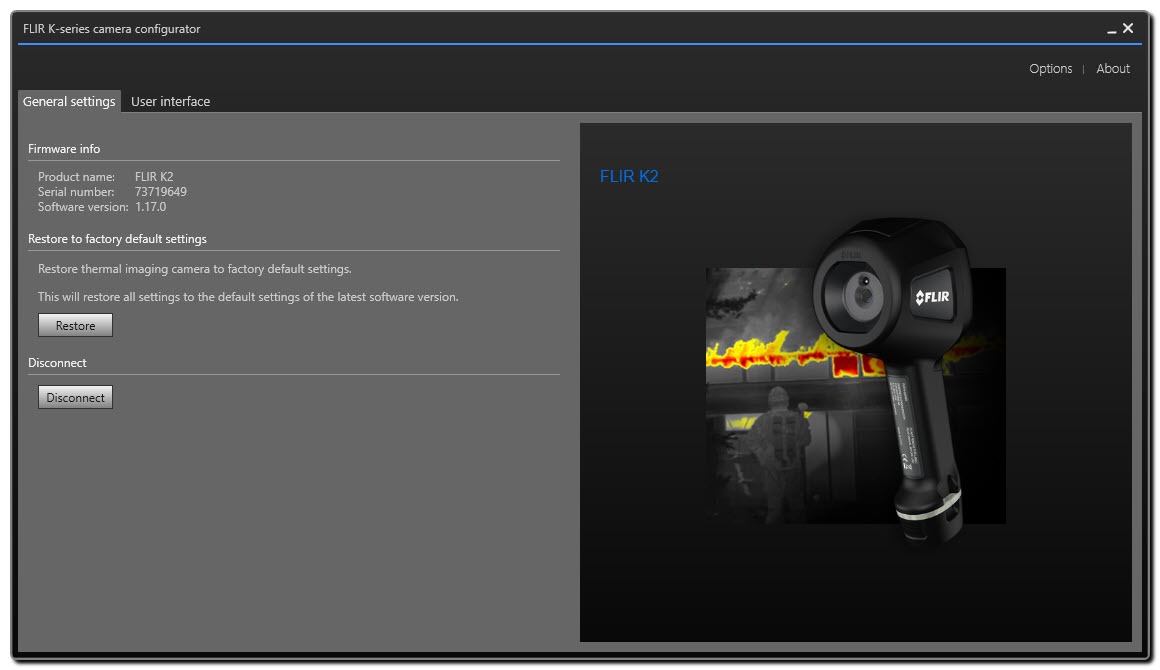
Restore to factory default area: To restore all camera settings to the factory defaults, click Restore.
Firmware info area: Displays the current version of the camera firmware. To check if a newer version of the camera firmware is available, go to https://support.flir.com, then find the software download area and search for your camera model.
Disconnect area: To disconnect the camera from the application, click Disconnect. To reconnect, turn off the camera and then turn it on again. The application will automatically connect to the camera.
The User interface tab
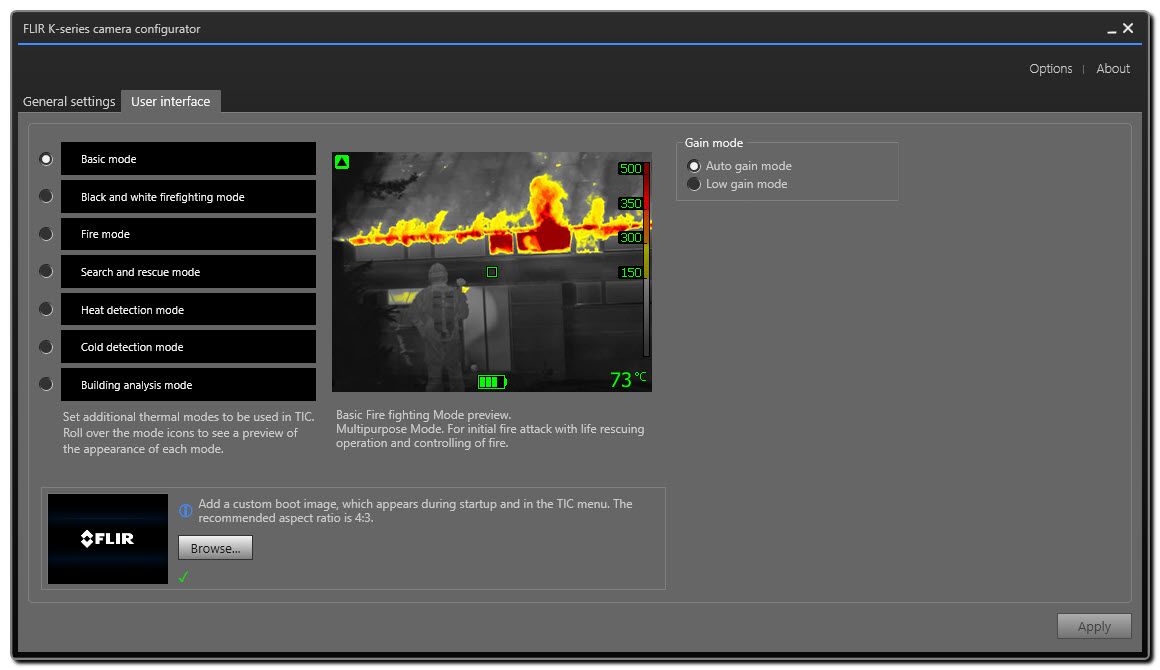
Camera modes area: To define which camera modes to enable in the camera, select the camera mode. For more information on each camera mode, see section Explanation of the different camera modes.
Gain mode area:
Auto gain mode: Select to make the camera automatically switch between the high-sensitivity range and the low-sensitivity range, depending on the scene temperature. The temperature level at which the camera switches between the two modes is +150°C (+302°F).
Low gain mode: Select to make the camera work in the low-sensitivity range only. This has the advantage that the camera does not perform a non-uniformity correction when an object with a temperature higher than +150°C (+302°F) enters the scene. However, the disadvantage is lower sensitivity and a higher level of signal noise.
Add custom boot image area: To specify your own unique image to appear during start-up, click Browse, and navigate to the image file. This is useful for, for example, identifying your fire department’s cameras. By incorporating your fire department’s logo, and a unique identity number in the image, you can keep track of your cameras.
To download any setting changes to the camera, click Apply.
Camera modes
General
The FLIR Kx series features seven different camera modes:
Basic mode.
Black and white firefighting mode.
Fire mode.
Search and rescue mode.
Heat detection mode.
Cold detection mode.
-
Building analysis mode.
Each mode is optimized for a certain type of firefighting application. The modes also differ in the following ways:
Modes with green icons (1–3 in the list): The camera switches between the high-sensitivity range (–20 to +150°C (–4 to +302°F)) and the low-sensitivity range (0 to +500°C (+32 to +932°F)) automatically when an object with a temperature above 150°C (302°F), covering more than 2% of the image, enters the field of view of the camera.
Modes with blue icons (4–7 in the list): The temperature range is locked to the high-sensitivity range (–20 to +150°C (–4 to +302°F)). This is useful if you need to maintain the best possible image for objects with a temperature below 150°C (302°F), even if there are objects with a temperature above 150°C (302°F) in the field of view of the camera.
Explanation of the different camera modes
Basic mode
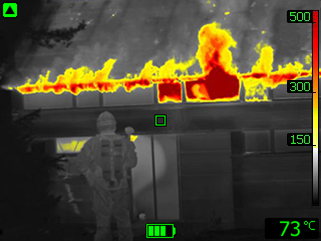
Figure 1. Basic mode.
The Basic mode is the default mode of the camera. It is a multipurpose mode for the initial fire attack with life rescuing operation and control of the fire. The camera automatically switches between the high-sensitivity range and the low-sensitivity range, to maintain an optimal infrared image while at the same time maintaining a safe and consistent heat colorization of the fire scene.
Automatic range.
Colorization of heat: +150 to +500°C (+302 to +932°F).
High-sensitivity range: –20 to +150°C (–4 to +302°F).
Low-sensitivity range: 0 to +500°C (+32 to +932°F).
Black and white firefighting mode
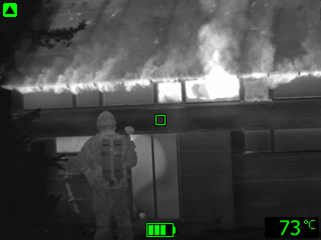
Figure 2. Black and white firefighting mode.
The black and white firefighting mode is a standardized firefighting mode based on the Basic mode. It is a multipurpose mode for the initial fire intervention that includes life rescuing operations and control of the fire. It is specifically designed for fire services that do not want to use the heat colorization feature.
The camera automatically switches between the high-sensitivity range and the low-sensitivity range, to maintain an optimal infrared image.
Automatic range.
High-sensitivity range: –20 to +150°C (–4 to +302°F).
Low-sensitivity range: 0 to +500°C (+32 to +932°F).
Fire mode
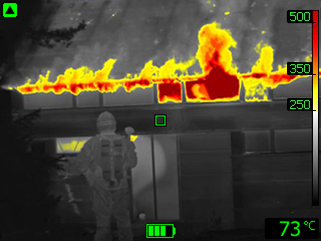
Figure 3. Fire mode.
The fire mode is similar to the Basic mode, but with a higher-temperature starting point for the heat colorization. It is suitable for fire scenes with higher background temperatures, where there are already a lot of open flames and a high background temperature. The camera automatically switches between the high-sensitivity range and the low-sensitivity range, to maintain an optimal infrared image while at the same time maintaining a safe and consistent heat colorization.
Automatic range.
Colorization of heat: +250 to +500°C (+ 482 to +932°F).
High-sensitivity range: –20 to +150°C (–4 to +302°F).
Low-sensitivity range: 0 to +500°C (+32 to +932°F).
Search and rescue mode
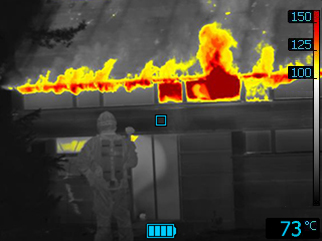
Figure 4. Search and rescue mode.
The search and rescue mode is optimized for maintaining high contrast in the infrared image while searching for people in landscapes, buildings, or traffic accident scenes.
High-sensitivity range only.
Colorization of heat: +100 to +150°C (+212 to +302°F).
High-sensitivity range: –20 to +150°C (–4 to +302°F).
Heat detection mode
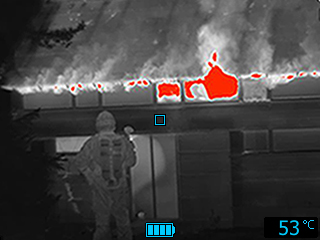
Figure 5. Heat detection mode.
The heat detection mode is optimized for searching hotspots during overhaul after the fire is out—typically to ensure that there is no remaining hidden fire. This mode can also be used to find thermal patterns (e.g., signs of people in car seats after accidents), to ensure that everyone has been found. This mode can also be used to search for people in water and open landscapes.
High-sensitivity range only.
Colorization of heat: the 20% highest temperatures in the scene.
High-sensitivity range: –20 to +150°C (–4 to +302°F).
Cold detection mode
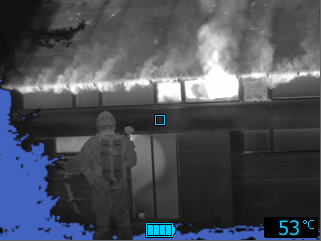
Figure 6. Cold detection mode.
The cold detection mode is optimized for searching coldspots—typically to find drafts and air flows.
High-sensitivity range only.
Colorization of cold: the 20% lowest temperatures in the scene.
High-sensitivity range: –20 to +150°C (–4 to +302°F).
Building analysis mode
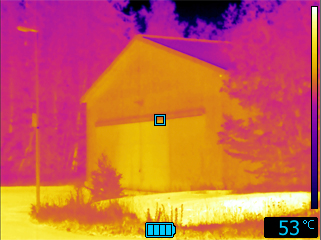
Figure 7. Building analysis mode.
The building analysis mode is suitable for the analysis of buildings and the detection of building-related anomalies. The thermal image can provide information on structural, mechanical, plumbing, and electrical constructions as well as an indication of moisture, wetness, and air infiltration.
In this mode, the camera uses an iron color palette to display the different temperatures, where black, blue, and purple are for the coldest areas, followed by red, orange, and yellow for the mid-range and going to white for the hottest parts. The temperature scale is automatically adjusted to the thermal content of the image.
Updating the camera
To take advantage of the latest FLIR camera firmware, it is important that you keep your camera updated.
For information on how to update your camera, go to http://support.flir.com.