Handling the camera
Charging the battery
General
Before starting the camera for the first time, charge the battery for 2 hours using the stand-alone battery charger.
Select a mains socket that is near the equipment and easily accessible.
Using the stand-alone battery charger to charge the battery
Put one or two batteries in the battery charger.
Connect the power supply cable plug to the connector on the battery charger.
Connect the power supply mains-electricity plug to a mains socket.
When the white LED on the battery charger glows continuously, the batteries are fully charged.
It is good practice to disconnect the stand-alone battery charger from the mains socket when the batteries are fully charged.
Stand-alone battery charger LED indicator
|
Type of signal |
Explanation |
|---|---|
|
The white LED flashes. |
The battery is being charged. |
|
The white LED glows continuously. |
The battery is fully charged. |
Using the USB battery charger to charge the battery
Put the battery into the battery compartment of the camera.
Connect the USB battery charger to a mains socket.
Fold up the rubber cover at the top of the camera.
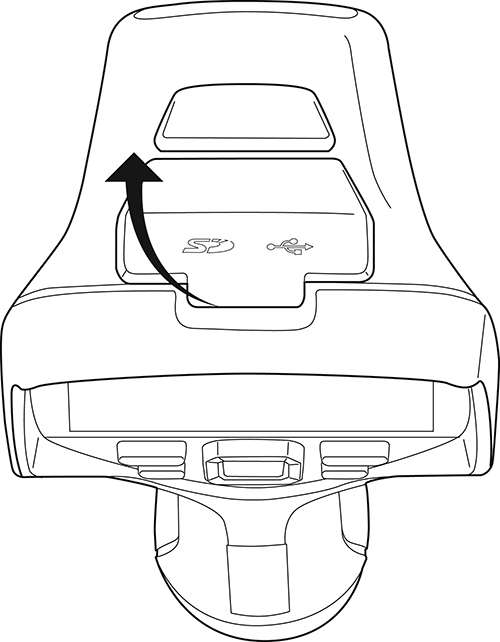
Connect the USB connector of the USB battery charger to the USB-C connector in the connector bay of the camera.
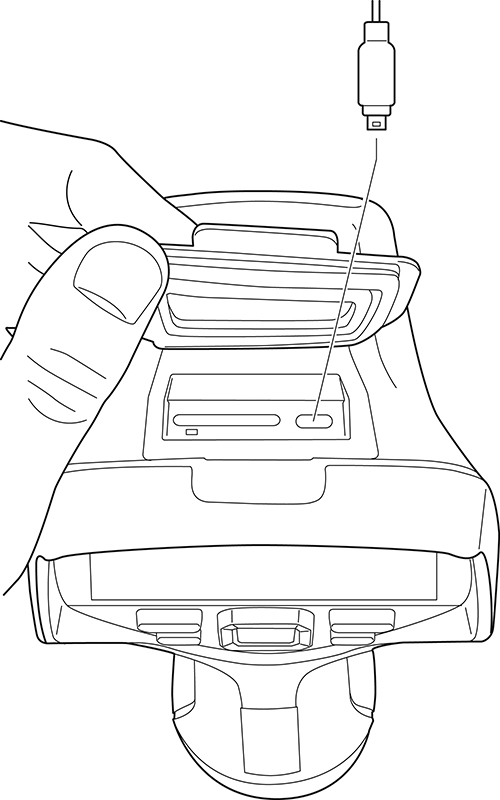
To check the status of the battery charging, do one of the following:
If the camera is turned on: Place your finger at the top of the screen and swipe down. The battery status is displayed on the swipe-down menu.
If the camera is turned off: The battery charging indicator is displayed on the screen.
It is good practice to disconnect the USB battery charger from the mains socket when the battery is fully charged.
Charging the battery using a USB cable connected to a computer
Fold up the rubber cover at the top of the camera.
Connect a USB cable to the USB-C connector in the connector bay. Connect the other end of the USB cable to the computer.
To charge the camera, the computer must be turned on.
Charging the camera using a USB cable connected to a computer takes considerably longer than using the USB battery charger or the stand-alone battery charger.
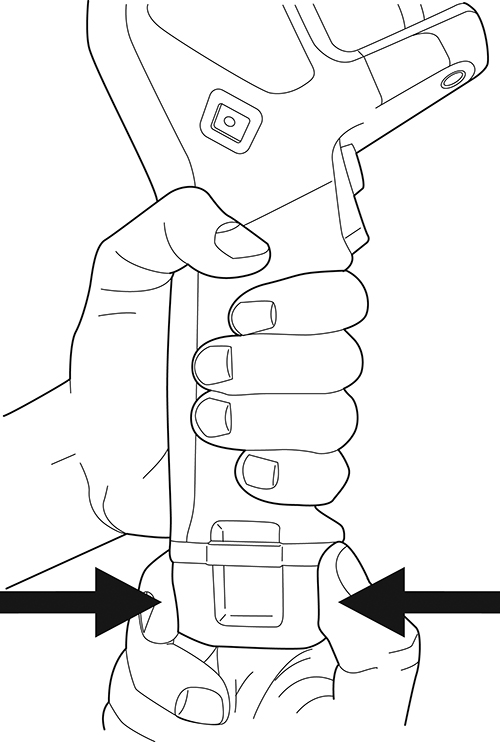
Removing the battery
Turn off the camera.
Remove the battery from the camera.
Turning on and turning off the camera
To turn on the camera, push the on/off button
 .
.To turn off the camera, push and hold the on/off button
for more than 0.5 second.
Do not remove the battery to turn off the camera.
Adjusting the thermal camera focus
It is very important to adjust the focus correctly. Incorrect focus adjustment affects how the image modes work. It also affects the temperature measurement.
You can adjust the camera focus by rotating the focus ring or by pushing the autofocus button. The camera can also be set up to perform continuous autofocusing.
Manual focus
To adjust the focus manually, rotate the focus ring.
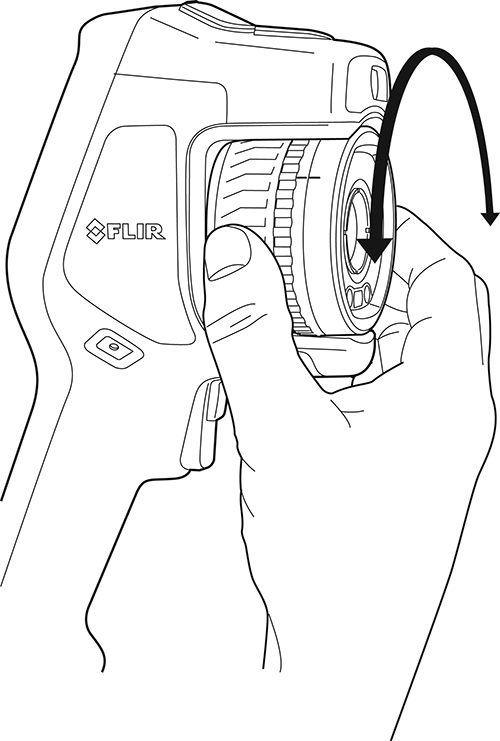
Do not touch the lens surface when you adjust the focus. If this happens, clean the lens according to the instructions in Infrared lens.
Autofocus
To autofocus the camera, push the Autofocus button.
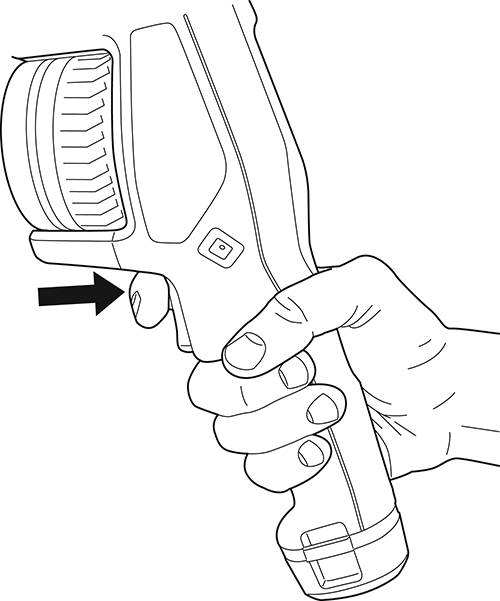
You can also assign the autofocus function to the programmable button. For more information, see section Programmable button.
Autofocus is not supported by all camera models.
Autofocus method
When autofocusing, the camera can use one of the following focus methods:
Contrast: The focus is based on maximizing the image contrast.
Laser: The focus is based on a laser distance measurement. The laser is used when the camera is autofocusing.
The focus method is configured by a setting. Select  (Settings) > Device settings > Focus > Auto focus and then select Contrast or Laser.
When the camera is set to autofocusing with the laser method, do not point the camera at the face of a person when you use the autofocus function. The laser beam can cause eye irritation.
Continuous autofocus
The camera can be set up to perform continuous autofocusing.
When the continuous autofocus function is enabled, the camera bases the focus adjustments on continuous laser distance measurements. The laser is continuously on.
To enable
or disable continuous autofocus, select (Settings) > Device settings > Focus > Continuous autofocus > On or Off.
Do not point the camera at the face of a person when the continuous autofocus function is on. The camera uses laser distance measurements (that are continuous) for the focus adjustments. The laser beam can cause eye irritation.
Before you can enable continuous autofocus, you need to enable the laser and select laser as focus method. See section Autofocus method.
When continuous autofocus is enabled, it is not possible to manually adjust the focus by rotating the focus ring.
-
You can also assign the continuous autofocus function to the programmable button. For more information, see section Programmable button.
-
Continuous autofocus is not supported by all camera models.
Operating the laser distance meter
General
The laser distance meter consists of a laser transmitter and a laser receiver. The laser distance meter determines the distance to a target by measuring the time it takes for a laser pulse to reach the target and return to the laser receiver. This time is converted to a distance, which is displayed on the screen.
The laser transmitter also works as a laser pointer. When the laser is on, you will see a laser dot approximately at the target.
Do not look directly into the laser beam. The laser beam can cause eye irritation.
The laser is enabled by a setting. Select
(Settings) > Device settings > Lamp & laser > Enable lamp & laser.The symbol
 is displayed on the screen when the laser is on.
The camera can be configured to automatically measure the distance when an image is saved. Select
(Settings) > Save options & storage > Measure distance. With this setting, the Object distance parameter (see section Changing the measurement parameters) in the image data is automatically updated
with the measured distance when an image is saved. (There is no effect
on the Object distance setting in live mode.)If the target reflection is low or if the target is angled from the laser beam, there may be no return signal, and the distance cannot be measured.
-
The laser distance meter is not supported by all camera models.
The laser distance meter may not be enabled in all markets.
Procedure
To operate the laser, do the following:
To turn on the laser, push and hold the laser button
 . The distance to the target is displayed on the screen.
To turn off the laser, release the laser button
.
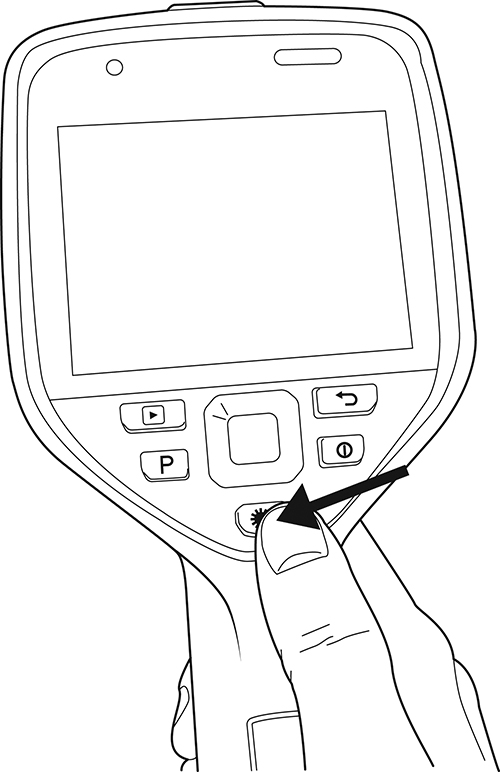
Measuring areas
General
The availability of this feature is dependent on the camera model.
The distance measured by the laser distance meter can be used as the basis for area calculations. A typical application is to estimate the size of a damp stain on a wall.
To measure the area of a surface, you need to lay out a box or circle measurement tool on the screen. The camera calculates the area of the surface enclosed by the box or circle tool. The calculation is an estimate of the surface area, based on the measured distance to the target.
When the laser distance meter is on, you will see a laser dot approximately at the target. The laser distance meter measures the distance to that target. The camera assumes that this distance is valid for the entire box or circle tool.
For successful area measurements, keep the following in mind:
Make sure that the box or circle tool is in the center of the image.
Adjust the size of the box or circle tool to the size of the target.
Hold the camera perpendicular to the target.
Avoid targets with many details at different distances from the camera.
Procedure
This procedure assumes that you have enabled the laser. Select (Settings) > Device settings > Lamp & laser > Enable lamp & laser.
Follow this procedure:
Add a box or circle measurement tool, see section Adding/removing measurement tools.
Set the camera to measure and display the area of the box or circle, see section Displaying values in the result table.
Make sure that the box or circle tool is in the center of the image, see section Moving and resizing a measurement tool.
Adjust the size of the box or circle tool to the size of the target, see section Moving and resizing a measurement tool.
Hold the camera perpendicular to the target. Push and hold the laser button
.The calculated area is displayed in the result table.
Connecting external devices and storage media
You can connect the following external devices and media to the camera:
An SD memory card.
A computer to move image and video files to and from the camera, using a USB-C to USB-A or a USB-C to USB-C cable.
A video monitor or projector, using a USB-C to HDMI adapter.
A USB battery charger.
Empty or use a memory card that has not previously been used in another type of camera. The cameras may organize files differently on the memory card. There is therefore a risk of losing data if the same memory card is used in different types of cameras.
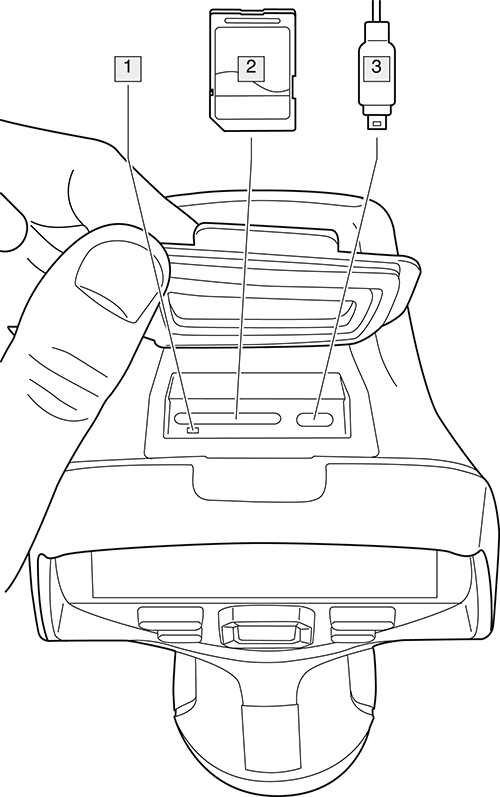
LED indicator showing that the memory card is busy.
NoteDo not eject the memory card when this LED is flashing.
Do not connect the camera to a computer when this LED is flashing.
SD memory card.
USB-C cable.
Moving files to a computer
When you save an image or video clip in the image archive of the camera, the file is stored on the memory card.
You can connect the camera to a computer, using a USB-C to USB-A or a USB-C to USB-C cable. Once connected, you can move the image and video files from the memory card to the computer.
To move files to a computer via USB cable, do the following:
Fold up the rubber cover at the top of the camera.
Connect a USB cable to the USB-C connector in the connector bay. Connect the other end of the USB cable to the computer.
Turn on the camera.
Do one of the following:
Move the files to the computer using a drag-and-drop operation.
NoteMoving a file using a drag-and-drop operation does not delete the file in the camera.
Import the images into a FLIR Thermography software.
Related topics
You can also set up the camera to upload images for storage online, see section Cloud connectivity.
Programmable button
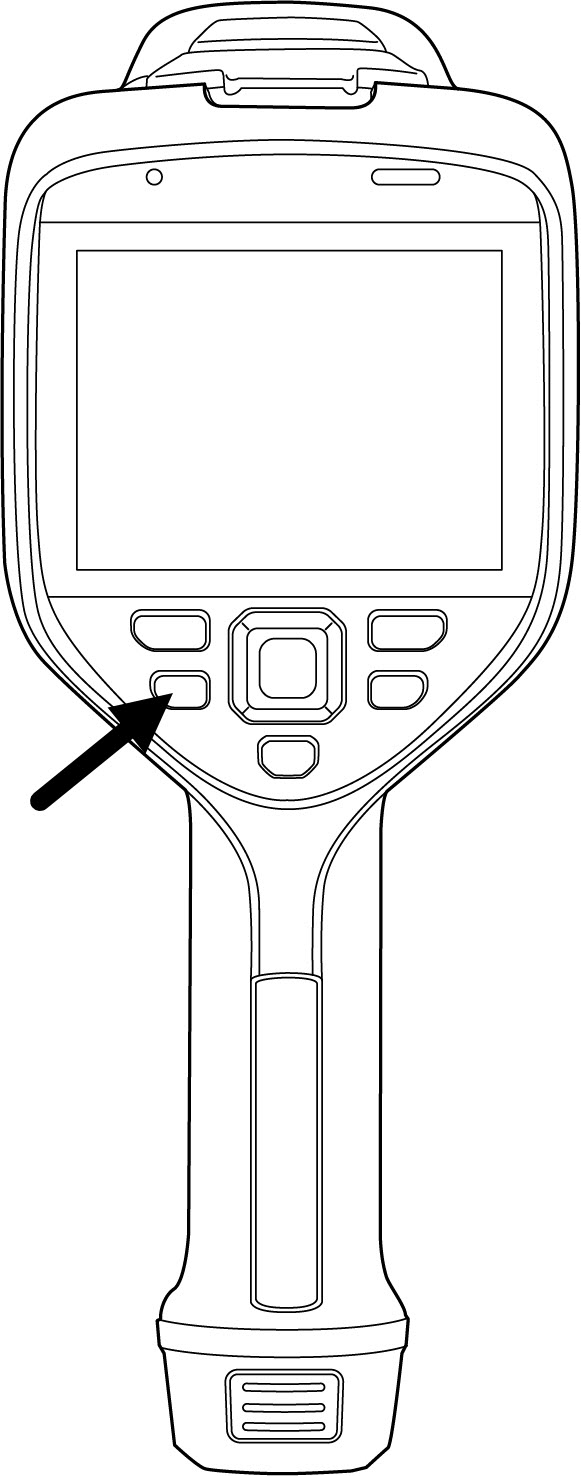
You can assign different functions to the programmable button. You can, for example, use the programmable button to easily switch between two settings you use often. You can also choose to define two different setups for saving and previewing: the ordinary setup for the trigger (which is defined by the Save options and storage settings, see section Save options & storage) and another setup for the programmable button.
To assign a function to the programmable button, do the following:
Push and hold the programmable button. This displays the Programmable button menu.
Push the navigation pad up/down to select one of the functions. Push the center of the navigation pad to confirm.
Programmable button options
Available options for the programmable buttons:
No action: This is the default setting. Nothing will happen when you push the button.
Switch Auto <> Manual temperature scale: Switch between automatic or manual image adjustment mode. For more information, see section Adjusting the infrared image.
Autofocus1: One-shot autofocus of the infrared camera.
Continuous autofocus2: Switch between the enabled/disabled continuous autofocus functions.
Hide image overlay graphics: Switch between hide/show all overlay graphics and image overlay information. For more information, see section Hiding all overlay.
Calibrate: Perform a manual NUC. For more information, see section Performing a non-uniformity correction (NUC).
Auto-adjust the manual temperature scale: Perform an automatic adjustment of the image while remaining in manual image adjustment mode.
Switch Thermal <> Digital camera: Switch between the image modes Thermal and Digital camera. For more information, see section Working with image modes.
Switch Thermal <> Thermal MSX3: Switch between the image modes Thermal and Thermal MSX. For more information, see section Working with image modes.
Switch 1x zoom <> Max zoom: Switch between the digital zoom factor of 1× and maximum zoom.
Switch camera flash On <> Off4: Switch between the enabled/disabled camera flash functions. For more information, see section Using the camera lamp as a flash.
NoteThe flash function will not be activated if the setting Lamp & laser is set to the option Disable all. For more information, see section Device settings.
Switch single shot <> Video: Switch between the recording modes Single shot and Video.
Switch between two latest palettes: Switch between the two last-used color palettes. For more information, see section Changing the color palettes.
Switch temperature range: Cycle through the camera temperature ranges. For more information, see section Camera temperature range.
Switch screen rotation On <> Off: Switch between enabled/disabled screen rotation.
Save: Save an image.
Save + Prompt for note: Save an image and display the note annotation tool.
Save + Prompt for table: Save an image and display the table annotation tool.
Save + Prompt for voice annotation: Save an image and display the voice annotation tool.
Save + Prompt for sketch: Save an image and display the sketch annotation tool.
Save + Select annotation from menu: Save an image and display the annotation tool menu.
Preview: Display a preview image.
Preview + Prompt for note: Display a preview image and the note annotation tool.
Preview + Prompt for table: Display a preview image and the table annotation tool.
Preview + Prompt for voice annotation: Display a preview image and the voice annotation tool.
Preview + Prompt for sketch: Display a preview image and the sketch annotation tool.
Preview + Select annotation from menu: Display a preview image and the annotation tool menu.
Using the camera lamp as a flash
The camera lamp can be used as a flash for the digital camera. When the flash function is enabled, the camera lamp will flash when an image is saved by pulling the trigger.
The availability of this feature is dependent on the lens model.
You can also turn on the camera lamp to use it as a flashlight.
Follow this procedure:
Push the navigation pad to display the menu system.
Select
(Settings) and push the navigation pad. This displays the Settings menu.Use the navigation pad to select Device settings > Lamp & laser.
To use the camera lamp as a flash, do one of the following:
-
To enable the camera lamp function, select Enable lamp & laser and push the navigation pad. To turn on/off the camera lamp, use the swipe-down menu, see section Swipe-down menu.
To enable the flash function, select Enable lamp & laser + Use lamp as flash and push the navigation pad.
To disable the camera lamp and flash functions, select Disable all and push the navigation pad.
-
You can also assign the function Switch camera flash On <> Off to the programmable button. For more information, see section Programmable button.
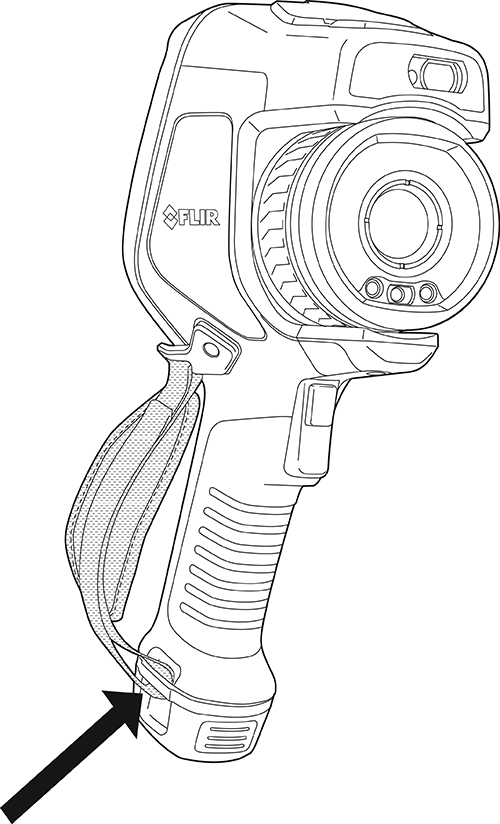
Hand strap
The upper part of the hand strap is attached to the camera by a bracket. There is one bracket for the left side and one for the right side of the camera.
The lower part of the hand strap is threaded through the attachment point at the base of the camera.
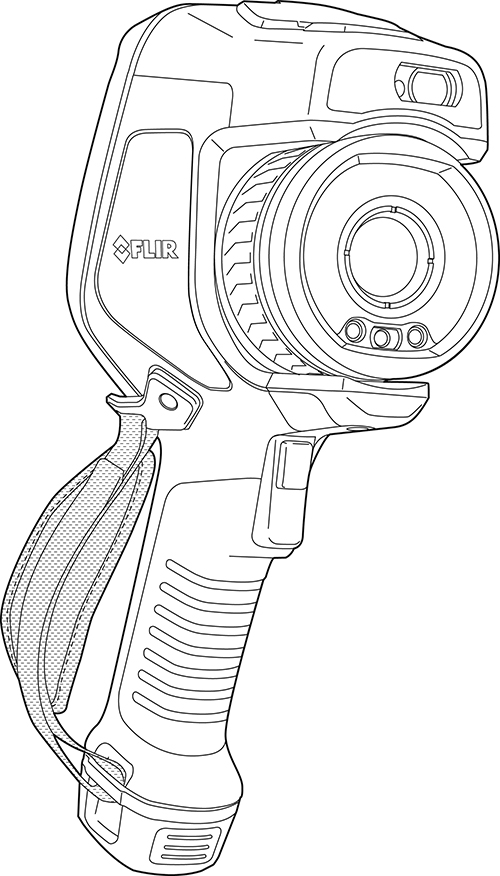
Mounting the hand strap
Fit the upper part of the hand strap into the bracket.
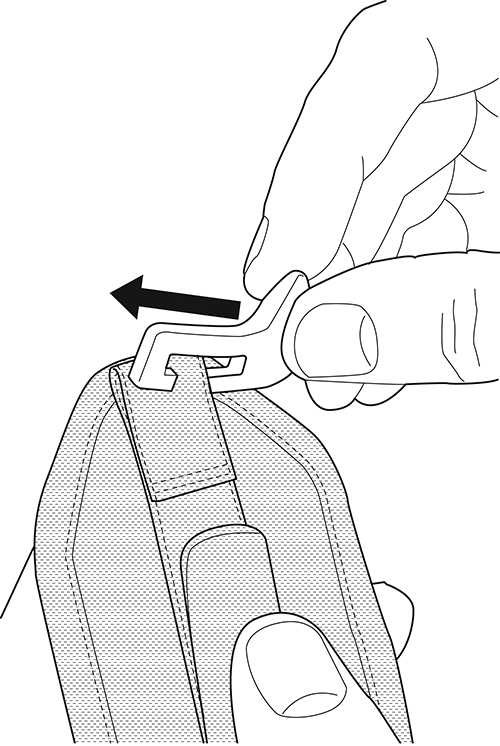
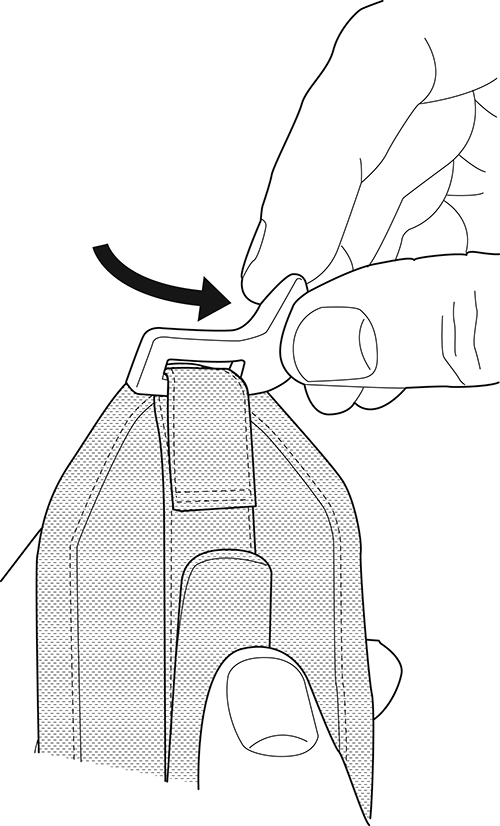
Fit the bracket in place on the camera and tighten the screw with the supplied Torx key.
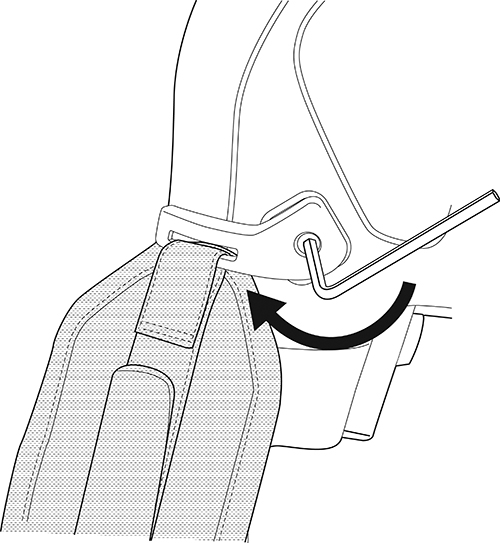
Thread the loose strap through the attachment point at the base of the camera. Secure the strap with the hook-and-loop fastener.
Lanyard strap
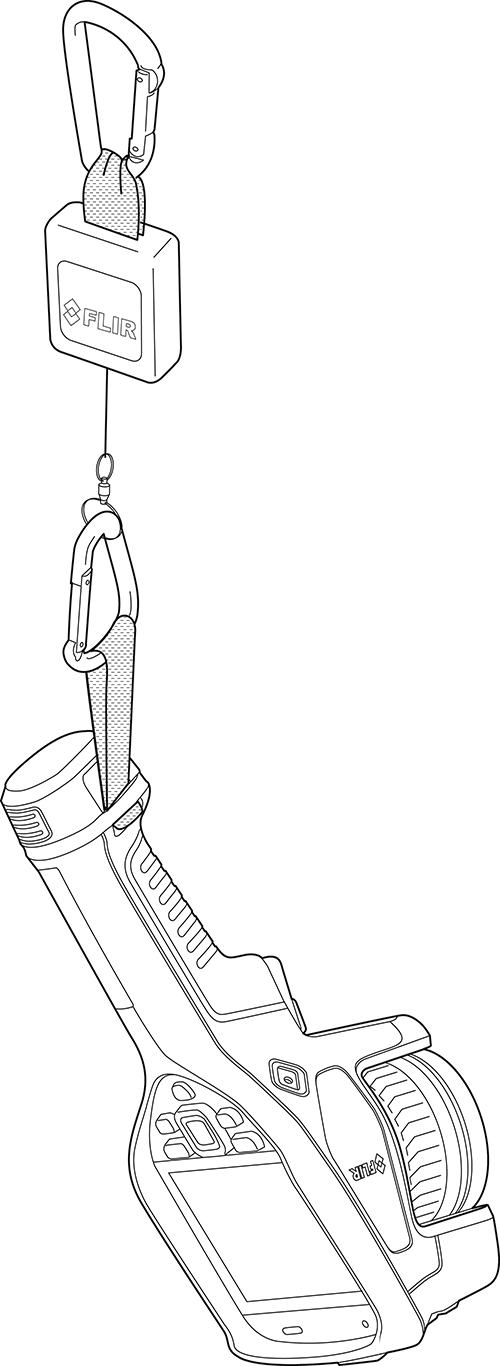
To mount the lanyard strap, do the following:
Remove the camera battery.
Starting with the FLIR logo part, thread the lanyard strap through the attachment point at the base of the camera.
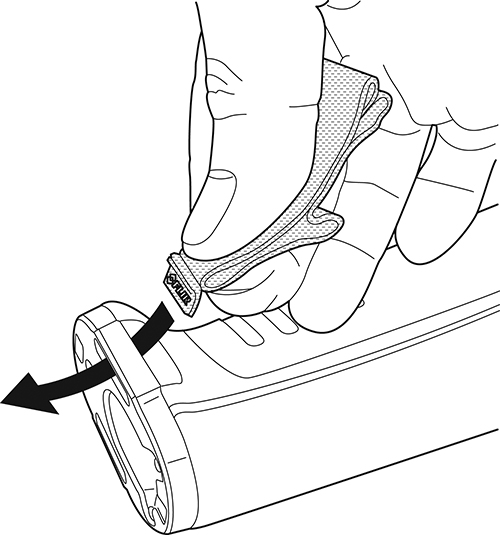
Pull the entire lanyard strap through the attachment point until it stops.
Wrist strap
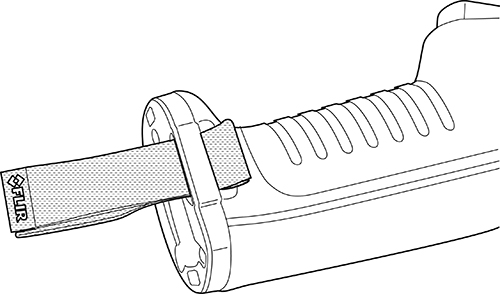
The wrist strap can also be used to attach a carabiner to the camera.
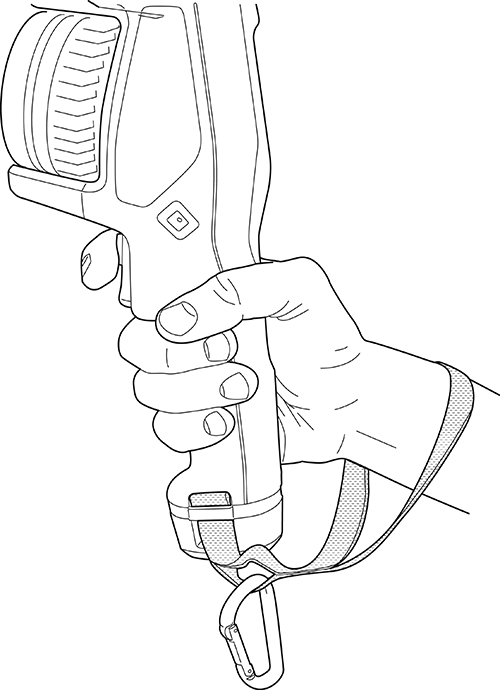
To mount the wrist strap, do the following:
Remove the camera battery.
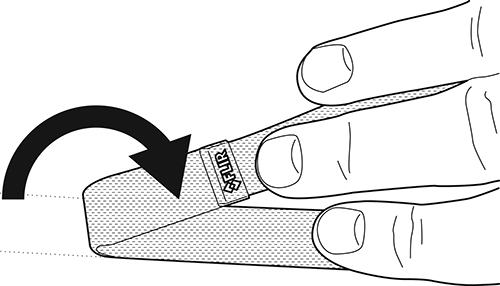
Fold the wrist strap. Make sure that the part with the FLIR logo faces away from the bend.
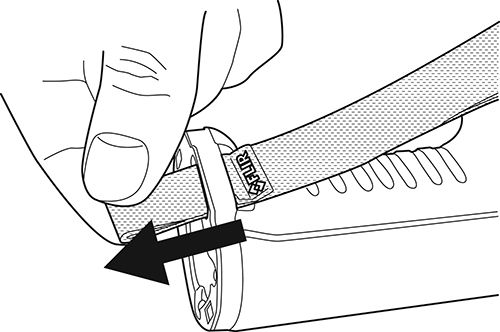
Thread the bent wrist strap through the attachment point at the base of the camera.
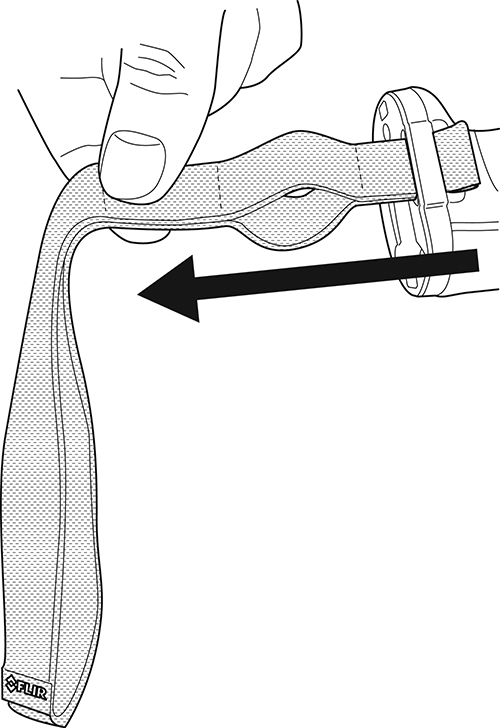
Pull the entire wrist strap through the attachment point until it stops.
Front protection
To protect the camera lens and the laser distance meter, you can attach the front protection by using the supplied fastening device.
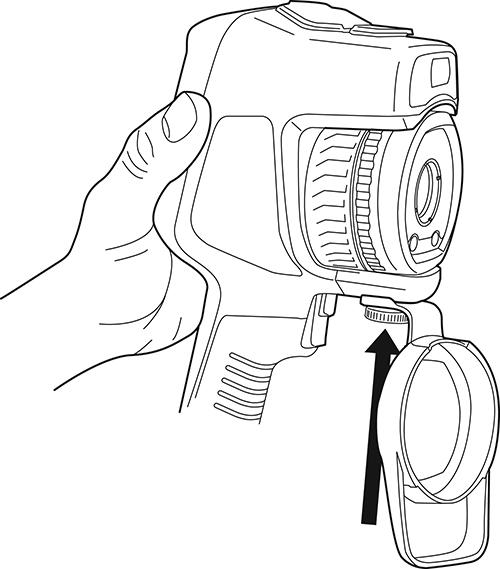
Changing camera lenses
Applicability: Camera models with an exchangeable lens.
If the new lens has not been used with the camera before, the lens–camera combination must be calibrated after the lens has been mounted. See section Calibrating the lens–camera combination for information on how to do this.
Do not touch the lens surface when you change lenses. If this happens, clean the lens according to the instructions in Infrared lens.
Follow this procedure:
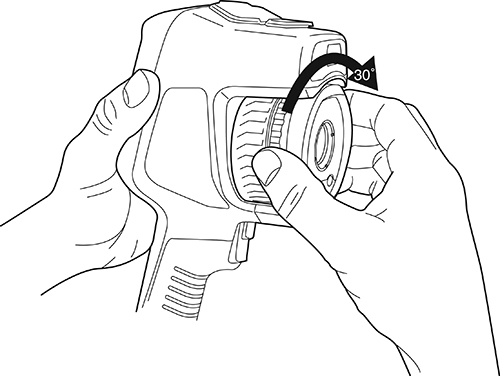
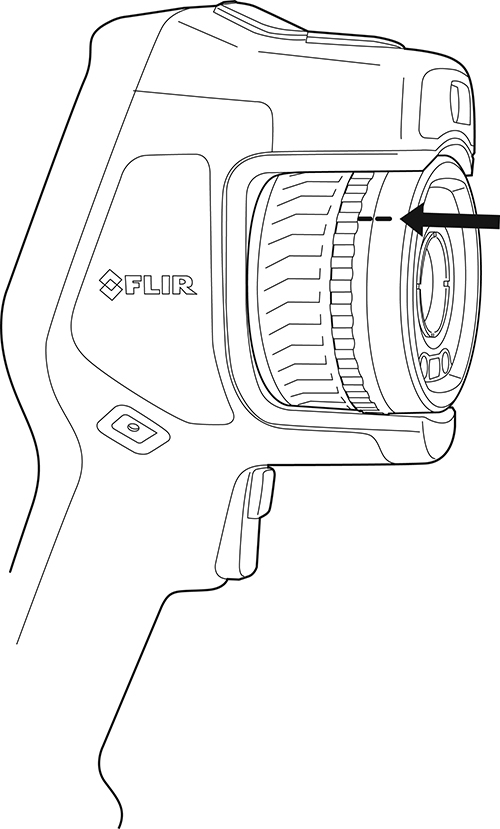
Take a firm grip around the inner ring of the lens. Rotate the inner ring 30° counter-clockwise until it stops.
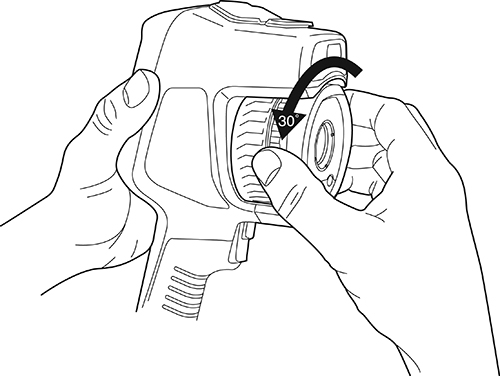
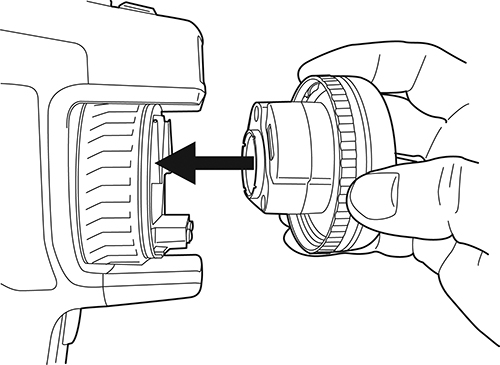
Carefully pull out the lens.
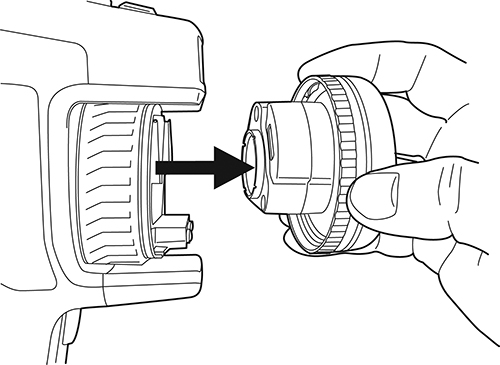
The infrared detector is now fully exposed. Do not touch this surface. If you see dust on the detector, follow the instructions in Infrared detector.
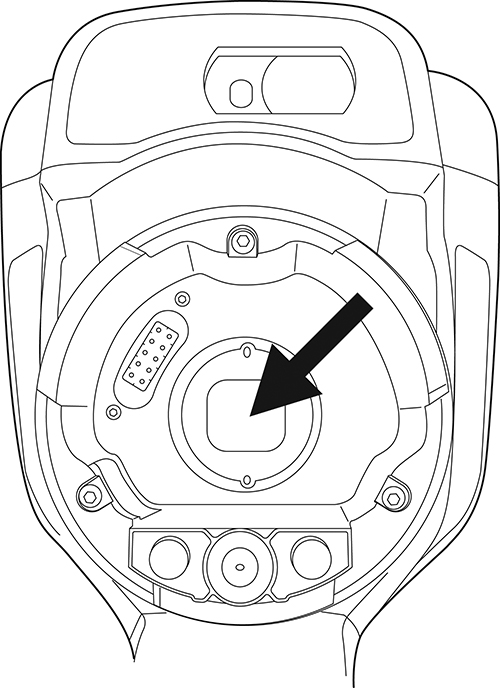
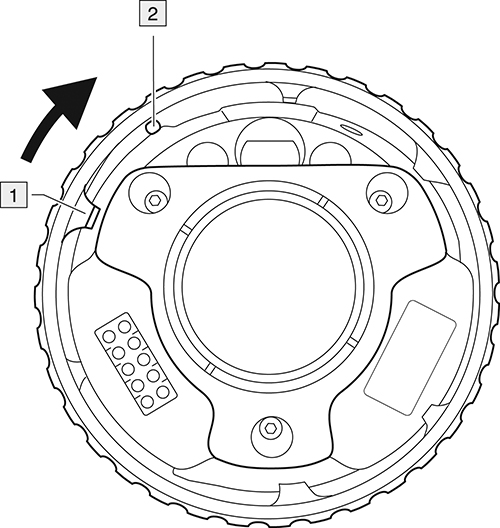
Make sure that the inner ring of the camera lens is fully in its open position.
Correct: The tooth (1) is in its end position at the black stop pin (2).
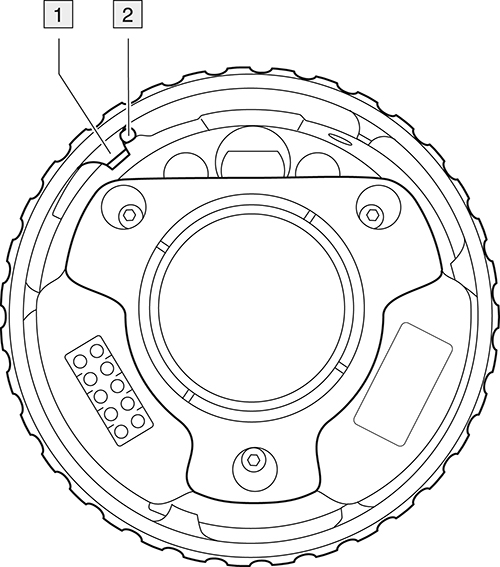
Wrong: You must rotate the inner ring until the tooth (1) reaches the black stop pin (2).
Carefully push the lens into position.
Rotate the inner ring of the lens 30° clockwise. The lens makes a click when it locks in place.
Make sure that the two index marks are aligned, indicating that the lens is locked in place.
Calibrating the lens–camera combination
Applicability: Camera models with an exchangeable lens.
Introduction
Before a new lens can be used with the camera, the lens–camera combination must be calibrated.
For lens models with the AutoCal feature, the calibration can be performed by the user. The AutoCal procedure requires a calibration target, which is included in the lens package.
For other lens models, the calibration must be performed by a FLIR service department.
For lenses that ship with the camera, the lens–camera combination is factory calibrated.
AutoCal procedure
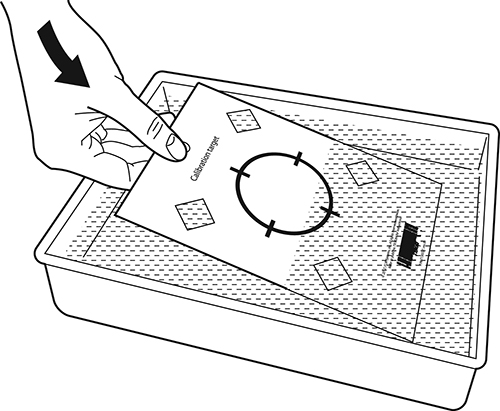
Dip the calibration target in water for 1 second and let the excess drip off.
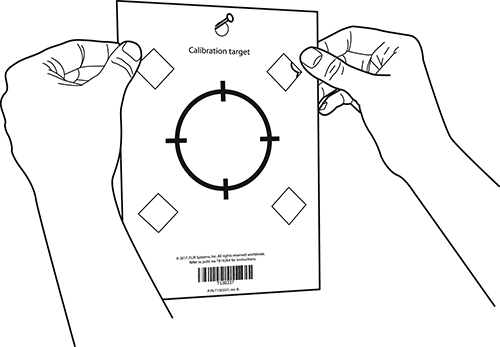
Tape or hang the calibration target on a wall.
Mount the new lens on the camera according to the procedure in section Changing camera lenses. When the lens is mounted, the calibration wizard starts automatically.
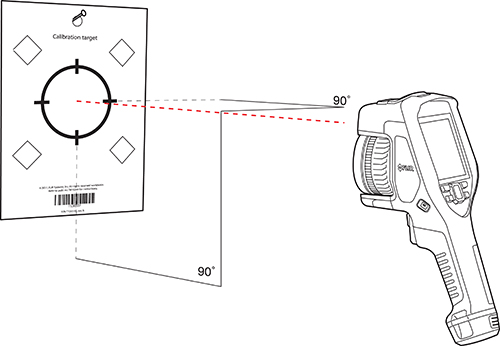
From a distance of 2 m (6.6 ft.), aim the camera toward the crosshair, using the laser pointer. The camera will take a picture automatically.
NoteMake sure the camera’s optical path is perpendicular to the calibration target. See the image below.
In the camera, align the thermal and visual images (indicated by the two squares in the image below), using the touchscreen arrows. The lens–camera combination is now calibrated.
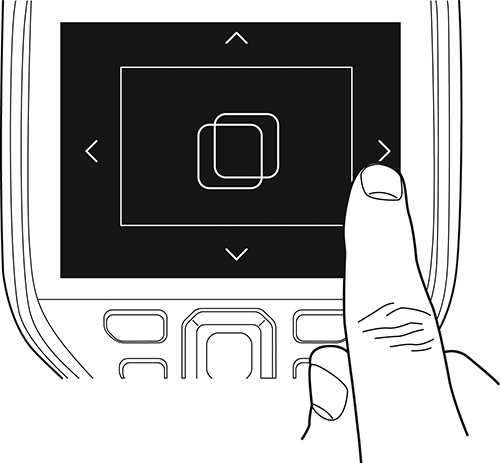
To repeat the procedure at a later time, go to Settings > Device settings > Camera information > Calibration > Calibrate lens....
Calibrating the compass
It is recommended that the compass is calibrated every time you move the camera to a new location.
Follow this procedure:
Push the navigation pad to display the menu system.
Select
(Settings) and push the navigation pad. This displays the Settings menu.Use the navigation pad to select Device settings > Geolocation > Compass.
Make sure the compass is enabled by toggling the switch.
Select Calibrate compass and push the navigation pad. Follow the on-screen instructions.
NoteYou must rotate the camera slowly.