Inspection Route
General
FLIR Inspection Route is a solution that streamlines thermal inspections and simplifies data collection and reporting. The solution includes FLIR software and camera support for preparation, inspection, and post-processing.
With the Inspection Route function, the camera guides the operator along a predefined route of inspection points, where images and data are collected in a structured manner. FLIR Inspection Route speeds up post-processing and reporting by ensuring that nothing is missed and that all inspection results are organized right from the start.
The inspection work flow is defined by an inspection route file, with a high degree of flexibility. It is possible to configure an automated work flow, where the camera automatically sets the status and steps to the next inspection point when an image is saved. The operator can also manually select the status, add comments, and add more images.
The inspection route work flow typically involves the following steps:
Prepare the inspection route file, using one of the following methods:
The FLIR Thermal Studio application.
Your own solution. The FLIR Thermal SDK can be used to build your own export/import software or to interface your existing asset management system.
Create a file in the camera.
Manually edit a file.
Add the inspection route file to the camera memory card.
Perform the inspection using the camera.
Move the results from the camera using the USB cable or the memory card, or upload the results to FLIR Ignite.
Import the results into FLIR Thermal Studio or your own image management and reporting system.
Create an inspection route report.
FLIR Inspection Route Solution user manual
The FLIR Inspection Route Solution user manual describes how to configure an inspection route file, perform an inspection, transfer the inspection results, and create an inspection report using a camera with FLIR Inspection Route enabled, the FLIR Thermal Studio application, and the FLIR Ignite cloud service.
To access the FLIR Inspection Route Solution user manual, go to http://support.flir.com/resources/route.
User interface
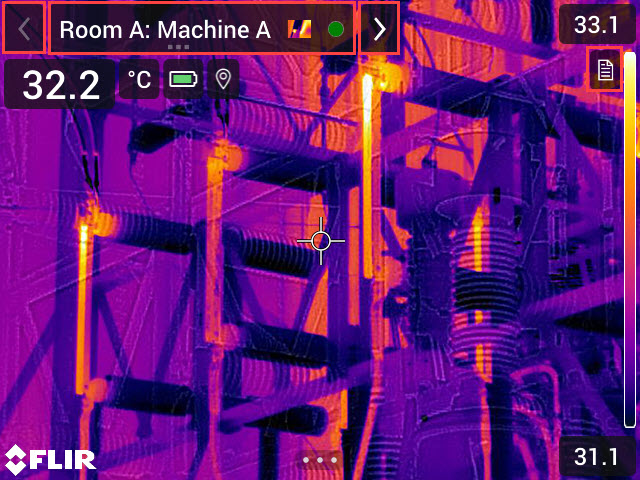
The Inspection Route overlay consists of the following parts:
Back arrow
Tap to go to the previous inspection point.
Current point indicator
Displays the name of the current inspection point.
Displays an image icon if there is an image saved for the inspection point.
Displays the status of the inspection point.
Next arrow
Tap to go to the next inspection point.
Document icon
This icon is displayed if there is a description and/or comment available for the inspection point. A description comes from the inspection route file and can, for example, include instructions or reminders for the inspection point. Comments are text notes added during the inspection. Tap the icon to display the description and/or comment.
Drop-down menu
To display the drop-down menu, tap the current point indicator.
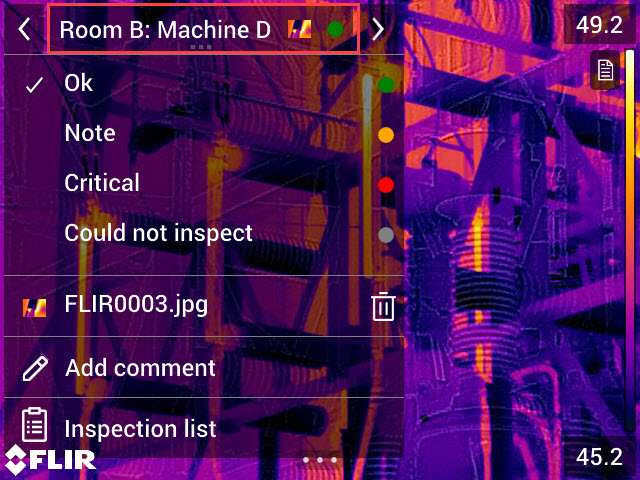
In the drop-down menu it is possible to:
Set the status of the current inspection point.
View the filenames of images and videos saved for this inspection point.
Add comments for the current inspection point.
Open the inspection list, see section Inspection list.
Inspection list
The inspection list gives an overview of the routes and their progress. It also allows editing of the inspection route.
The contents of the inspection list are defined by the inspection route file. The route structure and names come from the file.
To open the inspection list, tap the current point indicator and then tap Inspection list.
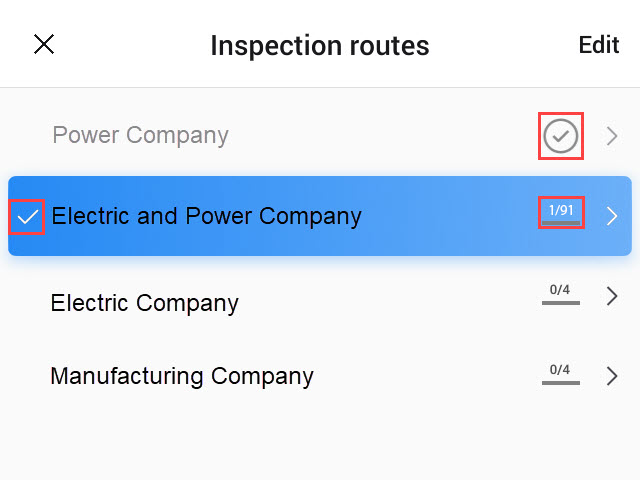
Figure 1.
Figure 1 shows an example of the inspection list:
The first inspection route is completed and locked, which is indicated by the check mark to the right.
The second inspection route has started. It includes a total of 91 inspection points, and one of them has been inspected. The second inspection route includes the current inspection point in live view, which is indicated by the check mark to the left.
To display the next level in the inspection route structure, tap an item in the list.
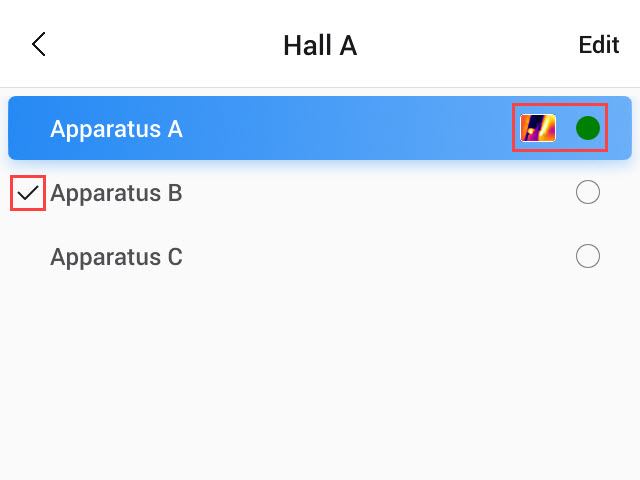
Figure 2.
Figure 2 shows an example of a level with inspection points:
The first inspection point has one or more images and the status is set to “green.”
The second inspection point is the current inspection point in live view, which is indicated by the check mark to the left.
Performing an inspection
Preparation
This procedure assumes that an inspection route file has been created. For more information, see section Creating an inspection route.
Add the inspection route file to the root folder on the memory card.
Insert the memory card into the camera.
Start the camera.
Activate the Inspection Route function by selecting
 (Settings) > Save options & storage > Inspection route, and then toggle the Inspection
route switch.
(Settings) > Save options & storage > Inspection route, and then toggle the Inspection
route switch.The camera is now ready.
Capturing inspection data
Once the camera is prepared, the inspection can start.
You can turn off the camera in the middle of an inspection. The camera will always save all data. When the camera is turned on again, it will display the first uncompleted inspection point.
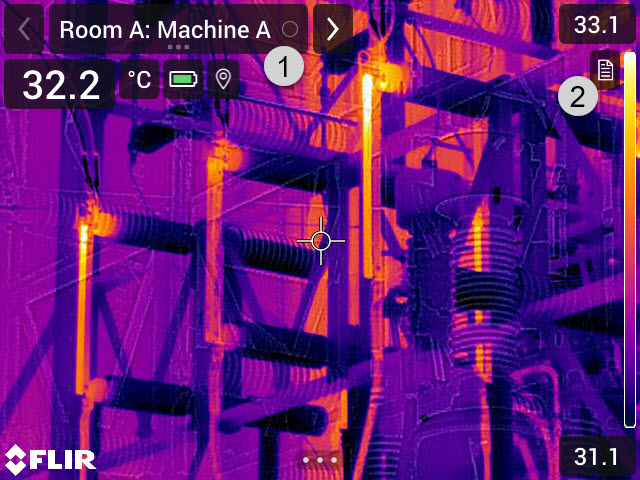
The current point indicator displays which inspection point to inspect.
To view a description of the inspection point, e.g., instructions or reminders, tap the document icon.
NoteThe document icon is only displayed if there is a description and/or comment available for the inspection point.
When you are at the inspection point, take an image. The camera automatically saves the image and sets the default status.
NoteThe default status is defined by the inspection route file. It is possible to change the default status in the camera, see section Configuration.
To edit the inspection point data, tap the current point indicator. This displays a drop-down menu where you can do the following:
Set the status of the inspection point, see section Setting the status.
Delete the image, see section Deleting an image.
Add a comment, see section Adding a comment.
NoteMake sure the current point indicator displays the inspection point you want to edit. If not, use the back or next arrow.
Tap the next arrow to continue to the next inspection point.
NoteThe camera can be configured to automatically continue to the next inspection point after saving an image, see section Configuration.
When you have completed the last inspection point in the route, a dialog box is displayed.
To lock the inspection, select Lock.
If you want to make any additional changes to the inspection, select Cancel. You make the changes from the inspection list, see section Inspection list.
Continue the inspection until you have completed all inspection points in all routes. You can at any point open the inspection list to see an overview of the routes and their progress, see section Inspection list.
When you have completed the inspection, transfer the inspection results to a computer for post-processing. For more information, see section Transferring inspection results.
Editing inspection point data
You can edit the data for the inspection point displayed by the current point indicator.
To go to another inspection point, use the back or next arrow or select the inspection point from the inspection list, see section Inspection list.
Setting the status
Tap the current point indicator. This displays a drop-down menu.
Tap the status you want to set. The set status is indicated by a check mark in the menu and by a color in the current point indicator.
The available statuses are defined by the inspection route file.
Depending on the inspection route configuration, it may be necessary to take an image before a status can be set.
Deleting an image
Tap the current point indicator. This displays a drop-down menu.
Tap
 to delete the image. This displays a dialog box.
To delete the image, tap Delete.
Adding a comment
Tap the current point indicator. This displays a drop-down menu.
Tap Add comment. This displays a soft keyboard.
Enter text by touching the screen.
When completed, tap Done.
The comment is displayed in the drop-down menu. You can also see the comment by tapping the document icon.
Saving an image
When you take an image, the camera automatically saves it to the memory card. The image is stored in a folder with the name of the current inspection route.
You can take and save multiple images of the inspection point.
For every new image, make sure that the current point indicator displays the inspection point you want to add the image to. If not, use the back or next arrow or select the inspection point from the inspection list, see section Inspection list.
Recording a video clip
You can record and save video clips of the inspection point. For more information, see section Record a video.
Make sure that the current point indicator displays the inspection point you want to add the video to. If not, use the back or next arrow or select the inspection point from the inspection list, see section Inspection list.
Viewing and editing inspection images
You can view and edit the inspection images in the image archive.
It is not possible to edit the inspection point data in the image archive. To edit the inspection point data, see section Editing inspection point data.
Inspection list
In the inspection list, you can see the progress of the inspection routes and review the inspection point results.
To see the progress and review the results, do the following:
Tap the current point indicator. This displays a drop-down menu.
Tap Inspection list. This displays a list with all inspection routes and their progress.
Tap an item in the list to display the next level in the inspection route structure.
When you reach a level with inspection points, you can see their status and if they have any images associated.
To make changes to an inspection point, tap the inspection point in the list. This takes you to the live view for that inspection point.
NoteYou can only make changes to inspection points in unlocked inspection routes.
Adding an inspection point
If the need for another inspection point arises during the inspection, you can add the inspection point directly in the camera. The new inspection point will be added to the inspection route file and the inspection data you capture for the new inspection point will be saved together with the results from the other inspection points in the route.
To add an inspection point, do the following:
Tap the current point indicator. This displays a drop-down menu.
Tap Inspection list. This displays a list with all inspection routes.
In the list, tap the inspection route where you want to add the inspection point. This displays the next level in the route structure.
Continue to tap an item in the list until you reach the level where you want to add the inspection point.
Tap Edit to enter edit mode.
Tap the
 icon on an item. The new inspection point will be added
below this item.
icon on an item. The new inspection point will be added
below this item.Enter the name of the new inspection point.
Select to add the new item as an inspection point.
Tap Done to exit edit mode.
Transferring inspection results
The inspection results are stored on the memory card:
The inspection route file (.xml) in the root folder includes the data (status, comments, and image file path) for all inspection points.
The DCIM folder includes folders with the images for each route.
You can upload the inspection results to your FLIR Ignite account or transfer the result files manually using the USB cable or the memory card. You can also open the results from the memory card and save them to a computer using FLIR Thermal Studio.
When you have transferred and safely stored the inspection results, you may want to remove the inspection route file and images from the camera.
Upload results to FLIR Ignite
Make sure the camera is connected to the internet.
Make sure the camera is paired with your FLIR Ignite account.
Select
(Settings) > Save options & storage > Inspection route > Upload inspection route. The camera now creates a compressed file (.route), which includes the inspection route file (.xml) and the image folders. The camera then uploads the compressed file (.route) to your FLIR Ignite account.
Move results manually
If you transfer the inspection results manually to a computer, you must move both the inspection route file (.xml) and the images in their route folders. It is important to maintain the DCIM folder structure.
Connect the camera to the computer with a USB cable or insert the memory card into the computer.
On the computer, create a folder for the inspection results. In that folder, create a subfolder named DCIM.
From the root of the memory card, transfer the inspection route file (.xml) to the inspection results folder on the computer.
From the DCIM folder on the memory card, transfer the image folders to the DCIM subfolder on the computer.
Remove results from camera
When you have transferred and safely stored the inspection results, you may want to remove or replace the inspection route file on the memory card. If this is not done, the camera will continue from the first uncompleted inspection point in the previous inspection when you start an inspection.
If you choose to keep, remove, or replace the current inspection route file depends on your inspection work flow and how your inspection route is designed. Some examples:
You have uploaded some results, but not yet completed the entire inspection. You keep the current inspection route file (.xml) and continue with your inspection.
You have an inspection route file with inspections for each day of the week and you have just transferred the results from the Monday inspection. You keep the current inspection route file (.xml) to be ready for the Tuesday inspection.
Next time you use the camera, you will do a new inspection. You remove the current inspection route file (.xml) and add a new inspection route file (.xml) file without any data to the root folder on the memory card.
Do not add multiple inspection route files (.xml) in the root folder on the memory card.
You may also want to remove the inspection image folders and/or the inspection images from the DCIM folder on the memory card. The camera will create new image folders when a new inspection starts.
Configuration
The behavior of the camera during the inspection route is controlled via settings in the inspection route file. It is possible to override these settings in the camera.
The camera behavior settings can be configured via the Settings menu. Select (Settings) > Save options & storage > Inspection route > Configure.
Configure menu:
Follow Inspection route: Select the check box to use the configuration from the inspection route file. Deselect the check box to make it possible to override the settings in the inspection route file.
Auto next: This setting defines if the camera after saving an image automatically will set the default status and step to the next inspection point. If most inspection points will have the default status, you will save inspection time by selecting the check box. If you often want to set the status or add comments to the inspection points, it may be more convenient to deselect the check box.
Default status: This submenu is used to select the status to be set when an image is saved. The options in the submenu come from the inspection route file.
Require image: This setting defines if the operator must save an image before it is possible to set the status of an inspection point.
Delete empty inspection points: This setting defines if all empty inspection points (no image and no status) will be removed from the inspection route file when the operator locks an inspection.
Creating an inspection route
The inspection route is defined by an XML file. The inspection route XML file specifies the route structure, consisting of multiple levels of nodes (sites/assets) and inspection points.
The inspection route file also defines the available statuses and the configuration of the camera behavior.
The inspection route file can be created using one of the following methods:
The FLIR Thermal Studio application.
Your own solution. The FLIR Thermal SDK can be used to build your own export/import software or to interface your existing asset management system.
Create a file in the camera.
Manually edit an XML file.
Creating an inspection route in the camera
Make sure that there is no inspection route XML file on the memory card.
Select
(Settings) > Save options & storage > Inspection route > Getting started > Create an empty Inspection
route.This places a basic XML file on the memory card.
In live mode, tap the current point indicator. This displays a drop-down menu.
Tap Inspection list. This displays a list with a node placeholder.
Tap Edit to enter edit mode.
In edit mode, use the following buttons to build the inspection route:
Tap
to add a new item below the selected one. You can select
the name of the new item and select if the new item is a node or an
inspection point.Tap
to delete the selected item and all of its dependents.Tap
 to add comments to the node. These comments will apply
to all of its dependents.
to add comments to the node. These comments will apply
to all of its dependents.
Tap Done to exit edit mode.
To make changes to the camera behavior configuration, see section Configuration.
When the inspection route is completed, make sure to copy the XML file on the memory card to a computer for future use. When you start an inspection in the camera, the inspection data will be written to the XML file on the memory card.
Manually editing an XML file
An example or empty XML file can be created on the memory card in the camera. This file can be used as a basis when manually editing an XML file.
Make sure that there is no inspection route XML file on the memory card.
Select
(Settings) > Save options & storage > Inspection route > Getting started.Select one of the following:
Create an example Inspection route: This creates an example XML file with a multi-level structure on the memory card.
Create an empty Inspection route: This creates a basic XML file on the memory card.
Transfer the example XML file to a computer for editing.