Routing
This chapter describes the FLIR Inspection Route solution in general and how to create routes and inspection reports on the Routing tab.
The inspection route functionality is available in FLIR Thermal Studio Pro.
FLIR Inspection Route
FLIR Inspection Route is a solution that streamlines thermal inspections and simplifies data collection and reporting. The solution includes FLIR software and camera support for preparation, inspection, and post-processing.
With the Inspection Route function, the camera guides the operator along a predefined route of inspection points, where images and data are collected in a structured manner. FLIR Inspection Route speeds up post-processing and reporting by ensuring that nothing is missed and that all inspection results are organized right from the start.
The inspection work flow is defined by a Route file, with a high degree of flexibility. It is possible to configure an automated work flow, where the camera automatically sets the status and steps to the next inspection point when an image is saved. The operator can also manually select the status, add comments, and add more images.
The Route file is used as template when starting an inspection in the camera. It is possible to have multiple Route files in the camera and the operator can run multiple inspections based on any of the Route files in the camera.
Reference images provide aiming support, increase quality in decision making in the field, and speeds up data collection by defining a baseline for the user based on a set of predefined parameters.
Work flow
The work flow typically involves the following steps:
Prepare one or more Route files.
Add the Route file(s) to the camera memory card.
Perform one or more inspections based on the Route files available on the memory card.
Transfer the inspection results to a computer, using one of the following methods:
Upload the results to cloud storage and then automatically sync the files with the computer.
Upload the results to cloud storage and then manually download the files to the computer.
Transfer and save the results manually using the USB cable or the memory card.
Create an inspection report.
FLIR Inspection Route Solution user manual
The FLIR Inspection Route Solution user manual describes how to configure Route files, perform inspections, transfer inspection results, and create inspection reports using a camera with FLIR Inspection Route enabled, the FLIR Thermal Studio application, and the FLIR Ignite cloud service.
To access the FLIR Inspection Route Solution user manual, go to http://support.flir.com/resources/route.
First generation FLIR Inspection Route
The first generation of the Inspection Route functionality in the camera was based on an inspection route file in .xml format. The new Inspection Route functionality is based on a Route file in .routex format.
The camera still supports the xml based functionality. However, it is not possible to use a mix of .xml and .routex files on the camera memory card.
FLIR Thermal Studio supports both file formats.
User manual
For a description of the xml based FLIR Inspection Route functionality, refer to the user manual for the FLIR Inspection Route Solution, First generation.
To access the user manual, go to http://support.flir.com/resources/route.
Create Route file
You can create a Route file in FLIR Thermal Studio.
General
The Route file specifies the structure, consisting of multiple levels of locations, assets, and inspection points. The Route file also specifies the available statuses and the configuration of the camera behavior and includes any reference images.
You can build the route structure manually in FLIR Thermal Studio.
It is also possible to import a structure from an asset management system. The file to import must be an Excel file (.xslx) or a Comma Separated Values file (.csv). After the import, you can make additional changes to the structure and configure the Route file manually.
Create a Route file
Select the Routing tab, and then select the Routes view.
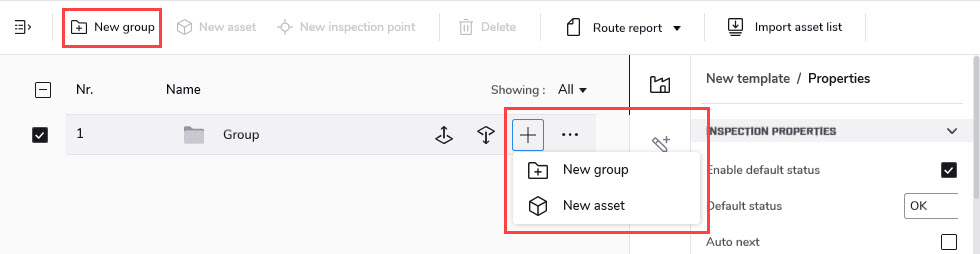
Groups:
To add a group at Level 1, click New group on the top toolbar.
Point at the group and then click the + button that appears. This displays a menu.
Click New group to add a group at a level below this group.
Click New asset to add an asset below this group.
Assets:
Point at the asset and then click the + button that appears. This adds an inspection point to the asset.

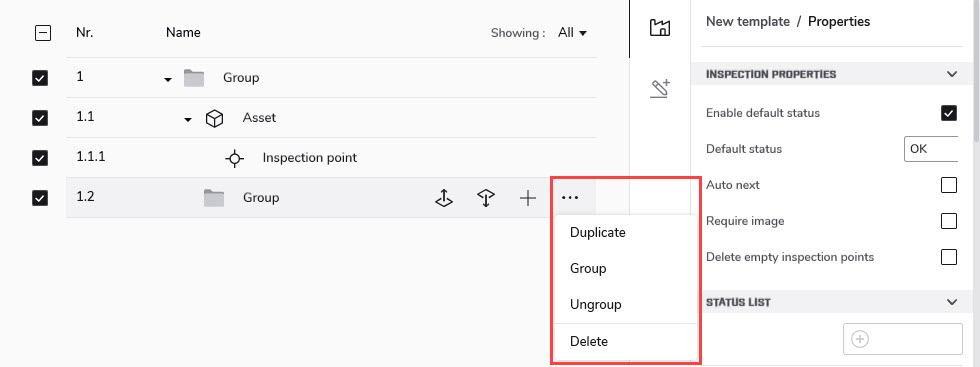
Groups, assets, and inspection points:
Point at the item and then click the buttons that appear.
Click the Move up or Move down button to move the item.
Click the three dots button. This displays a menu.
Click Duplicate to duplicate this item and its dependents.
Click Group to add a group at a level above this item.
Click Ungroup to delete this group and move its dependents to the group above.
Click Delete to delete the item and all of its dependents.
Enter the asset properties that will be displayed in the camera user interface as guidance to the operator:
In the center pane, click the item. This displays the item properties in the right pane.
For all locations, assets, and inspection points, enter a Name in the properties pane.
For the inspection points, you may want to add a Description, for example instructions or reminders.
Add an reference image to an inspection point:
In the center pane, click the inspection point.
On the top toolbar, click Show file explorer. This displays the library in the left pane.
Drag an image from the left pane and drop it on the Add image button in the right pane.
For more information, see section Reference images.
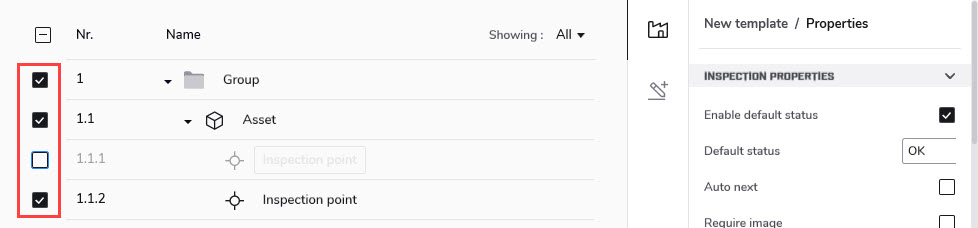
Include asset check box:
Only clear the Include asset check box if you want to exclude the item when you export the route. You may, for example, want to create a Route file for only a part of the structure and then you clear the check box for the items you want to exclude.
Configure the settings that control the behavior of the camera during the inspection:
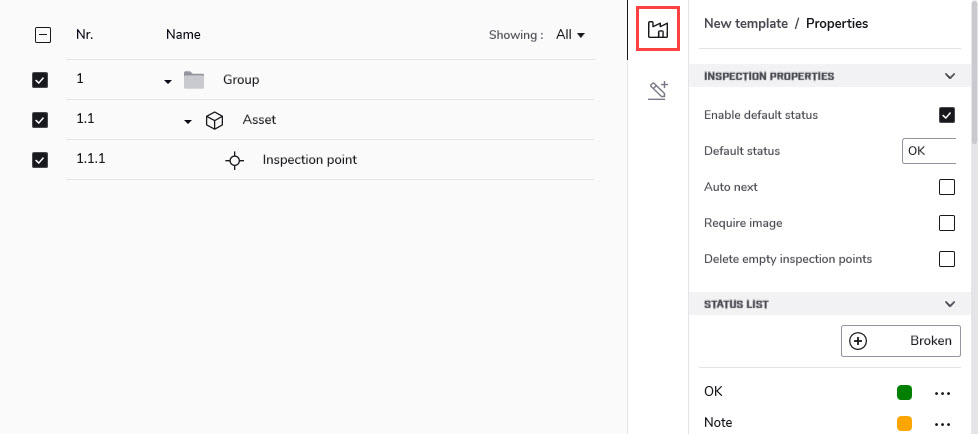
On the right pane toolbar, click the route properties button. This displays the route properties in the right pane.
To change the default status, first select the Enable default status check box. Then click the Default status field and select a status from the menu that appears.
Auto next: This setting defines if the camera after saving an image automatically will set the default status and step to the next inspection point. If most inspection points will have the default status, you will save inspection time by selecting the check box. If you often want to set the status or add comments to the inspection points, it may be more convenient to deselect the check box.
Require image: This setting defines if the operator must save an image before it is possible to set the status of an inspection point.
Delete empty assets: This setting defines if all empty inspection points (no image and no status) will be removed from the Inspection file when the inspection is finished.
Status list: This setting defines the text and colors of the statuses. To add a status, first enter the name in the field, and then click the + button.
To save the Route file, click Save at the top right corner and save as a .routex file.
The Route file (.routex) is now ready to be used as template for inspections in the camera.
Import a structure
Select the Routing tab, and then select the Routes view.
On the top toolbar, click New route. This opens the route workspace screen.
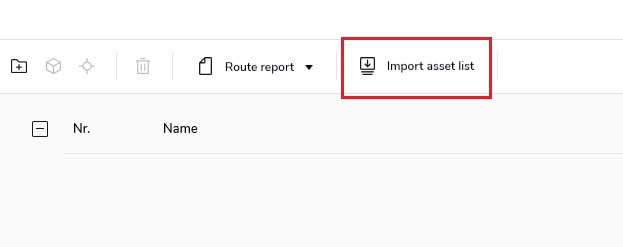
On the top toolbar, click Import asset list.
In the Open window, open the file (.xlsx or .csv) from your asset management system.
In the Column mapping window, select how to map the columns in your file to fields in FLIR Thermal Studio. The import function supports up to four groups (locations), one asset and one inspection point. A total of six levels are supported.
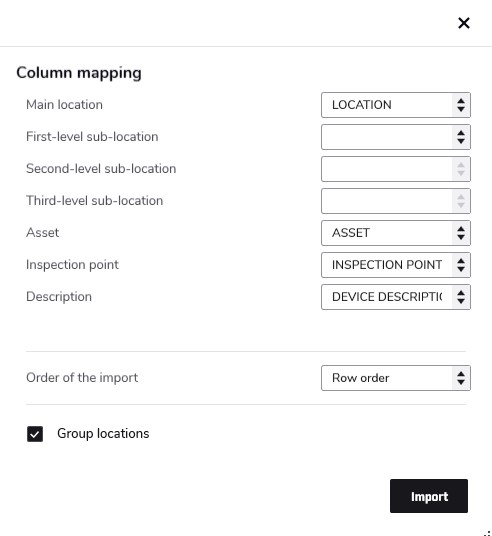
To make your imported route more manageable, consider grouping your locations. This can be done by selecting the Group locations checkbox.
NoteThe column structure in the xlsx or csv document does not have to be in order, you can select the column mapping in the order that you want in Thermal Studio.
When you have completed the mapping, click Import. This displays your structure in the route workspace.
To make additional changes to the route structure and configure the Route file, see section Create a Route file.
To save the Route file, click Save at the top right corner and save as a .routex file.
Import structure
To import the route structure from a .xlsx or .csv document, ensure that the columns and rows are formatted correctly for a successful import. The table below contains an example of the required structure. You can copy-paste this structure into your own file, or download a sample .xlsx file from Route Import Structure.
The column for inspection point is not mandatory. If left unmapped, Thermal Studio will automatically create inspection points (with the same name as the assets).
|
LOCATION |
SUB LOCATION 1 |
SUB LOCATION 2 |
SUB LOCATION 3 |
ASSET |
INSPECTION POINT |
DEVICE DESCRIPTION |
|
Main Group 1 |
Sub Group 1 |
Sub Group 2 |
Sub Group 3 |
Asset 1 |
Insp Point 1 |
Device description |
|
Main Group 1 |
Sub Group 1 |
Sub Group 2 |
Sub Group 3 |
Asset 2 |
Insp Point 1 |
Device description |
|
Main Group 1 |
Asset 3 |
Insp Point 1 |
Device description |
|||
|
Main Group 1 |
Sub Group 1 |
Sub Group 2 |
Asset 4 |
Insp Point 1 Insp Point 2 |
Device description |
|
|
Main Group 1 |
Sub Group 1 |
Asset 5 |
Insp Point 1 |
Device description |
||
|
Main Group 2 |
Sub Group 1 |
Asset 6 |
Insp Point 1 |
Device description |
||
|
Main Group 2 |
Sub Group 1 |
Sub Group 2 |
Sub Group 3 |
Asset 7 |
Insp Point 1 Insp Point 2 |
Device description |
|
Main Group 2 |
Large Asset 1 |
Insp Point 1 Insp Point 2 |
Device description |
|||
|
Main Group 2 |
Large Asset 2 |
Insp Point 1 Insp Point 2 Insp Point 3 |
Device description |
Create inspection report
When you have completed an inspection in the camera, you can create an inspection report on the Routing tab in FLIR Thermal Studio.
Prepare inspection results
The inspection results, including all inspection data and images, are stored in the Inspection file (.route).
Make sure you have the Inspection file (.route) available on your computer.
Uploaded results
When uploading the inspection results to FLIR Ignite, the camera uploads the Inspection file (.route) to your FLIR Ignite account.
If FLIR Ignite Sync is set up for automatic sync, the Inspection file (.route) should be in your sync folder on the computer.
To manually transfer the Inspection file (.route) from FLIR Ignite to your computer, do the following:
Sign in to your FLIR Ignite account.
Find the .route file.
Select the .route file by clicking the row.
Click the DOWNLOAD button.
Results on memory card
To transfer the Inspection file (.route) from the camera memory card to your computer, do the following:
Connect the camera to the computer with a USB cable or insert the memory card into the computer.
Go to the folder named Inspections located at the root of the memory card.
Save the Inspection file (.route) to the computer.
In FLIR Thermal Studio, you can also open the Inspection file (.route) directly from the Inspections folder on the camera memory card.
Open inspection results
Start FLIR Thermal Studio.
Select the Routing tab, and then select the Inspections view.
On the top toolbar, click Open inspection file.
In the open window, find the location for the Inspection file (.route) and open the .route file.
To review the inspection results, click the inspection points one by one, or use the arrow buttons at the top of the right pane. The inspection image(s), reference image (if there is one), status, and any comments are available in the right pane.
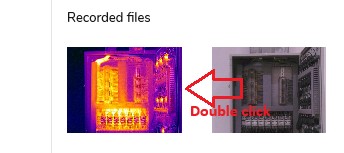
You can edit the inspection images, view images in the Comparison view, change status and add more information to the inspection points. To open the inspection image editor, double-click the image.
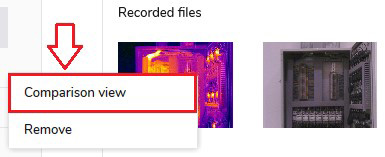
To open images using the Comparison view, right click the image on the right pane and select Comparison view.
 Note
In the Comparison view you can only edit the inspection image. The reference image can not be edited.
Save changes:
To save the changes in the original inspection file, click Save at the top right corner.
To save the changes in a new file, click the button with three dots at the top right corner and then click Save as.
Create an inspection report
Open the inspection results, see section Open inspection results.
On the top toolbar, click Generate inspection report. This opens the Available templates window.
In the Available templates window, click a template and then click Select.
Inspection default template: Template for inspection reports (with this template, the reference images will not be included in the report).
Inspection default ref image: Template for inspection reports with reference images. See also section Report with reference images.
The report workspace screen opens. You can make additional changes to the report using the normal reporting functions.
You can save the report as an .atr file. This will allow you to continue working with the report later. At the top right corner, click the button with three dots and then click Save as report.
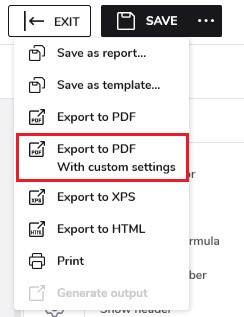
You can export the report to, for example, a PDF file. At the top right corner, click the button with three dots and then click Export to PDF. In addition, you can also export reports to PDF using custom quality on the exported images. To do so, go to Settings/Reporting and select the desired custom image quality, or click on the three dots in report editor and then click the Export to PDF with custom settings option.
Critical status inspection report
It is possible to create inspection reports that only include images with critical status.
To enable the critical status inspection report, do the following:
Select the Routing tab, and then click Open Routing settings on the top toolbar.
On the General tab, select the Generate report pages with critical assets only check box.
Do not change the name of the default status. Only images with the status name Critical will be included in the critical status inspection report.
Reference images
Reference images enable guidance support, increase quality in decision making in the field, and speeds up data collection by defining a baseline for the user based on a set of predefined parameters.
With FLIR Thermal Studio, it is possible to convert the images from an inspection to reference images. You can also add reference images manually when you create a Route file.
The camera can be configured to use the same measurement tools, measurement parameters, temperature scale values, and color palette as in the reference images.
Create Route file with reference images from inspection
You can export an inspection to a Route file (.routex) and use the inspection images as reference images in the new Route file.
Create a Route file, see section Create a Route file or section Import a structure.
NoteDo not add any reference images at this point. It is only possible to have one reference image for each inspection point. If there already is a reference image in the Route file, it will not be possible to replace it with an inspection image.
Perform an inspection with the camera and take reference images for all inspection points.
Make sure you have the inspection results available on your computer, see section Prepare inspection results.
Start FLIR Thermal Studio.
Select the Routing tab, and then select the Inspections view.
On the top toolbar, click Open inspection file and open the Inspection file (.route).
On the top toolbar, click Export to new route.
When asked, click Yes to save the inspection images as reference images.
For inspection points with more than one image, select the image you want to use as reference image. Then click Export.
Add reference images manually
You can manually add reference images to a Route file in FLIR Thermal Studio.
Select the Routing tab. Do one of the following:
Import an existing Route file: On the top toolbar, click Import route and open a Route file (.routex).
Start to create a new Route file, see section Create a Route file.
In the center pane, click the inspection point.
On the top toolbar, click Show file explorer. This displays the library in the left pane.
Drag an image from the left pane and drop it on the Add image button in the right pane.
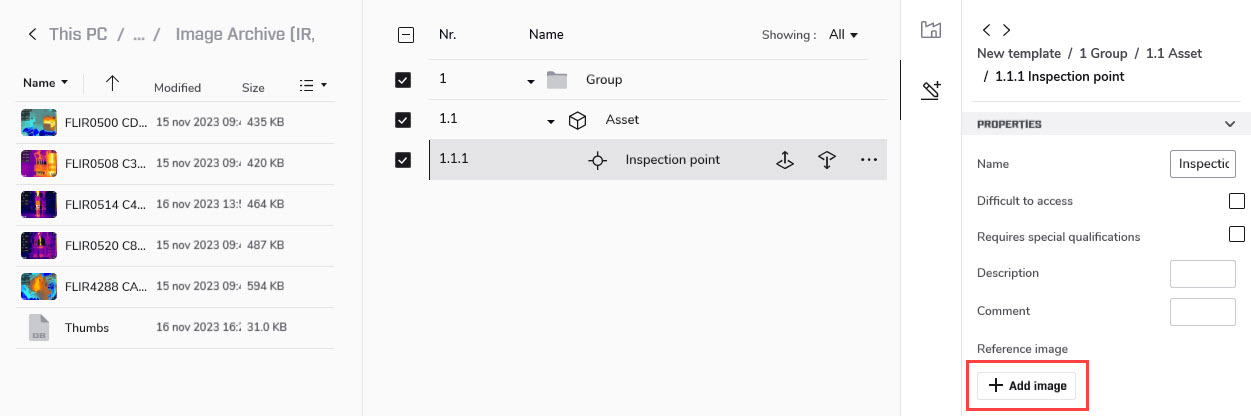
To delete the reference image, click the Clear reference image button in the right pane.
To edit the reference image, double-click the image. This opens the image editor.
Report with reference images
With the Inspection default ref image template, the reference images will be included in the report.
You can also add reference images to your own report templates.
To add reference images to a report template, do the following:
Select the Reporting tab, and then select the Templates view.
Right-click the template you want to use, and then click Edit.
In the page pane, click the report page where you want to add the reference image.
On the top toolbar, click Add page element. This displays the available elements in the left pane.
In the elements pane, click Thermogram. A placeholder for a thermal image is added to the report page.
In the right pane, scroll down to the Tag field and enter reference_image.
You may also want to add a Text box with information that this is a Reference image.
