Batch processing
This chapter describes the Batch edit tab and how you create and run batches of jobs.
General
Use the batch processing feature for automation of repetitive tasks when editing and normalizing thermal images. Operations that can be automated are, for example:
Set parameters.
Change settings.
Modify measurements.
Apply isotherms.
Change the palette.
Add a logo.
When processing batches of jobs, the following outputs are available:
Radiometric images (.jpeg) for further processing.
Plain overlay images for sharing online or with customers.
Transcoder from a radiometric sequence to an AVI video file.
Radiometric data exported to CSV files.
Batch jobs are saved in the .atb (advanced thermal batch) file format.
Navigation
This image shows what the user interface looks like when working with a batch.
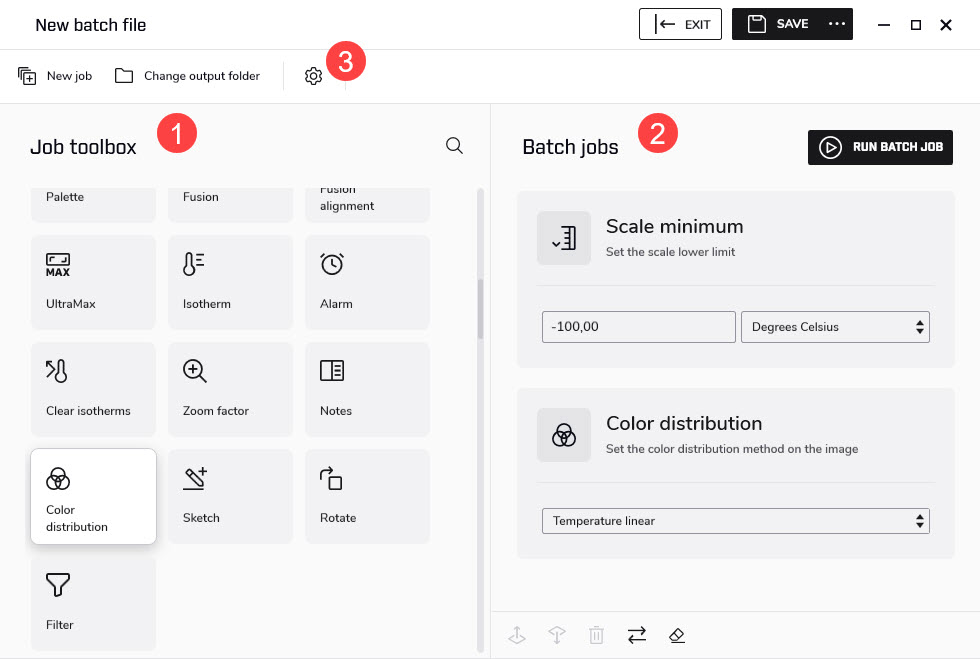
Job toolbox pane
The toolbox lists all the jobs that can be run in a batch. The jobs are grouped into categories, such as the Output targets, Image, and Parameters categories.
Batch jobs pane
This is the workspace where you create the batch by adding jobs and setting values. As more jobs are added, a batch execution list is created.
A new job is normally added at the end of list. Use the icons at the bottom of the pane to move the jobs up or down the list, to reverse the execution order of the jobs, to remove jobs from the list, or to clear the list of all jobs.
Click the icon to open the Settings window.
General tab: If the Open output folder when done check box is selected, File Explorer will open when the batch job is completed and show the output files in the defined output folder.
Image Overlay tab: Configure if and how you want to use an image overlay for batch processing. For more information, see section Image Overlay.
Start a new batch
Select the Batch edit tab.
On the top toolbar, click New job. This opens the batch workspace screen.
In the Job toolbox pane, click the jobs you want to add to the batch. Point to a job to see a short description. The jobs are added to the Batch jobs pane.
Note that some jobs have additional settings. In the Batch jobs pane, make any changes to the job settings.
Use the icons at the bottom of the pane to:
Move a selected job up or down the list.
Remove a selected job from the list.
Reverse the order of the selected jobs.
Remove all jobs and clear the list.
Verify that you have added an Output target job as the last job in the batch.
NoteAt least one Output target job must be run in the batch. If no output target has been selected, the job Radiometric JPEG will be added automatically and run as the last job in the batch.
To run the batch job, click Run batch job at the top of the right pane. This opens the image workspace screen.
In the left pane, select images and/or folders and drag-and-drop them into the right pane.
Use the icons at the bottom of the right pane to:
Move a selected file up or down the list.
Remove a selected file from the list.
Sort the files by name, or by date and time.
Reverse the order of the selected files.
Remove all files and clear the list.
To change the output folder, click Change output folder at the top toolbar.
To start the processing, click Run batch job at the top toolbar.
When the processing is completed, click Go to output at the top toolbar. This opens the output folder in the left pane.
To take a closer look at a result file and edit it if necessary, double-click the file in the left pane. This opens the image in the image editor. For more information, see Image editor.
Save a batch as a template
Select the Batch edit tab.
On the top toolbar, click New job. This opens the batch workspace screen.
Select which jobs to run, set values where applicable, and place the jobs in the correct order. See also section Start a new batch.
To save the batch as a template, click Save at the top right corner.
Start a predefined or saved batch
Select the Batch edit tab.
In the left pane, click the batch you want to run.
In the right pane, click Run job. This opens the image workspace screen.
Select the images to be processed and place them in the correct order. See also section Start a new batch.
To start the processing, click Run batch job at the top toolbar.
Create a panoramic image
Use the Panorama functionality to stitch a sequence of thermal images together into one single panoramic image.
The sequence of image files used as input must come from the same recording.
The order of the image files in the sequence is not important.
Only one panoramic image can be created at a time. If you select image files from multiple sequences as input, only the images of the first selected sequence will be processed.
To create a panoramic image, follow this procedure:
Select the Batch edit tab.
In the left pane, click Panorama.
In the right pane, click Run job. This opens the image workspace screen.
In the left pane, select a folder or individual images and drag-and-drop them into the right pane.
To start the processing, click Run batch job at the top toolbar.
When the processing is completed, click Go to output at the top toolbar. This opens the output folder in the left pane.
Optionally: Double-click the panoramic image in the left pane. This opens the image editor where you can change zoom, change palette, crop, or rotate the panoramic image.