Getting started
Before operating the camera, read and follow the warnings and cautions in section Safety information.
For information about LTE and connectivity, contact https://support.flir.com.
Basic steps
Charge the battery.
Push the battery into the camera battery compartment.
Press and hold the Power button to start the camera.
Follow the instructions on the camera screen to set up the camera according to your preferences.
NoteSelect the settings as a part of the initial setup of the camera or later at any time via the Settings app.
Aim the camera toward the object, to measure a temperature. The spotmeter temperature is displayed on the screen.
Pull the trigger to save the image.
Battery
Insert battery
Push the battery into the battery compartment.
Remove battery
Power off the camera.
Remove the battery from the battery compartment.
Charge battery
Select a socket that is easy to access. Should a hazardous situation occur, you must be able to easily disconnect the power supply.
Disconnect the power supply from the mains socket when not in use.
Charge the battery in the battery charger
Put the battery in the battery charger.
Connect the power supply to the battery charger.
Connect the power supply to a mains socket.
Battery charger indicator
Flashing light, the battery is charging.
Steady light, the battery is fully charged.
Charge the battery in the camera
Connect the camera to a power supply, using the USB cable.
Connect the power supply to a mains socket.
Insert/remove micro SIM card
Only applies to camera models with LTE.
The camera must be turned off.
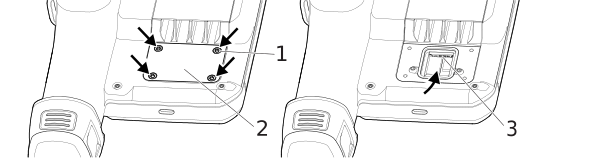
Insert the micro SIM card
Loosen and remove the four T8 screws (1) to the SIM card cover (2).
Remove the SIM card cover (2).
Slide the micro SIM card into place. Make sure it goes all the way into the slot (3).
Install the SIM card cover (2).
Tighten the four T8 screws (1).
Remove the micro SIM card
Loosen and remove the four T8 screws (1) to the SIM card cover (2).
Remove the SIM card cover (2).
Give the micro SIM card a push to release it.
Remove the micro SIM card.
Install the SIM card cover (2) and tighten the T8 screws (1).
The encapsulation rating is only applicable when the cover for the connector compartment is closed and locked in place and when the battery is correctly installed.
Power on/off
Power on
Press and hold the Power button to turn on the camera.
Standby
Put the camera in standby mode, press the Power button.
Get the camera to enter standby mode automatically after a period of inactivity:
Open the Settings app.
Open Display settings.
Select Screen timeout.
Power off
Press and hold the On/Off button to turn off the camera.
Do not remove the battery to power off the camera.