Locating sound sources
The acoustic camera captures sound, forming the basis for all its detection modes and features. The FLIR Si1-LD is an innovative tool that allows users to visualize sound, including ultrasound frequencies that are inaudible to human hearing.
Basic steps to sound location
To locate compressed air leaks, it is recommended to use the High filter. If you need to inspect a specific frequency range, switch to the M filter. See section Frequency view.
Use the Multi-source mode to scan a large area quickly and find several sound sources. To inspect interesting sound sources more closely, switch to Single-source mode.
Keep in mind that the camera only analyzes and displays results for the strongest sound source.
Make sure the displayed source is a physical sound source and not a reflection. See section Reflections.
It is easier to find the location of the sound source if you move the camera around and look at the source from different angles.
Analyzing snapshots and videos in the FLIR Acoustic Camera Viewer or in FLIR Thermal Studio can help find the exact location of a sound source.
Filters
The camera has different filters that help locate various sound sources. These filters limit the frequency range that the camera uses to detect sound sources. The filters typically filters out the background noise, allowing the camera to display only the interesting sound sources on the screen.
Filter selection
For leak detection, the filter selection can help to start inspections quickly, especially in noisy environments. The Si1-LD offers a single filter, the High filter (20 to 65 kHz), which effectively filters out most background noise while maintaining a good detection distance.
Change the filter setting
To change the filter setting, tap the Filter button and swap the user-adjustable frequency selection and the filter option.
General guidelines:
For quick air leak identification, try the High filter.
If scanning is needed within specific frequency ranges, try the manual frequency selection, M filter.
Frequency view
The Frequency view tool allows users to scan areas within specific frequency ranges to identify issues that are otherwise difficult to detect.
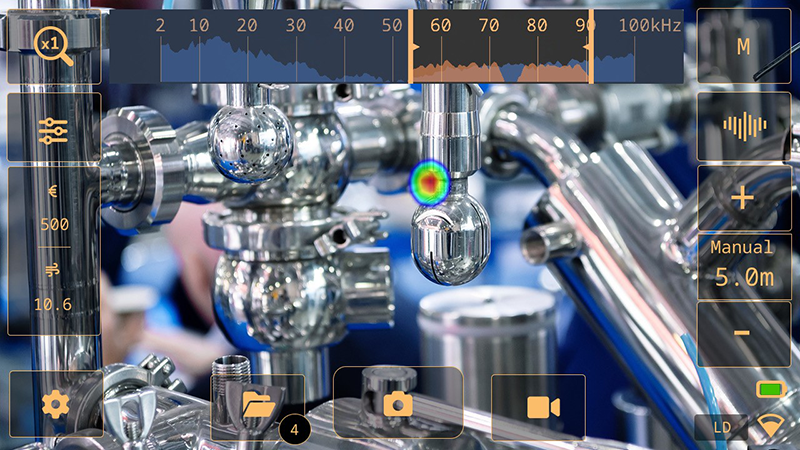
The Frequency view displays the spectrum of the sound and ultrasound in the environment as detected by the microphone array. The camera can sense frequencies from 2 kHz up to either 100 kHz. The view shows two different frequency spectrums:
Orange spectrum. Represents the dominant sound source that the camera currently is focusing on. This sound is filtered and processed by the camera´s algorithm to separate it from e.g. background noise.
Blue spectrum. Represents all sounds present in the environment within the selected frequency range. This can include the sound from both relevant sources and background noise outside the selected frequency range.
Enabling frequency view:
Enabling Frequency view. On the live screen, locate the Frequency view toggle button. When activated, the Frequency view will show up on the top of the screen.
Enable manual frequency selection. Using the Filter button, switch to select the “M” filter (manual filter).

Adjusting frequency limits.
Using handles. Drag the handles at the extremes to set the frequency detection limits, the frequency range is shown at the bottom as reference and represented in kHz. The selected frequency region will appear highlighted as a rectangular area.
Moving the region. Tap and drag the middle of the rectangular area to move it left or right to another frequency region.
Entering values manually. Tap the frequency spectrum to prompt a window displaying the lower and upper limits. Enter the desired values and press the check mark to confirm.
Single-source and Multi-source modes
The Single-source mode is useful when you are trying to locate a single sound source, while the Multi-source mode is more effective when you are trying to locate multiple sound sources.
In Single-source mode, the camera displays only the sound source with the highest intensity. The location of the sound source is highlighted in color. If there are multiple sound sources with the same or almost the same intensity, all of them will be displayed.
In Multi-source mode, the camera displays multiple sound sources. The sound sources are highlighted in color and the strongest source is marked with a crosshair. The camera analyzes and displays results for the strongest sound source. The camera will not display sound sources that are considerably weaker than the strongest source.
The strongest sound source (in both Single-source and Multi-source mode) depends on the currently selected filter, meaning that different sound sources may be displayed when you use different filters. See also section Filters.
Keep in mind that the camera analyzes and displays results for the sound coming from the strongest sound source. To locate and examine a weaker sound source in the presence of a strong sound source, move or rotate the camera so that the strong sound source is clearly outside the camera’s field of view. You can also use the Zoom button to narrow the camera’s field of view.
Switch between the modes
To switch between the Single-source and Multi-source modes, tap the Quick menu button and then tap the Mode button.
Reflections
The camera displays physical sound sources, but also any reflections from them.
To confirm that a displayed source is a physical sound source and not a reflection, move around and observe the source from different directions. If the source location remains the same from all directions, it is a physical sound source. If the source location moves along a surface or disappears when you move around, it is likely a reflection.
Using the Multi-source mode (see section Single-source and Multi-source modes), you may be able to see both the physical sound source and one or more reflections. By moving the camera around, you can identify which sources are reflections.
Position the camera
Changing the position of the camera and looking at the sound source from different angles makes it easier to find the location of the sound source.
A sound source can be directional, meaning that the sound level differs depending on the direction. Again, it is useful to move the camera around and look at the sound source from different angles.
The minimum distance between the sound source and the camera should be around 0.3 meters. If the distance is shorter than this, the location of sound sources will not be accurately displayed. Additionally, the optical camera will not focus at such short distances.
In practice, the camera can be used at distances up to 130 meters. Strong sound sources in quiet environments can be detected from larger distances. However, environmental factors such as temperature, humidity, and background noise may affect distances detection range.
Save and analyze sounds
It is often useful to take snapshots and record videos of interesting sound sources from different angles. Snapshots and videos can be further analyzed in the FLIR Acoustic Camera Viewer or in FLIR Thermal Studio.
When capturing several snapshots from different angles, use the one that displays the highest SPL levels. This will facilitate further analysis.
By adjusting the dynamic range in FLIR Acoustic Camera Viewer or FLIR Thermal Studio. Move the slide bar to increase or decrease the SPL value. This will make it possible to make the sound sources more or less prominent for reporting and representation.
Decrease the dynamic range to find the exact location of the sound source.
Increase the dynamic range to identify if there are multiple sound sources.
Example: Large sound source
If the sound source is large, like a large vibrating surface, the highlighted sound source on the camera screen may seem smaller than the actual source. The source may also appear to move around as you move around the surface, depending on which point of the surface is closest to the camera.
By analyzing a snapshot or video recording in FLIR Acoustic Camera Viewer or FLIR Thermal Studio and increasing the dynamic range, you may be able to determine the actual size of the sound source.