Basic operation
Safety information
Before operating the camera, you must read, understand, and follow the warnings and cautions in section Safety information.
Battery
Battery cover
To remove the battery cover, push the ends of the cover. Then lift the cover off the camera.
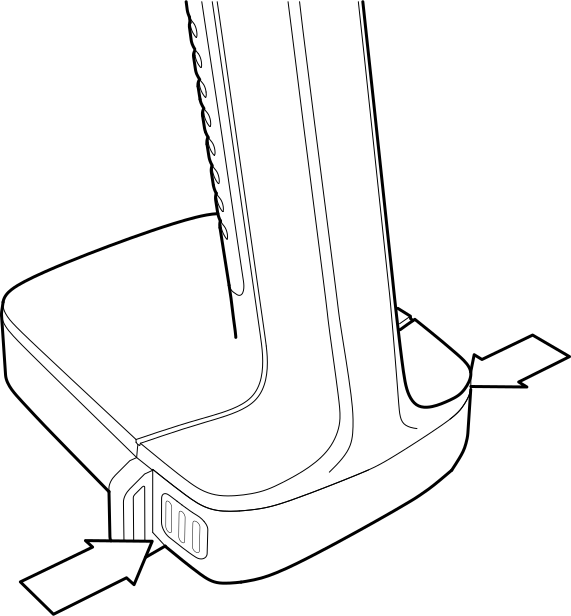
Install the battery
Remove the battery cover.
Align the battery connectors with the battery compartment.
Push the battery into the battery compartment with the connectors at the front and facing upwards.
Remove the battery
Power off the camera.
Remove the battery cover.
Pull the battery out of the camera.
Battery indicator
To check the battery level, push the indicator button on the battery. The lights indicate the battery level.
|
Indicator lights |
Battery level (%) |
|---|---|
 |
100–76 |
 |
51–75 |
 |
26–50 |
 |
10–25 |
|
(flashing) |
below 10 |
The battery indicator in the camera live view UI shows available charge, with green indicating sufficient battery level.
Low battery warning
The battery indicator in the camera live view UI turns red to indicate insufficient battery charge and the battery icon start to flash.
The color code in the UI displayed in the battery changes from green (full battery), orange to red (low battery).
Battery charging
When you connect the power supply to a mains socket, select a socket that is easy to access. Should a hazardous situation occur, you must be able to easily disconnect the power supply.
It is a good practice to disconnect the power supply from the mains socket when not in use.
Estimated charging time: The battery takes approximately 2 hours to fully charge.
Charge the battery using the battery charger
Put the battery in the battery charger.
Connect the power supply to the battery charger.
Connect the power supply to a mains socket.
Battery charger indicator
When the battery is inserted, the light on the battery charger starts flashing red and green.
NoteContinuous red flashing light indicates a malfunction or exceeding temperature limits.
During the charging, the light is steady yellow.
When the battery is fully charged, the light is steady green.
Power on/off
Power on
To power on the camera, push the On/Off button.
Power off
To power off the camera, push and hold the On/Off button.
Power LED
The Power LED at the top of the camera shows the camera status:
Green: ON
Red: Shutting down
Take a snapshot
When you take a snapshot, the camera captures the current camera image and the acoustic image.
The camera also saves a 2 seconds recording of the strongest sound signal. Holding the camera steady will help you capture a clear sound signal.
Before saving the snapshot, you can enter additional information, such as label, and change settings. This information will be saved in the snapshot.
To take a snapshot, do the following:
Tap the Snapshot button.
A preview with editing options is displayed.
Tap the field to enter information or change a setting.
To scan a QR code, tap the icon. The camera will recognize the code and display the information. For more details, see section Scanning a QR code.
To save the snapshot, tap Save.
Record a video
To start the recording, tap the Record button.
To stop the recording, tap the Stop button.
A preview with editing options is displayed.
Tap the field to enter information or change a setting.
To scan a QR code, tap the icon. The camera will recognize the code and display the information. For more details, refer to section Scanning a QR code.
To save the video, tap Save.
Scanning a QR code
A QR code is a type of matrix barcode that contains information readable by the FLIR Si1-LD camera. Some companies assign QR codes to identify assets. The information in these QR codes can be stored in the camera field, such as the label.
To scan a QR code, do the following:
Tap the snapshot or the record button.
Select Label and open the QR code reader via the text edit settings.
Find and align the QR code within the camera screen.
The information encoded in the QR code will be displayed on the screen, with a maximum limit of 512 characters.
To save the snapshot, tap the checkbox.
The QR code is compatible with the Wi-Fi setup, allowing you to connect instantly by scanning the QR code, without having to manually select an SSID or enter a passkey.
Archive
To open the archive, tap the Archive button.
In the archive, you can do the following:
At the bottom of the screen, swipe left/right to scroll through the snapshots thumbnails.
To edit additional information, such as label and distance, tap the edit icon.
Manually upload files to your FLIR Acoustic Camera Viewer. For more information, see section Manual upload.
To delete a snapshot, tap on the snapshot , then tap on the trash bin.
To enable selection mode, tap on a snapshot. Checkboxes will appear in the top right corner of each thumbnail. Tap the checkbox to select snapshot. The screen will display the total number of selected snapshots.
To exit the archive, tap the Exit button at the left of the screen.
Snapshots and videos are automatically removed from the camera, after they have been uploaded to the FLIR Acoustic Camera Viewer cloud service or exported to a USB memory stick.
The number of files in the archive is displayed next to the Archive button.
Zoom
The camera has a digital zoom, which can be used to narrow the camera’s field of view.
Tap the Zoom button to cycle through the available zoom options: 1x, 2x, and 8x.
File transfer
Snapshot and video files from the camera can be imported to the FLIR Acoustic Camera Viewer or opened in FLIR Thermal Studio for further analysis and reporting.
You can transfer snapshot and video files from the camera using one of the following methods:
Upload the files to the FLIR Acoustic Camera Viewer cloud service, see section FLIR Acoustic Camera Viewer.
Export the files to a USB memory stick, see section Export files to a USB memory stick.
Snapshots and videos are automatically removed from the camera, after they have been uploaded to the FLIR Acoustic Camera Viewer cloud service or exported to a USB memory stick.
Upload to FLIR Acoustic Camera Viewer is only applicable on camera models with Wi-Fi.
Export files to a USB memory stick
Only use the USB memory stick supplied with the camera. Other memory sticks may lead to loss of data.
Power on the camera.
Open the USB port cover at the top of the camera.
Insert the USB memory stick. This displays a dialog on the camera screen.
Tap Yes to start the transfer.
During the transfer, a progress bar is displayed.
To stop the transfer, tap Stop.
NoteDo not remove the USB memory stick while the transfer is in progress.
When the transfer is completed, the live view will be displayed.
Remove the USB Memory stick. Put the USB port cover back in place.
Insert the USB into a computer to access the files. The files are organized by the camera´s serial number and the timestamp of the snapshot.
Navigate to the DATA folder to find the camera files which are identified by the .nlz extension.
Tags
Tags are keywords you can assign to a snapshot to identify and sort the snapshot. Tags and relevant information are saved in the files and can be retrieved in the Acoustic Viewer for sorting information. They are also visible in Thermal Studio, shown as Acoustic user data.
Tags can be assigned directly in the camera. After taking a snapshot or recording a video go to the option Tags. Tap the + sign then tap the field to type a keyword.
To remove a tag, tap on the tag and select Remove.
Previously stored tags can be found by tapping the + sign.