Leak detection
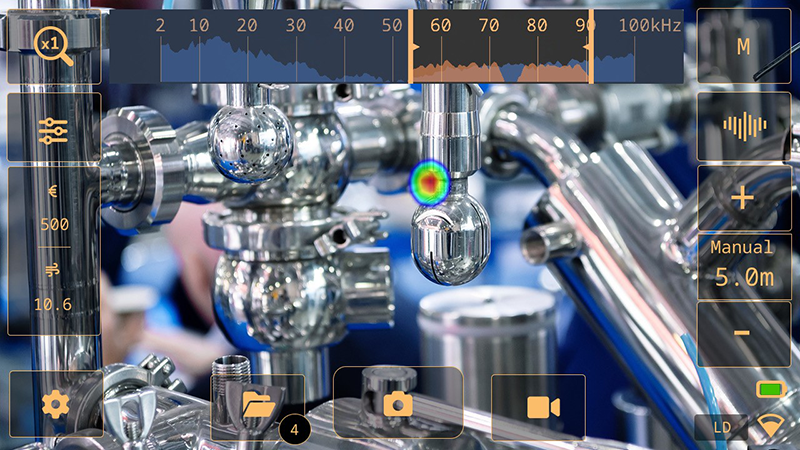
The camera can detect compressed air leaks by analyzing the sound emitted by the leak.
By using the High filter on the background noise and focusing on the ultrasonic frequencies, where the sound from a leak is typically much louder, the camera can determine if the sound source is likely a leak.
When a leak is detected, the camera will estimate the size of the leak and display an estimate of the annual cost of the detected leak.
The leak size and leak cost estimates both rely on the distance setting and the leak analysis parameters entered by the operator.
Work flow
Start with the High filter. Later you can try if the M filter fits in your environment and current situation.
Use the Multi-source mode first, which enables you to scan larger areas and find several sound sources at the same time.
To inspect interesting sound sources more closely, switch to Single-source mode.
When a leak is detected, the camera displays the leak size and cost in the analysis result box.
You can take snapshots and videos of the detected leak for further inspection and reporting in the FLIR Acoustic Camera Viewer or FLIR Thermal Studio.
Leak analysis results
The camera displays the following analysis results in the Leak mode:
Max (dB): Measure the strength of a sound.
Leak est: The estimated size of a detected leak.
Leak cost: The estimated cost of a detected leak. Expressed in currency/year.
Leak type: Select the type of gas from the available list in the camera.
The accuracy of the leak size and leak cost estimates depends on the correct input of the distance setting and leak analysis parameters.
The strength of the sound from a compressed air leak depends on the direction which you observe the leak. Therefore, the size and cost estimates will also depend a bit on the measurement direction.
The absolute SPL reading depends on the selected filter. To ensure that the results are comparable across different filters, the camera displays a normalized SPL value, that matches what the result would be with a measurement bandwidth of 20 kHz.
To ensure accurate leak analysis and snapshot data, it is essential to set the leak type, which defines the type of gas. The leak estimation is based on energy, mass, or volume of the selected gas. For more details, see section Leak analysis parameters.
Leak analysis parameters
To obtain accurate estimates of leak size and leak cost, it is important to set the leak analysis parameters correctly.
When you take a snapshot of a detected leak, the camera saves also the current leak analysis parameters settings. This means you can edit the parameters later using the FLIR Acoustic Camera Viewer or FLIR Thermal Studio.
Leak unit
The unit to use for the displayed leak size.
Currency
The currency to use for the displayed leak cost.
Energy/Volume cost
The cost setting depends on the selected Leak type and Leak cost calculation settings; Energy cost (price per kWh), Mass cost (price per kg) or Volume cost (price per cubic meter).
NoteIf you change the Currency setting, the cost setting must be updated accordingly.
Leak cost calculation
The estimated leak cost can be calculated based on either the energy cost, the mass cost or the cost per volume.
Environmental temperature
The temperature of the air can affect how sound waves propagate through the air. To obtain accurate results, it is recommended to specify the environmental temperature.
Relative humidity
The propagation of sound is affected by the relative humidity of the environment. To obtain accurate results, it is recommended to specify the relative humidity.
Leak correction factor
The camera’s ability to estimate leak size is based on a large set of leaks of different types. However, since there are many variables that can impact the leak size, the camera sometimes underestimates or overestimates the size. If the camera’s estimates systematically differ from your own observations, you can set a leak correction factor to adjust the estimate. Before displaying the final leak size estimate, the camera multiplies its estimate with the correction factor.
Specific power
Specific power is a measure of the energy required to produce a certain amount of compressed air. This option is intended if you are unsure of the specific power of your compressed air system, it is recommended that you leave it at the default value.
Utilization
By entering the hours, days, and/or weeks of use, you can describe how often the compressor is being used in practice. The camera will use the resultant utilization figure as a factor in leak cost calculations.
Leak type
FLIR Si1-LD supports leak size estimation for air leaks, considering the energy, volume, or mass cost parameters to estimate the leak cost. Select "Other" from the leak type drop-down menu in the leak mode settings to disable leak size and cost estimations.
Set the leak analysis parameters
Tap the Settings button.
Tap Leak mode settings.
Tap a parameter to change the setting.
Distance
When estimating the size of a leak, the camera takes into account distance information to adjust for the natural decrease in sound intensity as distance increases.
Auto Distance
With the Auto Distance feature, the camera automatically calculates the distance to the sound source. The distance is displayed in the Auto Distance field. Tap the center Distance button to switch between Auto Distance and manual distance settings.
The availability of the Auto Distance feature is only available in the High filter.
Set the distance manually
If Auto Distance cannot provide a reliable distance estimate, the camera displays a dash in the Auto Distance field. In this case, you must set the distance manually. Use the Distance buttons (+ and -) to select the distance to the sound source that you think is the most accurate.