Achieving a good thermal image
These are the functions and settings you need to experiment with to achieve a good thermal image:
Adjusting the temperature scale.
Selecting a suitable temperature range.
Selecting a suitable image mode.
Changing the color palette.
To keep in mind
A thermal camera has a resolution limit. This depends on the size of the detector, the lens, and the distance to the target. Use the center of the spot tool as a guide to the minimum possible object size, and get closer if necessary. Make sure to stay away from dangerous areas and live electrical components.
Be careful when holding the camera perpendicular to the target. Be observant of reflections, especially at low emissivities—you, the camera, or the surroundings may become the main source of reflection.
Select a zone of high emissivity, e.g., an area with a matte surface, to perform a measurement.
Blank objects, i.e., those with low emissivities, may appear warm or cold in the camera, because they mainly reflect the environment.
Avoid direct sunlight on the details that you are inspecting.
Various types of faults, e.g., those in a building’s construction, may result in the same type of thermal pattern.
Correctly analyzing an infrared image requires professional knowledge about the application.
Temperature scale
An infrared image can be adjusted automatically or manually.
In automatic mode, the camera continuously adjusts the level and span for the best image presentation. The temperature scale on the screen shows the upper and lower temperatures of the current span.
In manual mode, you can adjust the temperature scale to values close to the temperature of a specific object in the image. This will make it possible to detect anomalies and smaller temperature differences in the part of the image of interest.
Example 1
Here are two infrared images of a building. In the left image, which is auto-adjusted, the large temperature span between the clear sky and the heated building makes a correct analysis difficult. You can analyze the building in more detail if you change the temperature scale to values close to the temperature of the building.
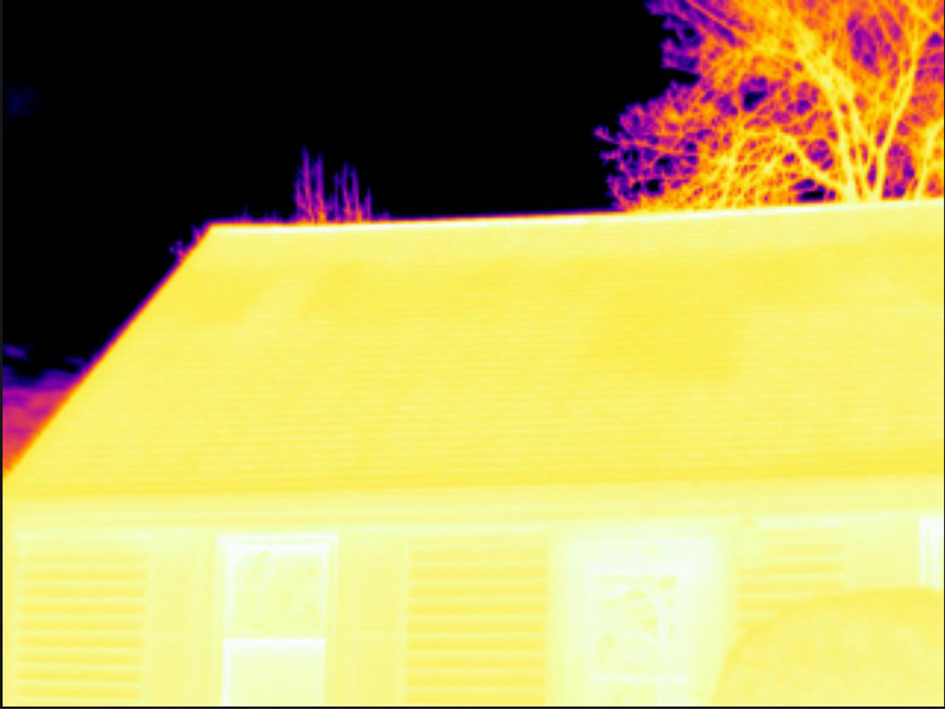
Automatic |
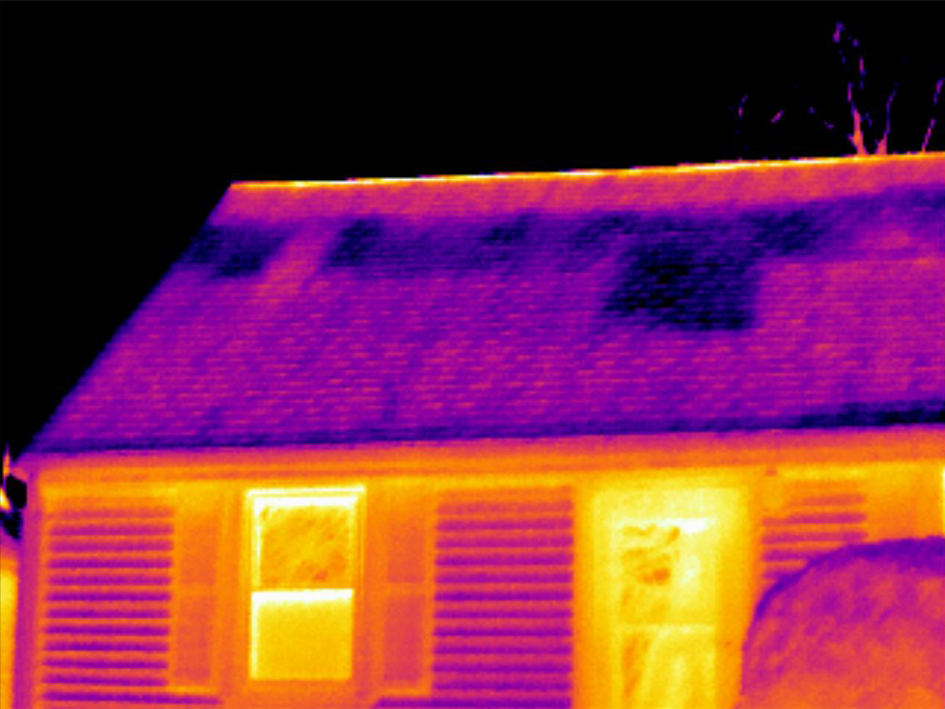
Manual |
Example 2
Here are two infrared images of an isolator in a power line. To make it easier to analyze the temperature variations in the isolator, the temperature scale in the right image has been changed to values close to the temperature of the isolator.
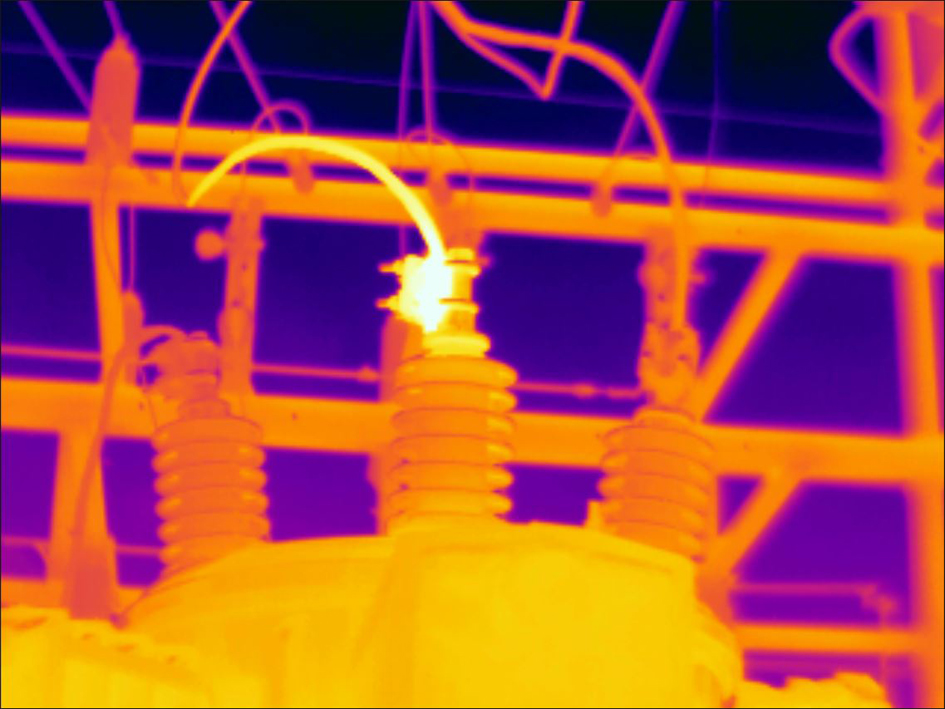
Automatic |
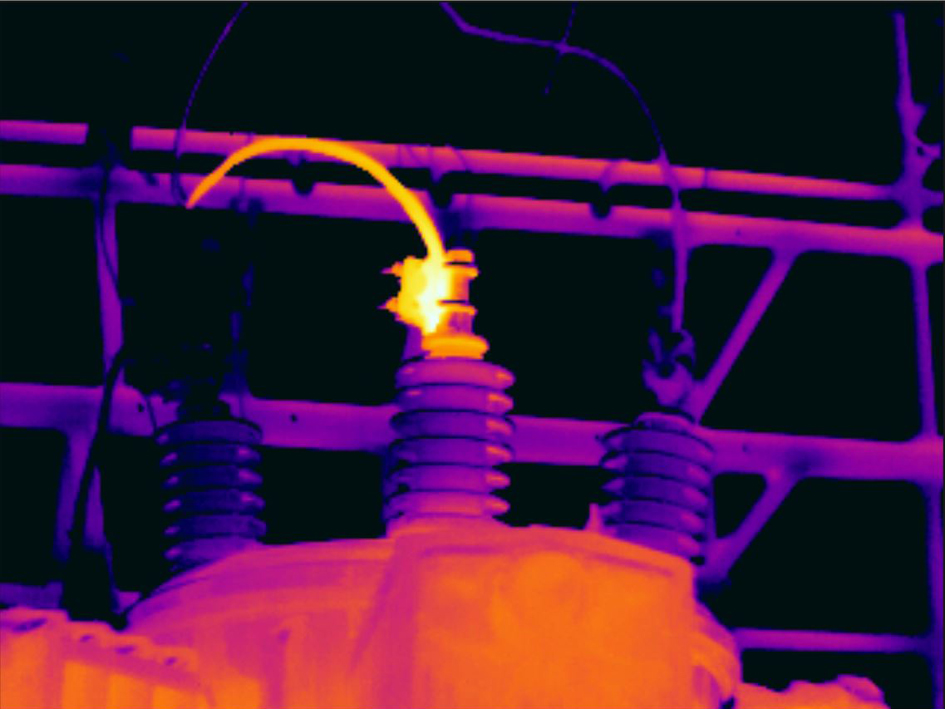
Manual |
Manually adjusting the temperature scale
Tap the menu button
 .
.Tap Temperature scale
 and then tap Manual
  . This displays a wheel next to the temperature scale.
To enhance the details of a certain point of interest in the image, tap that point on the screen. The image will be auto-adjusted based on the thermal content of the area around the tapped point.
To change the level, scroll the wheel up/down.
To change the span, do the following:
Tap the temperature limit you want to keep unchanged. This locks the limit.
Scroll the wheel up/down to change the value of the other temperature limit.
Locking the temperature scale
You can lock the temperature scale.
To lock the temperature scale, tap the upper and the lower temperature limits.
To unlock the temperature scale, tap the temperature limits again.
When a temperature limit (upper and/or lower) is locked, the auto-adjust by touch function is disabled.
If you switch to automatic mode, the temperature scale will automatically unlock.
A typical situation where you would lock the temperature scale is when looking for temperature anomalies in two items with a similar design or construction.
For example, you have two cables, and you suspect that one is overheated. With the camera in automatic mode, direct the camera toward the cable that has a normal temperature. Then activate the manual mode and lock the temperature scale.
When you direct the camera, with the temperature scale locked, toward the suspected overheated cable, that cable will appear in a lighter color in the thermal image if its temperature is higher than the first cable.
If you instead use the automatic mode, the color for the two items might appear the same despite their temperature being different.
Showing/hiding the temperature scale
In some situations, you may want to hide the temperature scale for a better view.
Tap the Settings button
 .
.Tap Device settings > Show temperature scale.
Show/hide the temperature scale by toggling the Show temperature scale switch.
Temperature range
The camera is calibrated for different temperature ranges. For accurate temperature measurements, you must change the Camera temperature range setting to suit the expected temperature of the object you are inspecting.
To change the temperature range, do the following:
Tap the Settings button
.Tap Camera temperature range.
Select the appropriate temperature range.
Image modes
General
The camera can capture thermal and visual images at the same time. By choosing the image mode, you select which type of image to display on the screen.
The camera supports the following image modes:
Thermal MSX (Multi Spectral Dynamic Imaging): An infrared image where the edges of the objects are enhanced with visual image details is displayed.
Thermal: An infrared image is displayed.
Digital camera: The visual image captured by the digital camera is displayed.
Picture in picture: An infrared image frame is displayed on top of the visual image.
For the Thermal MSX, Thermal, and Picture in picture image modes, all thermal and visual information is stored when an image is saved. This means that you can edit the image later, in the camera image gallery or in a FLIR Thermography software, and select any of the image modes.
For the Digital camera image mode, a visual image is stored when an image is saved. However, no thermal information is stored.
You can choose to turn off the digital camera. This can, for example, be required in restricted areas. Select
(Settings) > Save options & storage > Digital camera = Off. When the
digital camera is off, only the image mode Thermal is enabled.
Changing the image mode
To change the image mode, do the following:
Tap the menu button
.Tap Image mode
 .
.Tap the image mode you want to use.
Aligning the thermal and visual images
In Thermal MSX and Picture in picture modes, the camera displays a combination of thermal and visual images. When looking at an object close up or far away, you may need to adjust the distance setting in the camera to align the thermal and visual images.
To align the thermal and visual images, do the following:
Tap the screen. This displays a box with a distance in the upper right corner.
Tap the distance box. This displays a slider.
Use the slider to adjust the distance.
Color palettes
You can change the color palette that the camera uses to display different temperatures. Changing the palette can make it easier to analyze an image.
To change the color palette, do the following:
Tap the menu button
.Tap Color
 .
.Tap the palette you want to use.