Saving and working with images
About image files
General
When you save an image, the camera saves an image file that includes all thermal and visual information. This means that you can open an image file at a later time and, for example, select another image mode, apply color alarms, and add measurement tools.
The image *.jpg file is fully radiometric and saved lossless, which enables full post-processing in image analysis and reporting software from FLIR Systems. There is also a regular *.jpg component (lossy) for convenient viewing in non-FLIR Systems software (e.g., Microsoft Explorer).
The camera can also be configured to save an extra low-resolution visual image as a separate file. This can be convenient if you are not using a post-processing software. Select
 (Settings) > Save options & storage > Photo as separate JPEG = On.
When the Digital camera image mode is selected, a high-resolution digital image is stored when an image is saved. However, no thermal information is stored. For more information, see section Working with image modes.
You can choose to turn off the digital camera. This can, for example, be required in restricted areas and in confidential (e.g., doctor/patient) situations. Select
(Settings) > Save options & storage > Digital camera = Off. When the
digital camera is off, features that require visual information, such
as the images modes Thermal
MSX and Picture in
picture, are disabled.The availability of the digital camera depends on the lens model.
File-naming convention
The default naming convention for image files is FLIRxxxx.jpg, where xxxx is a unique counter.
It is also possible to save images with a date prefix added to the filename. However, these files may not automatically be detected by third-party applications. For more information, see the setting File naming format in section Save options & storage.
Storage capacity
When you save an image, the camera stores the image file on the memory card.
The size of an image file (with no annotations) is typically less than 1000 kB. Thus, the capacity of a 8 GB memory card is approximately 8000 images.
Empty or use a memory card that has not previously been used in another type of camera. The cameras may organize files differently on the memory card. There is therefore a risk of losing data if the same memory card is used in different types of cameras.
About UltraMax
UltraMax1 is an image enhancement feature that increases the image resolution and lowers the noise, making small objects easier to see and measure. An UltraMax image is twice as wide and high as an ordinary image.
When an UltraMax image is captured by the camera, several ordinary images are saved within the same file. Capturing all the images can take up to 1 second. To fully utilize UltraMax, the images need to be slightly different, which can be accomplished by a minute movement of the camera. You should hold the camera firmly in your hands (do not put it on a tripod), which will make these images vary just a little during the capture. Correct focus, a high-contrast scene, and a non-moving target are other conditions that help to achieve a good-quality UltraMax image.
Some FLIR Thermography software has the ability to process UltraMax images. Other FLIR software will treat the image as a regular image.
To configure the camera for UltraMax, select (Settings) > Save options & storage > Image resolution = UltraMax.
Saving an image
When you save an image, the camera stores the image file in the camera memory.
You can also set up the camera to upload images for storage online, see section Cloud connectivity.
To save an image, push the Save button.
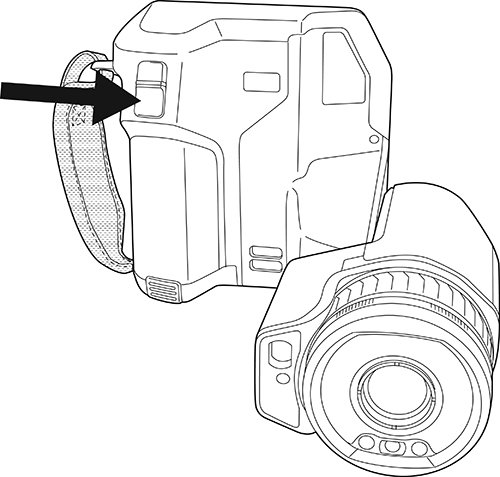
Depending on the settings in (Settings) > Save options & storage, the following may happen:
A preview image is displayed before the image is saved.
An annotation tool or the annotation menu is displayed when the image has been saved.
Previewing an image
You can preview an image before you save it. This enables you to see if the image contains the information you want before you save it. You can also adjust and edit the image.
The camera must be configured to display a preview image before
saving. Select (Settings) > Save options & storage > Preview image before
saving = On.
To preview an image, do the following:
To preview an image, push the Save button. This displays the preview.
Manual image adjustment mode is now active. For image adjustment instructions, see section Adjusting the infrared image.
To edit the image, push the navigation pad. This displays a context menu. For editing instructions, see section Editing a saved image.
Do one of the following:
To save the image, push the Save button.
To exit preview mode without saving, push the back button
 .
.
Opening a saved image
When you save an image, the image file is stored on the memory card. To display the image again, open it from the image archive (Gallery).
To open a saved image, do the following:
Push the image archive button
 . This displays the Gallery with one or more folders.
Select a folder and push the navigation pad.
Select the image you want to view and push the navigation pad.
Do one or more of the following:
To view the previous/next image, push the navigation pad left/right.
To display a toolbar at the top of the screen, push the navigation pad. Do one or more of the following:
To switch between an infrared image and a visual image, select the
 icon and push the navigation pad.
To edit the image, delete the image, display information, or add annotations, select the
 icon and push the navigation pad. This displays a menu
to the right.
icon and push the navigation pad. This displays a menu
to the right.
To return to the folder overview, push the back button
.To return to the live image, push the image archive button
.
Editing a saved image
You can edit a saved image. You can also edit an image in preview mode.
To edit a saved image, do the following:
Push the image archive button
. This displays the Gallery.Select a folder and push the navigation pad.
Select the image you want to edit and push the navigation pad.
Push the navigation pad to display the top toolbar.
On the top toolbar, select the
icon and push the navigation pad.On the right toolbar, select the
 icon and push the navigation pad. This opens the image
in edit mode.
icon and push the navigation pad. This opens the image
in edit mode.Manual image adjustment mode is now active. For image adjustment instructions, see section Adjusting the infrared image.
Push the navigation pad. This displays a context menu.
Select
 (Cancel) to exit edit mode.
Select
 (Measurement
parameters) to change the global parameters.
(Measurement
parameters) to change the global parameters.Select
 (Image mode) to change the image mode.
Select
 (Measurement) to add a measurement tool.
Select
 (Color) to change the color palette or set a color alarm.
Select
 (Save) to save and exit edit mode.
To store the edited image online, make a manual upload of the image. See section Manual upload.
Related topics
Displaying the image information
The image information consists of items such as the date, emissivity, and atmospheric temperature. When you save an image, the image information is saved in the image file and can be viewed in the image archive (Gallery).
To display the image information, do the following:
Push the image archive button
. This displays the Gallery.Select a folder and push the navigation pad.
Select an image and push the navigation pad.
Push the navigation pad to display the top toolbar.
On the top toolbar, select the
icon and push the navigation pad.On the right toolbar, select the
 icon and push the navigation pad. This displays the
image information.
icon and push the navigation pad. This displays the
image information.
Zooming an image
You can zoom an image by using the camera’s digital zoom function. You can do this on live images and on saved images in edit mode.
The digital zoom factor is displayed at the top of the screen.
To digitally zoom an image, do the following:
Zoom in: Touch the screen with two fingers and spread the fingers apart.
Zoom out: Touch the screen with two fingers and pinch the fingers together.
Deleting images
You can delete image files from the memory card. For more information, see sections Deleting an image or video file, Deleting multiple files, and Deleting all files.
Resetting the image counter
You can reset the numbering of the image filenames.
To prevent image files being overwritten, the new counter value will be based on the highest existing filename number in the image archive. To ensure that the counter is reset to 0001, insert an empty memory card before resetting the counter.
Follow this procedure:
Push the navigation pad to display the menu system.
Select
(Settings) and push the navigation pad. This displays the Settings menu.Use the navigation pad to select Device settings > Reset options > Reset image counter....
Push the navigation pad. This displays a dialog box.
To reset the counter, select Reset and push the navigation pad.